• Skip to primary navigation
  • Skip to main content
  • Skip to footer

Stickytapeandstring

Created with WordPress managed by 1&1

  • Craft projects
    • craft business tips
    • craft blog
    • Crochet patterns
    • Upcycling
    • craft with kids
  • Blogging
    • New to blogging
    • Blog diary
  • Bullet Journal
  • About me
  • Welcome!!

Craft projects

Hair accessory

June 24, 2018 by A_Sticky_tape_and_string_girl Leave a Comment

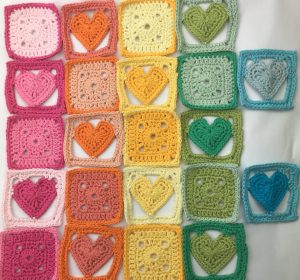
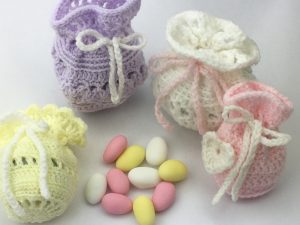
Hello!    I wanted to share this free pattern for a hair accessory with you.    Most of my making time at the moment is going into a large blanket made of smaller squares.   I am spending all my time making these squares and finishing off the ends.    The work is a stash buster in its own right as it uses small quantities of yarn to make each square.   However, I am still finding myself with some very small oddments and it hurts me to thrown those away so I have come up with this design to use even the smallest pieces of left over yarn!    Here is the finished result.


Instructions – Hair Accessory.

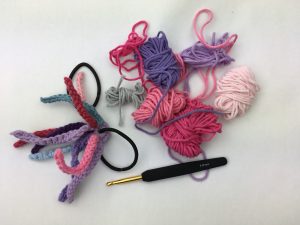
To make this you need small oddments of yarn, an elastic hair band/tie and the size of crochet hook appropriate to your yarn.   In my case I am using left over Drops Paris yarn which takes a size 5mm hook.

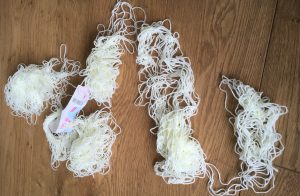
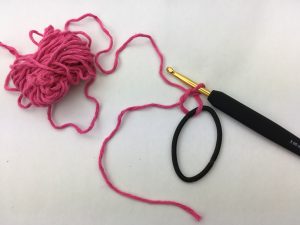
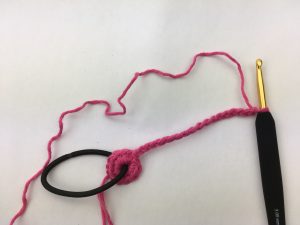
Start by making a magic loop that goes through the middle of the hair band.   I found this a bit of a mind bend to start with!   I am including a picture below so that you can lay your work down and copy mine if that helps!

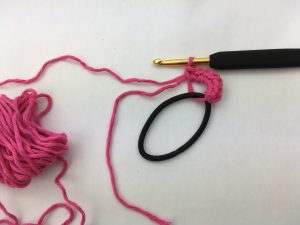
Work 12 DC (SC US) into the magic loop.    You might need to vary this according to the weight of your yarn.   It doesn’t really matter how many stitches you put into the loop as long as you can pull it tight to circle the hair band – see below.

Without breaking the yarn work a chain to the length you require.   This will form one of the ‘ribbons’ in the final item.   If you are using light/acrylic yarn then the ribbon will spiral so you may need a longer chain.   In the yarn I am using the ribbons do not curl much and I used a chain of between 12 and 16 in the finished piece pictured.

When you have the chain to the length you require work back along the chain either using slip stitches or DC (US terms SC).   The SC will give the effect of a cord, DC (SC US) will give a thicker strip.    Finish off the strip with a slip stitch into the outer edge of the DCs in the magic loop.  This will reinforce the join between the ring and the strips and make the item more robust.

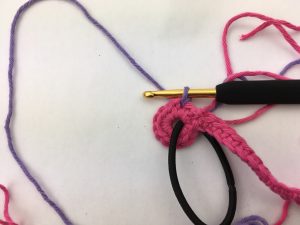
Join in other colours to the DC’s in the magic ring and repeat the steps above to add more strands to the accessory.   Keep these close together on one side of the ring so that the other side can sit against the wearers head without making it uncomfortable.

Finish the piece by sewing in the ends but this need not take long as you can run the loose ends down the length of the ribbons very quickly!    And that is it – you can play with colours – match them to other garments or use any random oddments in your stash!    These could look lovely on flower girls if they were worked all in cream/white or could be made to match the colours of flowers or bridesmaids dresses.

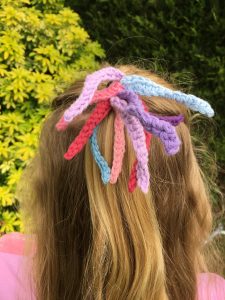
Hope you have a go at this and enjoy the results as much as I did.    I think it is a really fun way to use up tiny scraps of yarn and a lovely break from big projects.  Happy crocheting!

Annie ๐Ÿ™‚

Filed Under: Craft projects, Crochet patterns, Uncategorized Tagged With: commuter crochet, Craft, crochet, design, Free pattern, girls, hair, hair accessory, handmade, kids, stash busting, yarn

Crochet blog – update#4

June 16, 2018 by A_Sticky_tape_and_string_girl Leave a Comment

Hello ๐Ÿ™‚

Welcome to my fourth weekly update.   This update is slightly different as I have decided to split out the crochet content from the blog progress updates.   If you are interested in the blog progress then you can read about them here.

Soooo – crochet!!   This week I have been working on my Shades of the Rainbow blanket – do you like that name?   I am not sure yet.   I might call it Shades of the Heart because I have worked up my heart pattern into a square for inclusion in this blanket.   Here are a few of them laid out.   I have about five more sets of three colours to complete and about four more where I have completed the crochet but have to tie in all the ends yet *sigh*.   Here is a picture of some of the finished squares.

I put up a blog post giving the free pattern for the Heart Square – just follow the link if you would like to give it a go.


I am working on another type of square to include in the blanket – a spot.   I wanted to include more solid squares as I am worried that the heart squares might not be very stable given how much space there is around the heart.   Here are a few of the ‘spot squares’.   I worked these up from my sample square pattern but changed the colour of the yarn for the first round and last round.

These squares have all been brilliant to work on my commute – I only need to take a couple of small balls of yarn and my hook.   The yarn is Drops Paris which is incredibly good value at c ยฃ1 per ball for pure cotton.   The yarn splits a little so needs care to work with but it has been very good quality for the price with very few of the hated knots and breaks!

The other project I have worked on at home this week is my Spring Flowers Blanket.  I started this in Spring, hence the name but I don’t think I will be finishing it until next Spring at this rate of progress.   The problem I have with it is that I am working across the full width of a blanket so I cannot really take it out of the house as it is already getting a bit big to carry around!

This is the latest progress with the flowers joined to the body of the work and the next section started.    I will work up another row of flowers on my commute when I have completed all these hearts and spot blocks (see above!).

That is all from me for this week… happy crocheting!

Annie ๐Ÿ™‚

Filed Under: craft blog, Craft projects Tagged With: beginner blog, blankets, commuter crochet, crochet, crochet blog, Free pattern, squares, stash busting

Heart square

June 16, 2018 by A_Sticky_tape_and_string_girl Leave a Comment

Hello, in this post I am sharing a free pattern for a heart in a square with you.     A few weeks ago I designed a crochet heart and shared the pattern as a stash busting project.   I wanted to include my stash busting hearts in my Shades of the Rainbow blanket so I have designed a pattern to put the hearts into a square of the same size as my sample squares.

Here is a link to the heart pattern.   This pattern starts with a completed heart.   The heart you made should look like this.   I have also included the heart pattern again at the bottom of this post.

The picture above shows the start point for this pattern and the points where the outside border joins the heart are indicated with an X.

Heart in a Square pattern – UK version (US version below)

First round – slip stitch into the side of the heart in the stitch indicated in the picture above.  CH2, DC into next stitch, CH5, miss three stitches, TR into the next stitch (at the top right of the heart), DC into next stitch, CH5, DC into stitch at the top of the left side of the heart, TR, CH5, miss three stitches, 2DC, CH12, DC into the bottom stitch of the heart, CH12 and slip stitch to the second of the chains that started the round to join to your start point.

Second round – CH2, DC, (2DC, CH2, DC) into the corner, 2DC at the top right hand side of the heart, 5 DC across the centre/top of the heart, 2DC into the top left hand side of the heart, (DC,2CH,2DC) into the left hand corner, 2DC, (7DC, 2CH,5DC) into the bottom left corner, DC into the stitch at the bottom of the heart, (5DC,2CH,7DC) into the bottom right corner and slip stitch to the second of the chains that started the round to join to your start point.

Third round – CH2, DC all round working 2DC,2CH,2DC into the corner chains.

You should end up with a square that looks like this ๐Ÿ™‚

Heart in a Square pattern – US version

First round – slip stitch into the side of the heart in the stitch indicated in the picture above.  CH2, SC into next stitch, CH5, miss three stitches, DC into the next stitch (at the top right of the heart), SC into next stitch, CH5, SC into stitch at the top of the left side of the heart, DC, CH5, miss three stitches, 2SC, CH12, SC into the bottom stitch of the heart, CH12 and slip stitch to the second of the chains that started the round to join to your start point.

Second round – CH2, SC, (2SC, CH2, SC) into the corner, 2SC at the top right hand side of the heart, 5 SC across the centre/top of the heart, 2SC into the top left hand side of the heart, (SC,2CH,2SC) into the left hand corner, 2SC, (7SC, 2CH,5SC) into the bottom left corner, SC into the stitch at the bottom of the heart, (5SC,2CH,7SC) into the bottom right corner and slip stitch to the second of the chains that started the round to join to your start point.

Third round – CH2, SC all round working 2SC,2CH,2SC into the corner chains.

In case there are issues with the heart link or just in case you would like this pattern all in one place – here is the heart pattern:

Heart Pattern

UK terms

Make a magic loop, chain 3 and working into the magic loop, 3 dtr, 3tr, chain 1, 1dtr, chain 1, 3tr, 3dtr, chain 2, slip stitch into magic loop and pull the thread to close the centre of the heart.

second round – 2 sl stitch into the gap behind the three chain from the first round.  3dc into the next stitch (top of the left side of the heart), 3 dc into the next stitch and 2 dc into the following stitch.   Work 4 dc to take you to the bottom loop of the heart.  3dc into the bottom stitch of the heart, 4 dc, work 2dc, 3dc, 3dc into the next three stitches, 2 sl stitches and one final slip stitch into the centre of the heart.

third round – 2 slip stitches then 2dc into the next five stitches (around the top of the left side of the heart) 7 dc, 3dc into the bottom stitch of the heart, 7dc, 2dc into the next five stitches, 2 slip stitches and finish off to complete the heart.

US terms

Make a magic loop, chain 3 and working into the magic loop, 3TRC, 3DC, chain 1, 1TRC, chain 1, 3DC, 3TRC, chain 2, slip stitch into magic loop and pull the thread to close the centre of the heart.

second round – 2 sl stitch into the gap behind the three chain from the first round.  3SC into the next stitch (top of the left side of the heart), 3 SC into the next stitch and 2SC into the following stitch.   Work 4SC to take you to the bottom loop of the heart.  3SC into the bottom stitch of the heart, 4SC, work 2SC, 3SC, 3SC into the next three stitches, 2 sl stitches and one final slip stitch into the centre of the heart.

third round – 2 slip stitches then 2SC into the next five stitches (around the top of the left side of the heart) 7 SC, 3SC into the bottom stitch of the heart, 7SC, 2SC into the next five stitches, 2 slip stitches and finish off to complete the heart.


That’s all for now.    I will be sharing my completed blanket in a few weeks – just a few more squares to go – and a lot of ends to tie in!!

Happy crocheting!

Annie ๐Ÿ™‚

Filed Under: Craft projects, Crochet patterns Tagged With: block, commuter crochet, Craft, crochet, design, Free pattern, handmade, small crafts, squares, stash busting

Hearts

June 3, 2018 by A_Sticky_tape_and_string_girl 2 Comments

I looked for a heart motif online and couldn’t find one that was quite right so I made my own!    It is very quick to make up and you can stop before the last row if you need a slightly smaller version.

I am addicted to making them now! These hearts are great for stash busting if, like me, you keep every single scrap of spare yarn and have lots of tiny oddments.   You could use the finished hearts as table decorations, charms or motifs for applique.   Made up in heavier yarn they could even be used as coasters but might need a few more rows adding to make them large enough.

Here is the pattern:

UK terms

Make a magic loop, chain 3 and working into the magic loop, 3 dtr, 3tr, chain 1, 1dtr, chain 1, 3tr, 3dtr, chain 2, slip stitch into magic loop and pull the thread to close the centre of the heart.

second round – 2 sl stitch into the gap behind the three chain from the first round.  3dc into the next stitch (top of the left side of the heart), 3 dc into the next stitch and 2 dc into the following stitch.   Work 4 dc to take you to the bottom loop of the heart.  3dc into the bottom stitch of the heart, 4 dc, work 2dc, 3dc, 3dc into the next three stitches, 2 sl stitches and one final slip stitch into the centre of the heart.

third round – 2 slip stitches then 2dc into the next five stitches (around the top of the left side of the heart) 7 dc, 3dc into the bottom stitch of the heart, 7dc, 2dc into the next five stitches, 2 slip stitches and finish off to complete the heart.

US terms

Make a magic loop, chain 3 and working into the magic loop, 3TRC, 3DC, chain 1, 1TRC, chain 1, 3DC, 3TRC, chain 2, slip stitch into magic loop and pull the thread to close the centre of the heart.

second round – 2 sl stitch into the gap behind the three chain from the first round.  3SC into the next stitch (top of the left side of the heart), 3 SC into the next stitch and 2SC into the following stitch.   Work 4SC to take you to the bottom loop of the heart.  3SC into the bottom stitch of the heart, 4SC, work 2SC, 3SC, 3SC into the next three stitches, 2 sl stitches and one final slip stitch into the centre of the heart.

third round – 2 slip stitches then 2SC into the next five stitches (around the top of the left side of the heart) 7 SC, 3SC into the bottom stitch of the heart, 7SC, 2SC into the next five stitches, 2 slip stitches and finish off to complete the heart.

Hope you like this pattern.  Happy crocheting!

Annie ๐Ÿ™‚

Filed Under: Craft projects, Crochet patterns Tagged With: commuter crochet, crochet, crochet heart, Free pattern, heart, hearts, uk and us instructions, uk crochet heart, us crochet heart

27 May 2018

June 2, 2018 by A_Sticky_tape_and_string_girl Leave a Comment

Hello ๐Ÿ™‚

Welcome to my second update.   I hope you have had a happy, productive week?   I have been busy finishing the little bags I started last week but Sunday did not start well.    I left my crochet in a bag in our living room over night, and this is what I found the following morning….

and this is the likely culprit!    We have three dogs, a mum and two pups.   The pups are just over a year old and still love to chew things!   The puppy in this pic is called Poppy and she is the worst for chewing things.   So far she has demolished various bags and shoes, including some expensive boots and the only pair of pricey sunglasses I have ever bought!    Our fault for leaving things in her reach I suppose.

Luckily for me my Mum loves to untangle yarn so I gave the tangled mess to her and now have a nice tidy ball again.     I finished the bags and basic bag pattern and put a blog post out about that.   bag pattern post.

I also made a few discs and hearts in the process – the discs were the bottom of the bags but I like the look of them on their own.   I might work them into a project of some kind but haven’t quite figured out what yet.    The hearts started out as motifs for the bags, from a basic pattern I found online.  I wasn’t very happy with the pattern so I adapted that to make a few medium and larger ones.  The larger ones are a bit more stable, I am very pleased with the pattern I created.

I am going to experiment with a heavier weight of yarn next.    I think these would make lovely table decorations for a wedding, baby shower or birthday.   I will write up the heart pattern so I can share it with you in a future post.

I made some in brighter colours too in Drops Paris yarn that I am worked sample squares in for a blanket.    I might try to work these hearts into the blanket design!

The other project I have been working on since I spoke to you last, is some bunting for a family birthday.    I put up a separate post on this as I managed to complete the work.   The bunting looks lovely and will be able to be reused unlike the tacky plastic stuff I normally buy.    I have been considering a design for crochet balloons but I am not sure I have that sorted yet ๐Ÿ™‚   My post on the bunting includes the basic flag pattern and explains how I joined them into a garland.    You can read that post here  Bunting Pattern post

Last week I promised an update on my blog goals.    I put quite a bit of thought into this but I haven’t managed to create the bullet journal pages yet.  I am trying to keep it simple as I do find that keeping a bullet journal takes a lot of time.    The time I spend is lovely relaxing mindful time but I am not sure I have enough time available to devote so much of it to keeping a track of progress.   I will try to get these trackers done for next week’s update.   I do worry that I would make more progress if I didn’t spend so long tracking it ๐Ÿ™‚

Status today – I have 544 Pinterest followers so I put on 22 this week.   Nothing exciting has happened with AdSense so I am still on 16p ๐Ÿ™‚   I am getting a few page views, around 80 per week on average but no clicks.     I need to do some research on how to improve that if I want to achieve my goal of being able to spend more time on my crafting and blogging.   Maybe the adverts are not relevant enough.

I haven’t read up on mailing lists yet but mean to do that this weekend so watch this space on that one.   I haven’t listed anything new on Etsy either – I plan to write up the more complicated bag instructions along with some edged bunting and options for decoration then I will list both patterns.    I could list the bunting for sale but I want to use it at home – I will have to make some more!!

Finally, I was soooo thrilled to get a response to my first weekly update so this week I am planning to do a bit more research on my fellow crochet bloggers and leave a few comments on their posts, to see if I can make new connections and support people who are working on similar projects.   That’s all for now – more next week!

Happy crocheting!

Annie ๐Ÿ™‚


Filed Under: craft blog, Craft projects Tagged With: bags, beginner blog, Birthday, bunting, commuter crochet, Craft, crochet, design, Free pattern, handmade, small bags, stash busting, wool eating puppies

wedding favours

May 27, 2018 by A_Sticky_tape_and_string_girl Leave a Comment

Hello ๐Ÿ™‚   The UK has just been through the most amazing wedding fever!    I don’t know anyone who is getting married soon but wanted to put a bit of time in on a wedding project so I came up with these little bags that could be used for wedding favours or if made a little larger could be given to flower girls to carry.

I have a huge stash of yarn oddments and managed to find some lovely baby pastel colours for this batch but the bags would also look good in bold colours to match any theme.

I will share the basic bag pattern here but as you can see I enjoyed playing around with the design to add in textures and features.    The yellow bag has a heart trim around the top.   The purple bag has a row of hearts around it.    The pattern I am sharing makes the little pink bag the one with the heart motif attached in the photo below.

The pattern is written in UK notation.   For US terms please note:

DC means SC in US notation

TR means DC in US notation

Bag Pattern – start by making a magic circle, chain 3 and work 17 Tr into the circle. Close with a slip stitch into the third chain from the start.

Pull the circle closed.

Work rounds as shown below, each time finish the round by joining to the chain with a slip stitch.

round 2 – chain 1 and work a round of DC, two into each of the stitches in the circle.

round 3 – chain 2 and work a round of TR

round 4 – chain 1 and work a round of DC into the back loop only of the row below.

round 5 – chain 1 and work a round of DC through both loops of the row below

round 6 – chain 2, work a round of TR into both loops of the row below

round 7 & 8 – chain 1 and work a round of DC through both loops of the row below

repeat rows 6 to 8 twice more.

round 15 – chain 4, miss one stitch and work 1 TR into the next.  (Chain 1, miss one stitch and work 1 TR into the next) repeat to the end of the round and join to the third stitch of the first chain with a slip stitch.   This creates the round of ‘holes’ that we will use to thread the ribbon tie through.

round 16 & 17 – repeat round 7

round 18 – repeat round 6

round 19 – finish the work with a row of slip stitches around the top.

Ribbon ties – you could use ribbon to match any theme or make your own ‘ribbon’ using a row of chain.   I found that a chain of 70 was about the right length but you can judge this for yourself.

Hope you like these little bags.    I am going to be making more during the week and will put a few more patterns up for sale in my Etsy shop when I have written them up.

If you want to read about some of the challenges I have had when it comes to crochet in a house with puppies then please check my weekly blog.   Happy crocheting!

Annie ๐Ÿ™‚

Filed Under: Craft projects, Crochet patterns Tagged With: bags, commuter crochet, Craft, crochet blog, design, favours, Free pattern, handmade, small bags, small crafts, stash buster, stash busting, weddings

  • « Go to Previous Page
  • Page 1
  • Interim pages omitted …
  • Page 6
  • Page 7
  • Page 8
  • Page 9
  • Page 10
  • Page 11
  • Go to Next Page »

Footer

Newsletter

Copyright © 2026 ยท Genesis Sample on Genesis Framework ยท WordPress ยท Log in