• Skip to primary navigation
  • Skip to main content
  • Skip to footer

Stickytapeandstring

Created with WordPress managed by 1&1

  • Craft projects
    • craft business tips
    • craft blog
    • Crochet patterns
    • Upcycling
    • craft with kids
  • Blogging
    • New to blogging
    • Blog diary
  • Bullet Journal
  • About me
  • Welcome!!

squares

Crochet blog – update #6

July 1, 2018 by Annie Leave a Comment

Hello and welcome to my sixth update!   This week I made more progress on my blanket project.   I realised I have been calling it different names as is has progressed.   It started life as my Shades of the Rainbow blanket but more recently I have been calling it Hearts and Spots!   Whatever name it ends up with I have to confess, I am ready to move on… I have never been great at finishing things but this blog acts as a conscience so I will get it done!

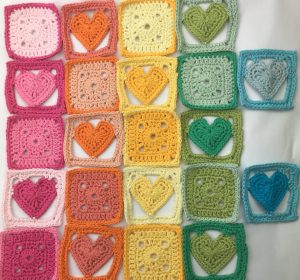
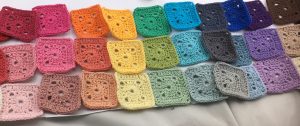
This photo shows four more completed rows of squares.   Only four more to go and I can start the making up.   I have already made the majority of the blocks for those last four rows but still need to fasten off the ends.

I started to look into pricing of this project, researching on Etsy and google for similar items and found a huge range of pricing.   Some of it was incredibly low and looks to cover the cost of materials at best.   This got me thinking!   I built myself a little spreadsheet to calculate the cost of producing the blanket.   I know what the yarn cost including shipping and I used the UK minimum wage to value my time. The blanket isn’t finished yet but when it is I will know what I should be charging. The spreadsheet has a section to record the number of hours worked.   I think I will use one for every project from now on.   I created it as a PDF and set up a FREE DOWNLOAD HERE.   Pricing basics (605 downloads)   I wrote a longer post on pricing which you can read here – pricing basics.

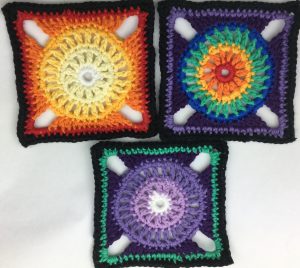
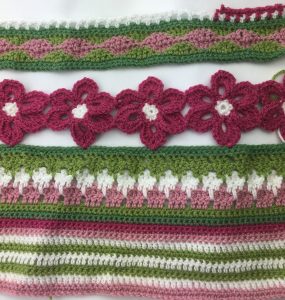
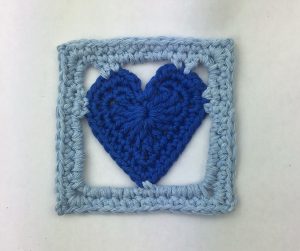
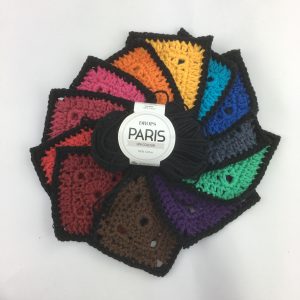
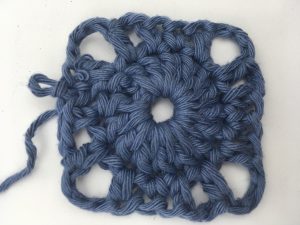
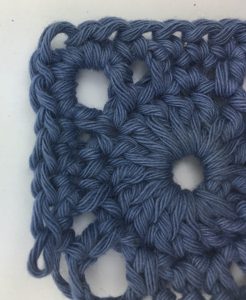
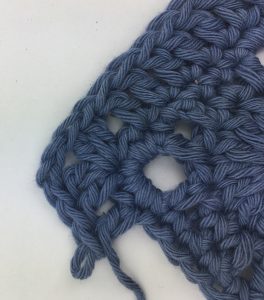
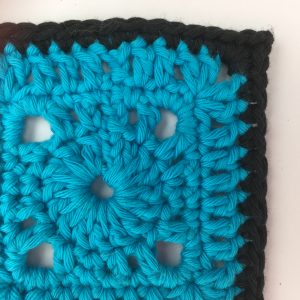
As a break from my big project this week I designed this new block in the picture above.   I have made it up in a few colours with some of my left over scraps. I am very pleased with the way it turned out.   Here is a link to the FREE PATTERN. There are no complicated stitches so it should be suitable for beginners.   I have listed the instructions in both UK and US notation.   I haven’t decided on my next big project but I would quite like to make a blanket with this block.   I worked it in Drops Paris yarn on a 5mm hook and the finished blocks are about 14cms square.

The problem with these little side projects is that they hold up work on the main project.   I do tend to get a bit distracted by new things.   Confession time, I have three other side projects on the go.   I am working on a cushion design, a summer top and a shoulder bag design.   The good news is that I will be able to share those patterns with you soon I hope.

For now it is back to finishing of little Hearts and Spots squares.   I hope you have a good week. Happy crocheting!

Annie ๐Ÿ™‚

Filed Under: craft blog, Craft projects Tagged With: blankets, blocks, commuter crochet, cotton, Craft, crochet, design, Free pattern, handmade, squares, stash, stash busting

Crochet blog – update#4

June 16, 2018 by Annie Leave a Comment

Hello ๐Ÿ™‚

Welcome to my fourth weekly update.   This update is slightly different as I have decided to split out the crochet content from the blog progress updates.   If you are interested in the blog progress then you can read about them here.

Soooo – crochet!!   This week I have been working on my Shades of the Rainbow blanket – do you like that name?   I am not sure yet.   I might call it Shades of the Heart because I have worked up my heart pattern into a square for inclusion in this blanket.   Here are a few of them laid out.   I have about five more sets of three colours to complete and about four more where I have completed the crochet but have to tie in all the ends yet *sigh*.   Here is a picture of some of the finished squares.

I put up a blog post giving the free pattern for the Heart Square – just follow the link if you would like to give it a go.


I am working on another type of square to include in the blanket – a spot.   I wanted to include more solid squares as I am worried that the heart squares might not be very stable given how much space there is around the heart.   Here are a few of the ‘spot squares’.   I worked these up from my sample square pattern but changed the colour of the yarn for the first round and last round.

These squares have all been brilliant to work on my commute – I only need to take a couple of small balls of yarn and my hook.   The yarn is Drops Paris which is incredibly good value at c ยฃ1 per ball for pure cotton.   The yarn splits a little so needs care to work with but it has been very good quality for the price with very few of the hated knots and breaks!

The other project I have worked on at home this week is my Spring Flowers Blanket.  I started this in Spring, hence the name but I don’t think I will be finishing it until next Spring at this rate of progress.   The problem I have with it is that I am working across the full width of a blanket so I cannot really take it out of the house as it is already getting a bit big to carry around!

This is the latest progress with the flowers joined to the body of the work and the next section started.    I will work up another row of flowers on my commute when I have completed all these hearts and spot blocks (see above!).

That is all from me for this week… happy crocheting!

Annie ๐Ÿ™‚

Filed Under: craft blog, Craft projects Tagged With: beginner blog, blankets, commuter crochet, crochet, crochet blog, Free pattern, squares, stash busting

Heart square

June 16, 2018 by Annie Leave a Comment

Hello, in this post I am sharing a free pattern for a heart in a square with you.     A few weeks ago I designed a crochet heart and shared the pattern as a stash busting project.   I wanted to include my stash busting hearts in my Shades of the Rainbow blanket so I have designed a pattern to put the hearts into a square of the same size as my sample squares.

Here is a link to the heart pattern.   This pattern starts with a completed heart.   The heart you made should look like this.   I have also included the heart pattern again at the bottom of this post.

The picture above shows the start point for this pattern and the points where the outside border joins the heart are indicated with an X.

Heart in a Square pattern – UK version (US version below)

First round – slip stitch into the side of the heart in the stitch indicated in the picture above.  CH2, DC into next stitch, CH5, miss three stitches, TR into the next stitch (at the top right of the heart), DC into next stitch, CH5, DC into stitch at the top of the left side of the heart, TR, CH5, miss three stitches, 2DC, CH12, DC into the bottom stitch of the heart, CH12 and slip stitch to the second of the chains that started the round to join to your start point.

Second round – CH2, DC, (2DC, CH2, DC) into the corner, 2DC at the top right hand side of the heart, 5 DC across the centre/top of the heart, 2DC into the top left hand side of the heart, (DC,2CH,2DC) into the left hand corner, 2DC, (7DC, 2CH,5DC) into the bottom left corner, DC into the stitch at the bottom of the heart, (5DC,2CH,7DC) into the bottom right corner and slip stitch to the second of the chains that started the round to join to your start point.

Third round – CH2, DC all round working 2DC,2CH,2DC into the corner chains.

You should end up with a square that looks like this ๐Ÿ™‚

Heart in a Square pattern – US version

First round – slip stitch into the side of the heart in the stitch indicated in the picture above.  CH2, SC into next stitch, CH5, miss three stitches, DC into the next stitch (at the top right of the heart), SC into next stitch, CH5, SC into stitch at the top of the left side of the heart, DC, CH5, miss three stitches, 2SC, CH12, SC into the bottom stitch of the heart, CH12 and slip stitch to the second of the chains that started the round to join to your start point.

Second round – CH2, SC, (2SC, CH2, SC) into the corner, 2SC at the top right hand side of the heart, 5 SC across the centre/top of the heart, 2SC into the top left hand side of the heart, (SC,2CH,2SC) into the left hand corner, 2SC, (7SC, 2CH,5SC) into the bottom left corner, SC into the stitch at the bottom of the heart, (5SC,2CH,7SC) into the bottom right corner and slip stitch to the second of the chains that started the round to join to your start point.

Third round – CH2, SC all round working 2SC,2CH,2SC into the corner chains.

In case there are issues with the heart link or just in case you would like this pattern all in one place – here is the heart pattern:

Heart Pattern

UK terms

Make a magic loop, chain 3 and working into the magic loop, 3 dtr, 3tr, chain 1, 1dtr, chain 1, 3tr, 3dtr, chain 2, slip stitch into magic loop and pull the thread to close the centre of the heart.

second round – 2 sl stitch into the gap behind the three chain from the first round.  3dc into the next stitch (top of the left side of the heart), 3 dc into the next stitch and 2 dc into the following stitch.   Work 4 dc to take you to the bottom loop of the heart.  3dc into the bottom stitch of the heart, 4 dc, work 2dc, 3dc, 3dc into the next three stitches, 2 sl stitches and one final slip stitch into the centre of the heart.

third round – 2 slip stitches then 2dc into the next five stitches (around the top of the left side of the heart) 7 dc, 3dc into the bottom stitch of the heart, 7dc, 2dc into the next five stitches, 2 slip stitches and finish off to complete the heart.

US terms

Make a magic loop, chain 3 and working into the magic loop, 3TRC, 3DC, chain 1, 1TRC, chain 1, 3DC, 3TRC, chain 2, slip stitch into magic loop and pull the thread to close the centre of the heart.

second round – 2 sl stitch into the gap behind the three chain from the first round.  3SC into the next stitch (top of the left side of the heart), 3 SC into the next stitch and 2SC into the following stitch.   Work 4SC to take you to the bottom loop of the heart.  3SC into the bottom stitch of the heart, 4SC, work 2SC, 3SC, 3SC into the next three stitches, 2 sl stitches and one final slip stitch into the centre of the heart.

third round – 2 slip stitches then 2SC into the next five stitches (around the top of the left side of the heart) 7 SC, 3SC into the bottom stitch of the heart, 7SC, 2SC into the next five stitches, 2 slip stitches and finish off to complete the heart.


That’s all for now.    I will be sharing my completed blanket in a few weeks – just a few more squares to go – and a lot of ends to tie in!!

Happy crocheting!

Annie ๐Ÿ™‚

Filed Under: Craft projects, Crochet patterns Tagged With: block, commuter crochet, Craft, crochet, design, Free pattern, handmade, small crafts, squares, stash busting

Sample Square – pattern

April 22, 2018 by Annie Leave a Comment

Hello – just a short post to give you the pattern for the sample squares I worked on last week.    This is what they look like – with an edge and without.

The instructions are written using UK notation.   For US conversion please use the terms in brackets.  CH = chain, DC = double crochet (US – single crochet) , Tr = treble (US – double crochet), Htr = half treble (US – half double crochet).

Round 1 – CH 5 and form into a ring with a slip stitch into the first loop of the chain

Round 2 – chain three then work 15 Tr into the centre ring.   Finish the circle by slip stitch into the third of the chain stitches you started the round with.    Check – this should give you a wheel with 16 spokes!

Round 3 – CH 2, DC, (CH1, Htr, CH2, Htr, CH1, 2DC) x 3, CH1, Htr, CH2, Htr, CH1, DC.    Finish the round with a slip stitch into the second of the chain stitches you started the round with.

Note you should have the beginnings of a square now.   The spaces created by each of the 2chain elements is the start of the corners.


Round 4 – a round of DC with four along each side and 5 into the corner space.   CH2, work 2 DC which should bring you to the corner space.   (Work 5 DC into the corner space.  Work 4 DC along the next side.) x 3, work 5 DC into the final corner space, work 1 DC and join with a slip stitch to the second of the chain stitches you started the round with.

Round 5 – a round of trebles with six along each side and four with a two chain spacer at each corner.   CH3, 3Tr into the top of the dc’s on the row below.  Miss one of the dcs then (into the top of the middle dc of the corner work (2 Tr, CH2, 2Tr) all into the same stitch, miss one dc on the row below then work 6Tr along the next side) x 3, into the top of the middle dc of the final corner work (2Tr, CH2, 2Tr) all into the same stitch, miss one dc on the row below then work 2Tr and finish with a slip stitch into the third of the chain stitches you started the round with.

Edging – I edged my squares in black by working a round of dc’s into every stitch on the final round – 10 down each side and five into the corner space.

And there it is!   I hope you find it easy to understand, I have taken a lot of photos which should help.

Any questions please leave me a comment and I will try to help.

Happy crocheting!

Annie ๐Ÿ™‚

Filed Under: Craft projects, Crochet patterns Tagged With: blocks, commuter crochet, crochet, design, Free pattern, handmade, original, pattern, squares, stash buster

Footer

Newsletter

Copyright © 2021 ยท Genesis Sample on Genesis Framework ยท WordPress ยท Log in