• Skip to primary navigation
  • Skip to main content
  • Skip to footer

Stickytapeandstring

Created with WordPress managed by 1&1

  • Craft projects
    • craft business tips
    • craft blog
    • Crochet patterns
    • Upcycling
    • craft with kids
  • Blogging
    • New to blogging
    • Blog diary
  • Bullet Journal
  • About me
  • Welcome!!

craft with kids

Making a Cushion Pad

May 27, 2020 by Annie Leave a Comment

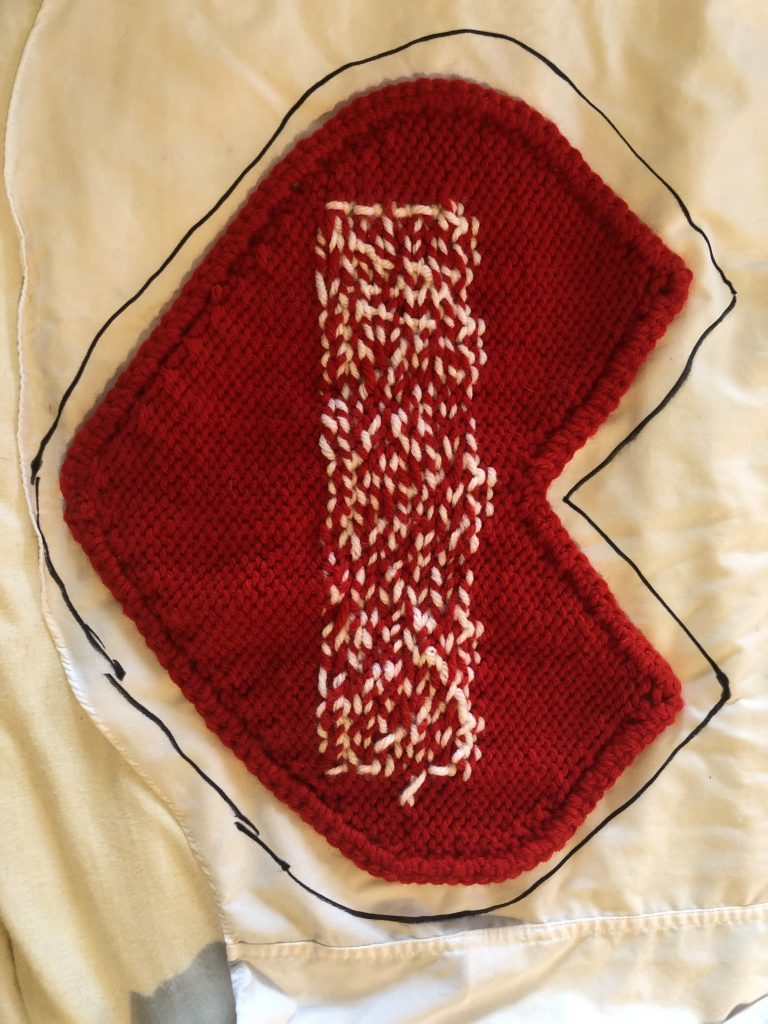
A quick post on making a cushion pad! I have put together a couple of heart cushion patterns. My favourite is this one – heart full of rainbows cushion. But cushion patterns aren’t much use unless you have a cushion to put inside them!

This post describes how you can make a quick cushion pad to fit inside your work. The method I use should give you a perfect fit and it uses up any old scraps of fabric you have. I used an old shirt to make mine!

Cutting out

First lay out the fabric you want to use on a nice flat surface. Make sure there is nothing underneath the fabric that you can damage or cut into!

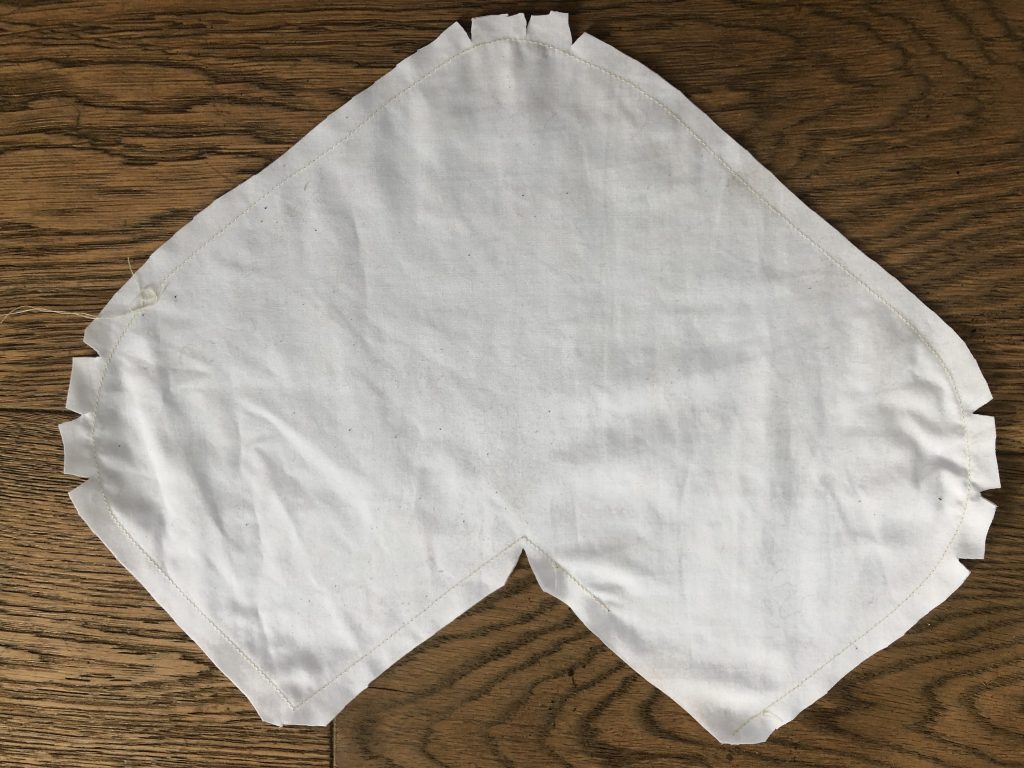
Take one side of your cushion shape. Ideally you will have already blocked your work. This makes the shape more stable and easier to work with. Place the cushion shape onto the fabric. Try to be economical with the placing of the work – put it up against an edge or corner. You will need to two of these. You can fold the fabric if you are using a large enough piece and cut two at once. If you are using scraps (or a shirt like me) you will need to cut one then move it to a new place on the fabric.

This is going to be hidden inside your cushion so you can draw around the shape without worrying about the lines you make. If you want the cushion to be well filled and firm then the cushion pad needs to be a tiny bit larger than the cover. You will be stitching the cushion pad together which means there also needs to be a seam allowance.

Draw around your shape with a sharpie or other permanent pen. I drew around mine just a little outside the edge of the shape.

Cut out the shape adding the seam allowance so cut 1.5 cm OUTSIDE the line you have drawn. This should give you a shape which is a bit bigger than your cushion cover. Cut a second shape identical to the first.

Making up the cushion pad

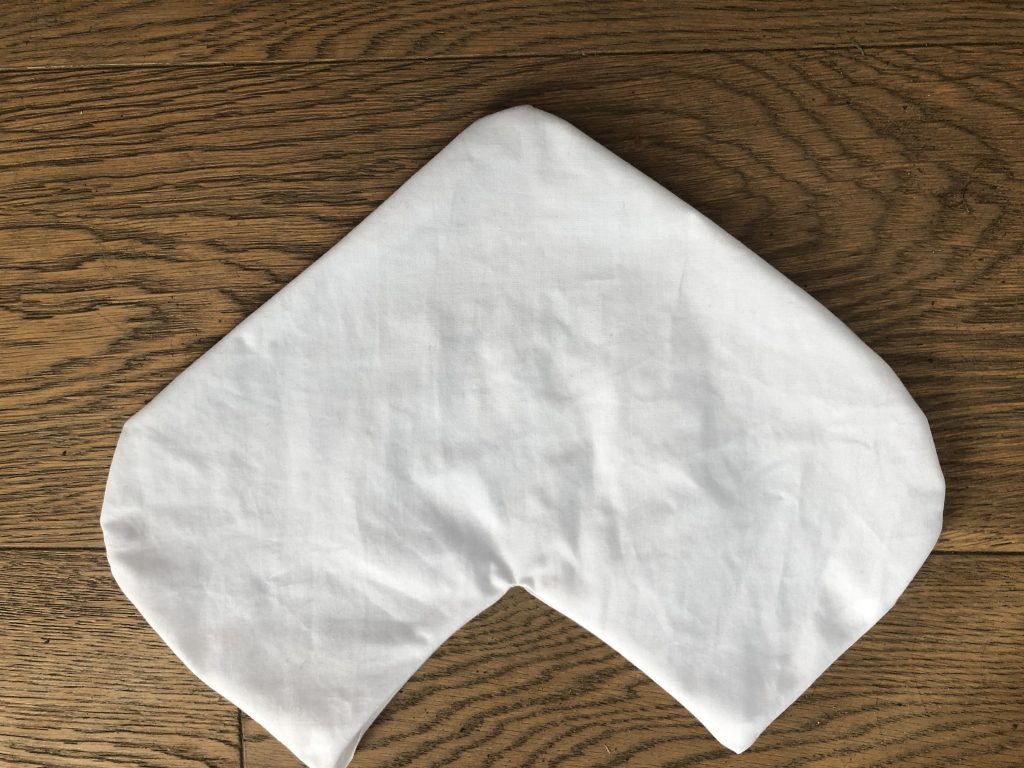
Stitch round the shape leaving the seam allowance you added. Remember to leave an opening for the stuffing! Trim the seam allowance back to half a centimeter. Snip into the seam allowance on any curves. This allows the seams of the cushion to sit flat.

Turn the cushion outside in by pulling it through the opening you have left for stuffing.

Next, stuff the cushion!!! I used old stockings πŸ™‚ Stitch up the opening you left to put the stuffing in ….. and you are done!

I wrote this because I had made a couple of heart shaped cushion covers and needed a cushion pad. You could use this method to make any shape of cushion. If you are making a cover in fabric the same method would work for that too. I hope it works for you.

Happy crafting!

Annie πŸ™‚

Filed Under: craft with kids, Quick makes

Creative fun with your kids

June 10, 2017 by Annie Leave a Comment

Having creative fun with your kids is a fantastic way to bond and develop together. Would you like to help your kids explore their creativity and lay down great memories!?    Would you like to make the most of long school holidays and weekends?   Age is no barrier to this – teenagers can be inspired to flex their creativity and the results can be amazing! It would be such a shame for them to lose that time to social media and electronic games.    After all it really won’t be many years before they head into a world of work with two weeks summer holiday at most.    Many older children will start with holiday jobs before leaving home and hence have even fewer long breaks. 

With all the distractions and pressures of the modern electronic world spending time away from games and social media is really positive and creativity is great for reducing stress.   I would certainly like to provide space and inspiration to allow my children to make things and learn or at least explore new crafts.

Like most people I don’t have all the money in the world to spend and I don’t have much time either.  I would like to organise holiday activities that encourage and develop creativity but don’t break the bank.

This post contains ideas for three activities you can do today with your kids. They are the basis for all the other activities which will follow. I will include a more detailed post on each in later weeks but there is enough here to get you started!

1.  A list of creative fun activities

This is something we do at the start of our school holidays. We all contribute ideas and then estimate for each idea what the cost would be in time and money.    I love doing this with my family.    It is an exercise in creativity all by itself.    Just getting teenagers to explore what activities they might want to do is refreshing and interesting.  You might find some of the ideas your kids come up with are surprising!

Set categories such as indoor/outdoor, dry/wet weather, free/cheap/splurge, active or restful.   Make sure you have activity ideas in each category.  Doing this helps people consider all sorts of activities not just the ones that involve parents spending lots of money!

This can also be an excellent way to teach younger kids about the costs of activities and explain or set budgets.  I will be sharing my lists here in later posts.   Incidentally Pinterest is a great source of ideas! I have a board devoted to activity ideas which you can see here Pinterest – Activity Ideas

I have produced a free printable template to record the activity ideas which you can read about and download here

2. Family scrapbook

These can be as fancy or simple as you and your family would like.  We used to do one each when my children were younger.   This year I am considering moving to a single one for all of us. Capture the ideas list you create with your family in the scrapbook right at the front! 

I love the bullet journal format but a notebook doesn’t really work when you are looking to collect ticket stubs and add photos.   The additional thickness puts too much strain on the spine of the book.  I find they work best as a loose leaf format so that pages can be added. 

You can keep it cheap and simple with office ring binders.   If you have a bigger budget and want something ready made and prettier there are lots of albums available.    The page limit doesn’t have to be a problem if you are prepared to have more than one!   

Again following a bullet journal type format, I like to use dotted paper which you can buy cheaply as refill pads.   Dotted paper is more flexible than lined paper when it comes to designing pages but the grid provides a guide to keep designs looking neat even if (like me) erm….art is not your first talent!

You can try to be ultra disciplined in terms of what you keep and record or you can keep a draft and refine the content when you make it a permanent record.   I will cover the structure and content of our scrapbooks in a later post.   

Ask your kids to complete a page every time they have something fun to document. Tip – ask them to put the day, date and time at the top of the page!! This helps with filing later and is a good teaching point. You could also get them to include the location (if you are travelling) and the weather is another interesting record to me. (but then I am British!)

You don’t need any special kit to get started on this activity. You can use any scrap paper and pens. I do find it is more special if you have pens and paper set aside specially for the scrapbook. Scrapbooking is a whole industry with some amazing and beautiful layouts, paper and embelishments you can buy. I haven’t gone down that road myself. Our scrapbooks have been much more home-made and low cost. Here are my starter for ten – budget kit and splurge kits if you would like to keep special pens and paper for this activity.    Please note, if you follow links in this post I may receive a small payment which goes towards the cost of running this blog.

Budget Scrapbook Kit

When your budget is tight it is important to spend on the things that will really make a difference.    In this instance I think that is the pens that you will use to brighten your pages and make them stand out.   There are so many options out there but for price and quality I would go with Stabilo point 88 fineliners.   I wouldn’t go for a large number of colours – you can make things look really special with just a few colours.   If you have a young family I would not recommend fineliners as the points can easily be damaged by little hands. When my kids were at that stage we stuck to wax crayons or chubby coloured pencils which I have in my recommendations below.

For the pages themselves to keep the cost down I would go for plain printer paper which you can buy locally to avoid shipping cost. I will also provide free downloads for printable pages when I can.

Finally if your budget is tight then I would either make a folder or do without one at the outset.   I will share a tutorial on making folders in a later post.    To keep your pages tidy you could use treasury tags or simply hold them together with a spare bit of ribbon, yarn or a shoelace!

Splurge Scrapbook Kit

As above, I would put my money into the fineliners.    I would still go for the Stabilo fineliners 88 but would maybe go for a few more colours πŸ™‚   You will find you use a lot of the black pen so it is worth buying a separate set of those.   I also suggest you go for some pens with a thicker point for block colouring.  

Dotted A4 paper is the most flexible and I find it helps me make pages look tidy/pretty. The paper can be bought in pad form which makes it easier to work on and can be filed when pages are completed. 

If you are interested in the elaborate artistic scrapbooking that you can see in craft shops and on Pinterest, there are lots of beautiful supplies you can treat yourself to. Search on scrapbooking on Amazon, Etsy or Pinterest for a taste. I am not familiar with much of that world and it can be very expensive!

For the binder there are lots of options out there but I find the easiest way to source these is to buy lever arch files from my local office supplies shop.   Longer term I really would recommend making your own as part of one of your activity sessions.

3.  Family playlists

The third activity I would recommend is to set up a family playlist. This is something we started in the summer a few years ago now.  They are actually playlists for an entire year.  We each put forward the songs that make us think of that particular year.  Because the list requires everyone’s agreement it is an exercise in selling and diplomacy!  We have rules as follows:

1. Everyone can veto songs they don’t like. 

2. However we all have the right to one song that has been vetoed.  Oh… and

3. The judges decision is final (ie Mum gets to arbitrate if things get nasty!). 

We add to the list all year and record the reasons we are putting each track on the playlist.  It isn’t all current music. One year our playlist included older tracks used for an aqua-aerobics class at a hotel we were at for a week.  We heard the music every day and later those tracks reminded us of the holiday! Capture your list and include it in your family scrapbook!

When I was young, a play list was something you pieced together on a cassette tape. When I was a young Mum playlists were on my ipod. Now, if you subscribe to a music service you can set up an actual play list. We use Spotify here but I believe all services will allow you to set up shared play lists.

So those are my three start points.   I will share more detail from our planning and would love to hear from anyone with different ideas.  What do you do that works well?  What potential
mistakes should I avoid?  Please share!!

Have fun!

Annie πŸ™‚

Filed Under: Craft projects, craft with kids Tagged With: Craft, fabric, family, family activities, kids, memories, pens, school holiday, scrapbooks

Footer

Newsletter

Copyright © 2025 Β· Genesis Sample on Genesis Framework Β· WordPress Β· Log in