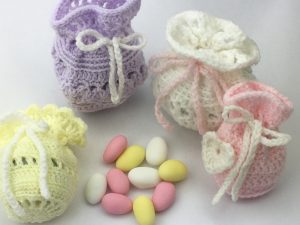
Hello 🙂 The UK has just been through the most amazing wedding fever! I don’t know anyone who is getting married soon but wanted to put a bit of time in on a wedding project so I came up with these little bags that could be used for wedding favours or if made a little larger could be given to flower girls to carry.
I have a huge stash of yarn oddments and managed to find some lovely baby pastel colours for this batch but the bags would also look good in bold colours to match any theme.
I will share the basic bag pattern here but as you can see I enjoyed playing around with the design to add in textures and features. The yellow bag has a heart trim around the top. The purple bag has a row of hearts around it. The pattern I am sharing makes the little pink bag the one with the heart motif attached in the photo below.

The pattern is written in UK notation. For US terms please note:
DC means SC in US notation
TR means DC in US notation
Bag Pattern – start by making a magic circle, chain 3 and work 17 Tr into the circle. Close with a slip stitch into the third chain from the start.
Pull the circle closed.
Work rounds as shown below, each time finish the round by joining to the chain with a slip stitch.
round 2 – chain 1 and work a round of DC, two into each of the stitches in the circle.
round 3 – chain 2 and work a round of TR
round 4 – chain 1 and work a round of DC into the back loop only of the row below.
round 5 – chain 1 and work a round of DC through both loops of the row below
round 6 – chain 2, work a round of TR into both loops of the row below
round 7 & 8 – chain 1 and work a round of DC through both loops of the row below
repeat rows 6 to 8 twice more.
round 15 – chain 4, miss one stitch and work 1 TR into the next. (Chain 1, miss one stitch and work 1 TR into the next) repeat to the end of the round and join to the third stitch of the first chain with a slip stitch. This creates the round of ‘holes’ that we will use to thread the ribbon tie through.
round 16 & 17 – repeat round 7
round 18 – repeat round 6
round 19 – finish the work with a row of slip stitches around the top.
Ribbon ties – you could use ribbon to match any theme or make your own ‘ribbon’ using a row of chain. I found that a chain of 70 was about the right length but you can judge this for yourself.
Hope you like these little bags. I am going to be making more during the week and will put a few more patterns up for sale in my Etsy shop when I have written them up.
If you want to read about some of the challenges I have had when it comes to crochet in a house with puppies then please check my weekly blog. Happy crocheting!
Annie 🙂
Recent Comments