• Skip to primary navigation
  • Skip to main content
  • Skip to footer

Stickytapeandstring

Created with WordPress managed by 1&1

  • Craft projects
    • craft business tips
    • craft blog
    • Crochet patterns
    • Upcycling
    • craft with kids
  • Blogging
    • New to blogging
    • Blog diary
  • Bullet Journal
  • About me
  • Welcome!!

heart

Little Padded Hearts

January 10, 2021 by A_Sticky_tape_and_string_girl Leave a Comment

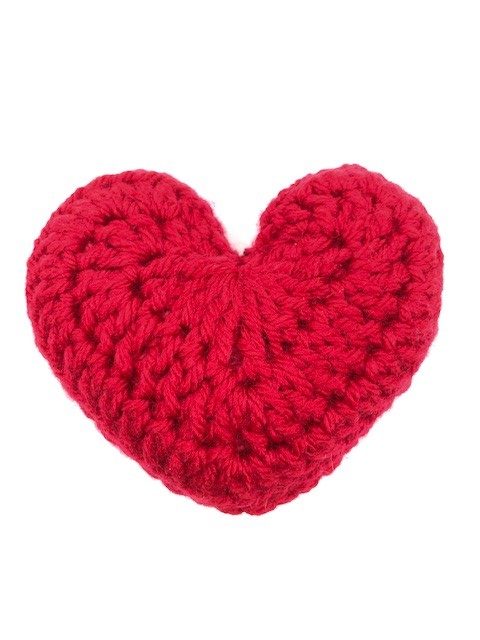
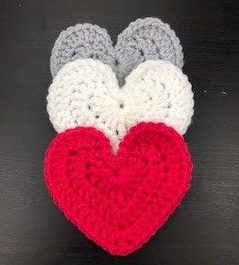
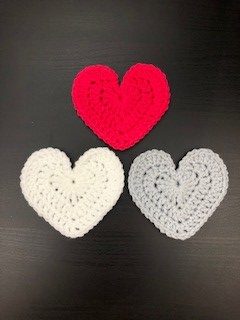
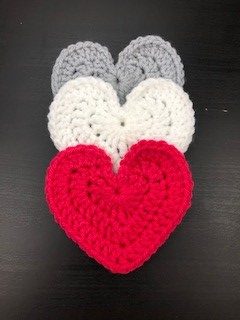
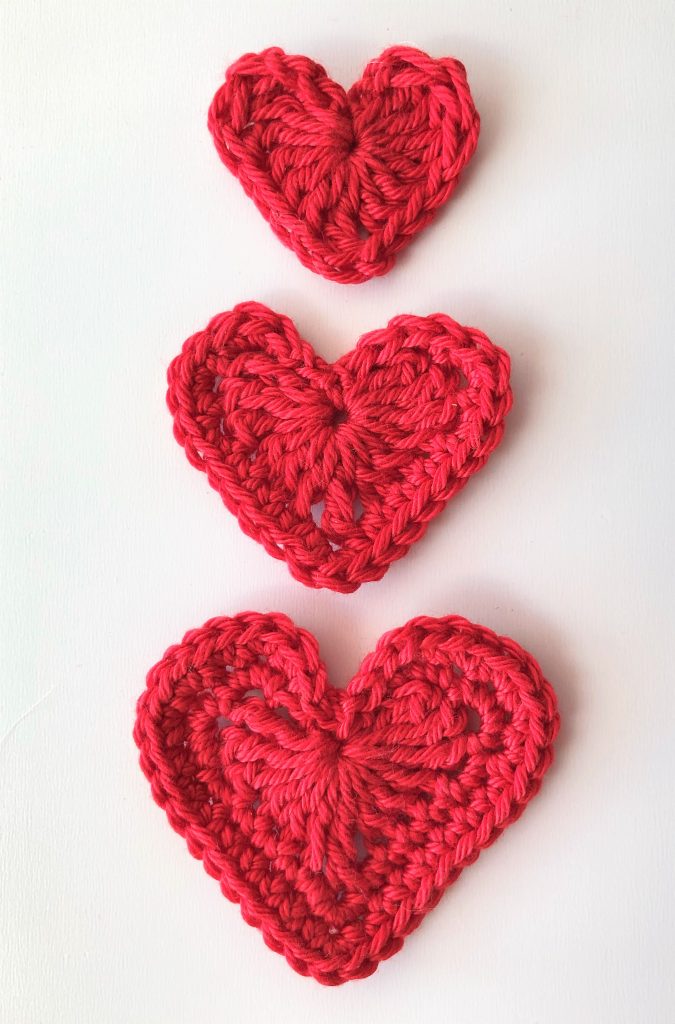
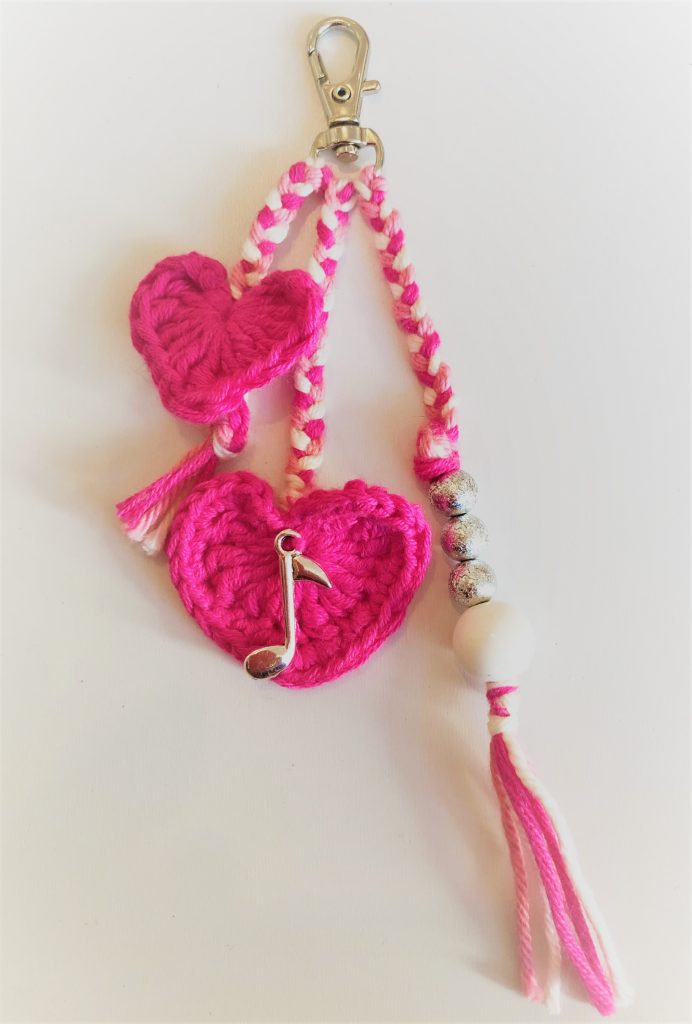
I have been having a bit of fun with my heart patterns. These little padded hearts are one of the things I have made. They are based on the new large heart pattern I shared earlier this month. These hearts are about 11cm across when made in chunky yarn. You can use them for decoration, bunting or as gifts.

basket of little hearts
little padded hearts

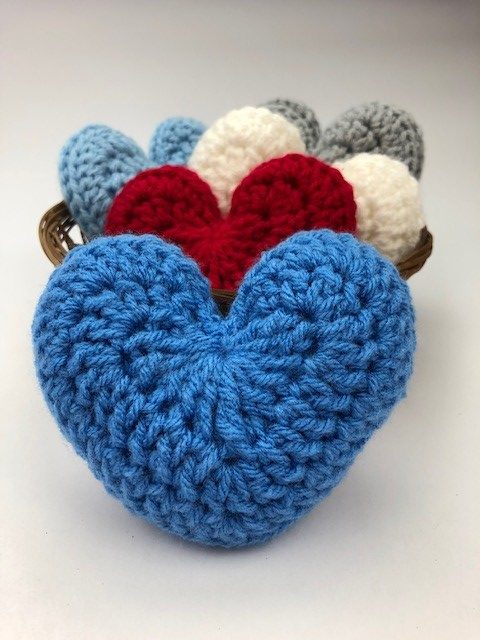
The first heart I made was a blue one with my thoughts firmly on the National Health Service here in the UK as they battle through one of the worst periods in their history. It doesn’t feel like there is much we can do to help but I have read posts by doctors and nurses on twitter saying they appreciate the show of solidarity as we all add blue hearts to our profiles.

To make your own padded heart you need to follow the new large heart pattern which you will find here. The hearts I made use Stylecraft Special Chunky which you can see here from Woolwarehouse. I don’t have any relationship with either brand but I love the quality and value of the Stylecraft yarns and I really value the service and range offered by Woolwarehouse.

The examples you can see here are worked on a 6mm hook. It takes about six or seven minutes to make each side of the heart. Factoring in making up time and a cup of tea, it takes roughly 25 mins to produce a padded heart ๐Ÿ™‚

To make your little padded heart, first make two hearts following the large heart pattern. When you finish the second, either leave the yarn attached or pull out a long length before cutting the yarn off. You will use this to make up the padded heart.

Making up your Little Padded Hearts

The examples you can see here have been joined using a crochet hook. I used a wool needle to finish them off and join the last few stitches. If you are a regular reader you will have seen me recommend Knit Pro wool needles before. I cannot believe it took me so long to find these little needles. They make such a difference to the time it takes to finish off ends and make projects up.

The beauty of these little padded hearts is that you don’t really need to weave in ends. Just pull them through to the wrong side of the heart, fasten them off securely and pop them inside as part of the stuffing!

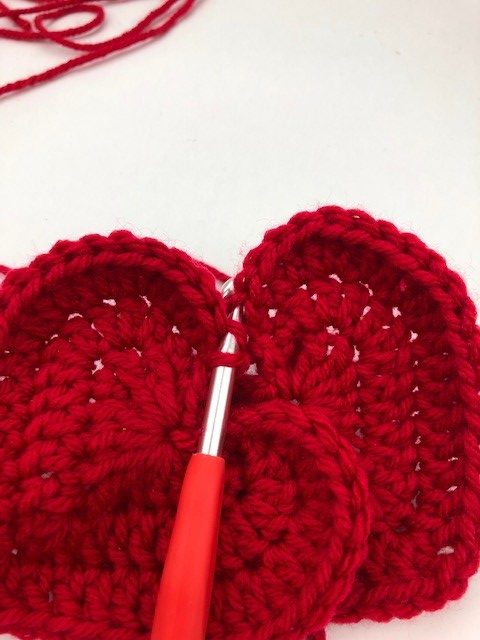
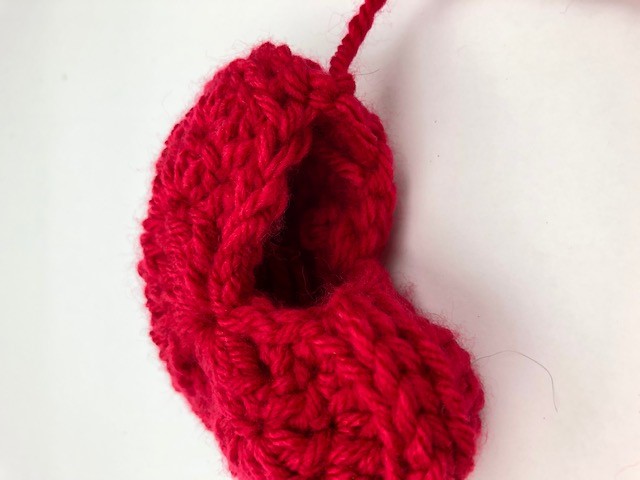
Start the making up as shown below. Place the two hearts right side up in front of you. Push your hook into the outer strand of the edge stitch on the right side of the centre of the left heart. Appreciate this sounds very complicated. You might find it easier to follow the pictures below!

showing how to join the hearts 1 of 9
pick up stitch from outer edge of left heart
shows how to join two hearts 2 of 9
pick up stitch from outer edge of right hand heart

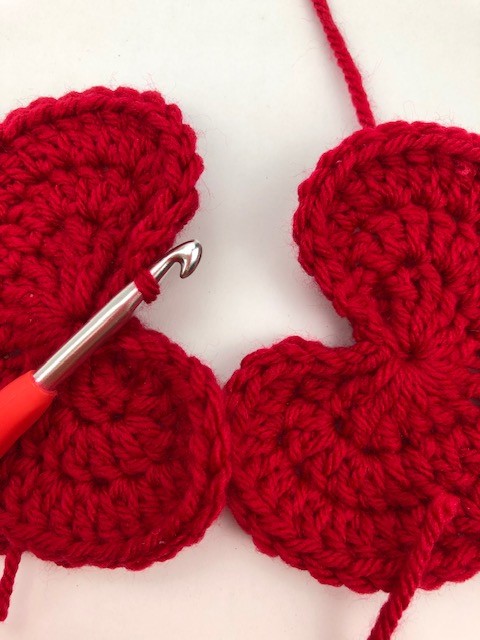
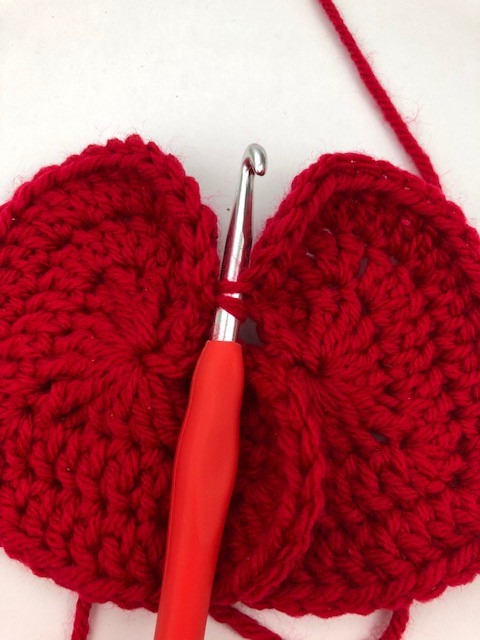
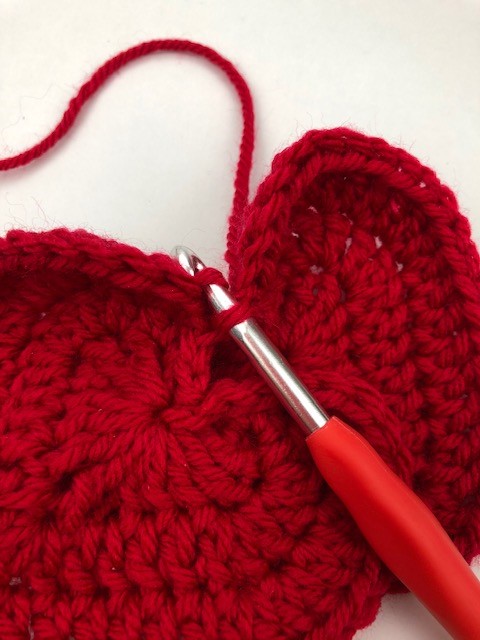
Next push your hook into the outer strand of the edge stitch on the right side of the centre of the right heart. This bit is fiddly but it does get easy once you get going I promise. Pull the yarn through both looks so that your two hearts are joined and you have a loop of yarn on the hook.

joining two hearts 3 of 9
wrap your yarn around the hook
joining two hearts 4 of 9
pull the yarn through so you have a loop on the hook

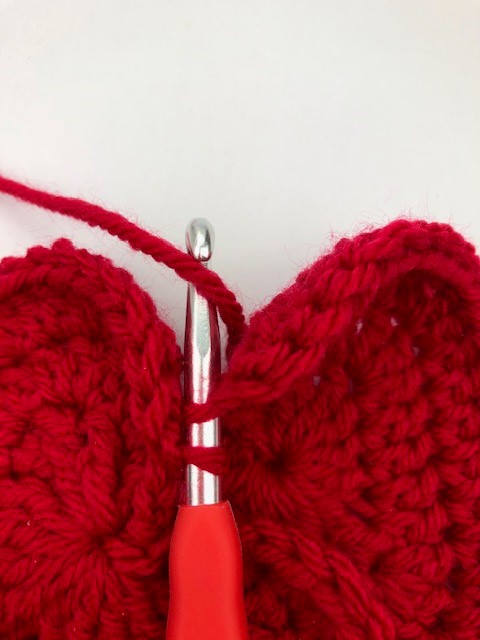
Repeat the process above but going into the outside edge of the next stitch on both hearts so that you have two loops on your hook. Pull the second loop through the first and you will start to make the joining seam. It should look like a row of raised chain stitches going round the edge of the hearts.

joining two hearts 5 of 9
repeat the process picking up a stitch on the left heart
joining two hearts 6 of 9
pick up the next stitch from the right hand heart
joining two hearts 7 of 9
wrap your yarn around the hook
joining two hearts 8 of 9
pull the yarn through the two stitches from either side of the heart
joining two hearts 9 of 9
finally pull the yarn through the loop on the hook

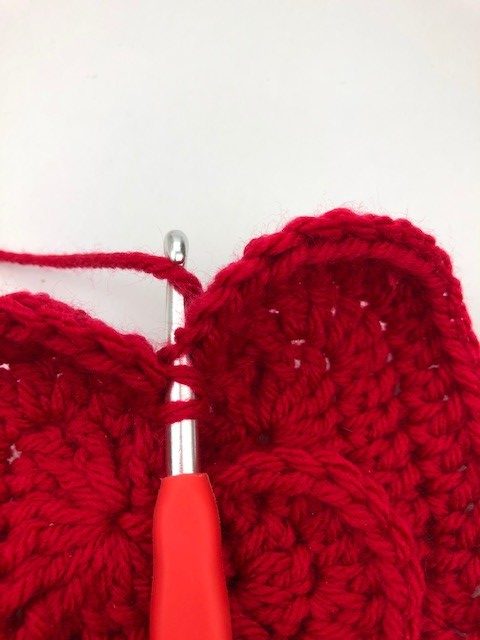
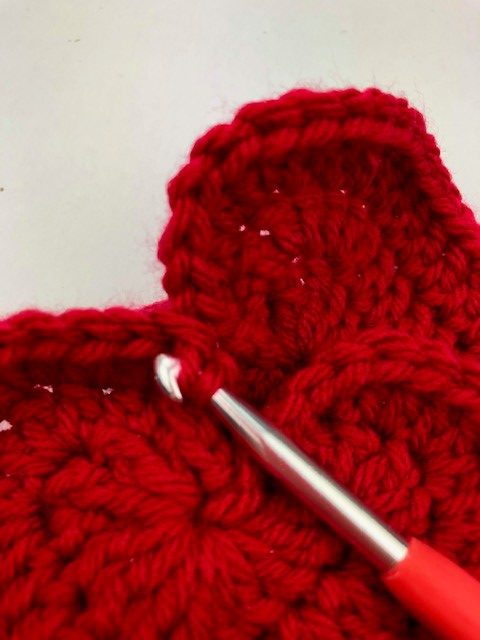
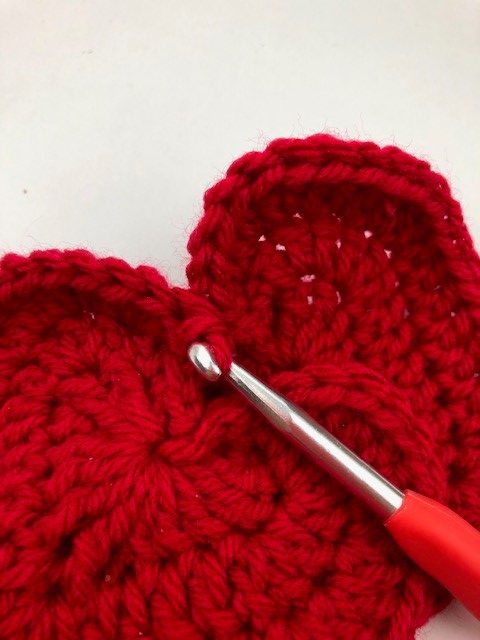
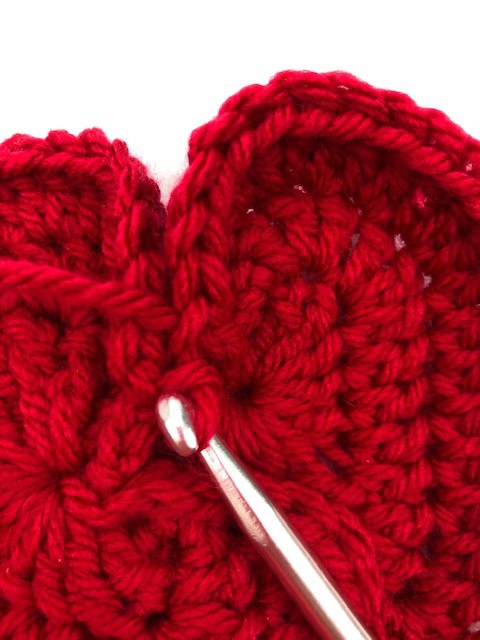
Keep going like this until you get round the whole heart and stop with a few stitches to go so that you can stuff the heart. As you stitch keep an eye on both sides to make sure you are working in the same stitches on both sides.

shows the start of the joining seam
your joining seam should look like this

Secure the end by pulling it through the last loop. Stuff the heart then use the remainder of the yarn to stitch up the final bit of the seam.

leaving a gap to stuff the heart
leave a gap to stuff the heart then join with a wool needle

I hope you love these little padded hearts! I will make a few more and list them on my Etsy store in time for Valentines day. Happy crocheting!

Annie ๐Ÿ™‚

little padded heart

Filed Under: Craft projects, Crochet patterns Tagged With: crochet, crochet heart pattern, crochet pattern, free crochet heart pattern, free crochet pattern, Free pattern, heart, little padded heart, valentine

Crochet blog – January update

January 3, 2021 by A_Sticky_tape_and_string_girl Leave a Comment

Hello everyone. Welcome to my crochet blog – January update with a couple of free patterns to start 2021. I have been reviewing and overhauling old blog posts. Turns out the last time I sent a general update was back in April 2019! There is nothing that points to success as a blogger better than consistency ๐Ÿ™‚ Possibly why my little blog is still just that…. a very little blog!

Anyway – thank you for reading, despite my lack of proper application to the task.

Project Updates

Lockdown Lapghan

In recent months I have been working on two projects. Firstly I created a pattern for a Lapghan using only one stitch, five colours and a pattern suitable for beginners. I called it Lockdown Lapghan and have worked it up in two sets of colours. You can see these below.

Lockdown Lapghan - berries in snow
Lockdown lapghan – Berries in the snow (with Milo)

lockdown lapghan - autumn sunset
lockdown lapghan – Autumn Sunset

The pattern for the Lapghan is spread across three separate posts as follows:

Lockdown Lapghan charts available to download here

Lockdown Lapghan basic pattern in UK and US instructions here

Lockdown Lapghan finishing and edging instructions here

New Large Heart and Edged Heart patterns

The other project I have just completed is a new crochet heart pattern. This is based on my previous heart pattern which remains my most popular (only popular) blog post. I wanted to create a larger sized heart. This one is c 10cm across when worked in chunky yarn. The free pattern for the new large heart is available here and I have also just added an edging pattern which is shown below. The original post for crochet hearts in three sizes is here

free pattern for new large heart
new large heart pattern

New Large Heart Edging – UK instructions

Starting at the centre of the top of the heart in a contrasting colour work 6 Dc. At the top of the heart into the next stitch work 2Dc. Work 2Dc into the next stitch then Dc into the following stitch. Then work 2Dc into the next stitch and 13 Dc down the left hand side of the heart. At the bottom of the heart work 1 Dc into the gap made by the chain on the previous row then 3Dc into the bottom stitch of the heart.

We are going to complete the second half of the heart edging as a mirror to the first. Work 1 Dc into the gap made by the chain on the previous row then 13 Dc up the right hand side of the heart. Next work 2Dc into the next stitch then Dc into the following stitch. Work 2Dc into each of the next two stitches. Finally work 6Dc down the centre of the right hand side of the top of the heart and finish off.

New Large Heart Edging – US instructions

Starting at the centre of the top of the heart in a contrasting colour work 6 Sc. At the top of the heart into the next stitch work 2Sc. Work 2Sc into the next stitch then Sc into the following stitch. Then work 2Sc into the next stitch and 13 Sc down the left hand side of the heart. At the bottom of the heart work 1 Sc into the gap made by the chain on the previous row then 3Sc into the bottom stitch of the heart.

We are going to complete the second half of the heart edging as a mirror to the first. Work 1 Sc into the gap made by the chain on the previous row then 13 Sc up the right hand side of the heart. Next work 2Sc into the next stitch then Dc into the following stitch. Work 2Sc into each of the next two stitches. Finally work 6Sc down the centre of the right hand side of the top of the heart and finish off.

crochet blog January update - New Large Heart - edging
new large heart pattern with edging

That is it for the crochet blog – January update. Spot the new year’s resolution to be better at posting updates and newsletters and blogging in general. Expect more in February (or not ๐Ÿ™‚ ) Happy Crocheting!

Annie ๐Ÿ™‚

Filed Under: Blog diary, Crochet patterns Tagged With: crochet, crochet blanket, crochet blog, crochet design, crochet heart, crochet pattern, free crochet pattern, heart

New Large Heart Pattern

December 28, 2020 by A_Sticky_tape_and_string_girl 4 Comments

My heart patterns go down so well with you all that I have decided to create a new one! I am actually working on a new blanket design that needed a larger version. Hoping to release that blanket pattern in the coming weeks. I am sharing the new large heart pattern now in case you want to use it for Valentines day ๐Ÿ™‚

I am using Stylecraft Special chunky yarn which is my current favourite. It is really good values and comes in a great range of colours. I get all my yarn from Woolwarehouse here in the UK. The pattern will work in any yarn. However, you might find the proportions are slightly different if you use a yarn of different tension.

three hearts  - new large heart pattern

New Large Heart Pattern – UK terms

First round

Make a magic loop and work into the loop as follows: 3CH, 3DTr, 3Tr, CH, DTr, CH, 3Tr, 3Dtr, 3CH, slip stitch into the loop to finish the round. Pull the magic loop closed to form the heart.

Second round

Working up the left side of the top of the heart, one slip stitch and one chain. Into the next stitch work 1DC, 1Htr. Crochet 3Tr into the next stitch and 3Tr into the following stitch. Work 1Tr into the next four stitches which should bring you to the bottom point of the heart. Crochet 3Tr into the bottom point. Working up the right hand side of the heart work 1Tr into each of the next four stitches. Now work 3Tr into the next stitch and 3Tr into the following stitch. Finally work 1HTr, 1Dc into the next stitch and chain 1 and slip stitch into the final stitch on the right hand side of the centre of the heart. You should be back to the start point of the round. Put your hook into the centre of the heart and pull the yarn through to complete the round.

Third Round

This round follows the same lines as the previous round. Starting with the left hand side of the centre of the heart work two slip stitches then chain 1. Into the next stitch work 1Dc, 1Htr. Work 2Tr into the next stitch then 3Tr into the following stitch. Crochet 2Tr into each of the next three stitches then work 1Tr into the following six stitches. This should bring you to the bottom point of the heart.

Into the bottom of the heart work 1Tr, 1Ch, 1Tr, 1CH, 1Tr. Next work one Tr into each of the next six stitches then work 2Tr into each of the following three stitches. Work 3Tr into the next stitch and 2Tr into the following stitch. Finally work 1Htr, 1Dc into the next stitch at the top of the right hand side of the centre of the heart. Chain1 and slip stitch to finish the round. Again I like to put my hook through the centre of the heart and slip stitch to that point to complete the heart.

new large heart pattern
New large heart pattern

New Large Heart Pattern – US terms

First round

Make a magic loop and work into the loop as follows: 3CH, 3Tr, 3DC, CH, Tr, CH, 3DC, 3Tr, 3CH, slip stitch into the loop to finish the round. Pull the magic loop closed to form the heart.

Second round

Working up the left side of the top of the heart, one slip stitch and one chain. Into the next stitch work 1SC, 1HDc. Crochet 3Dc into the next stitch and 3Dc into the following stitch. Work 1Dc into the next four stitches which should bring you to the bottom point of the heart. Crochet 3Dc into the bottom point. Working up the right hand side of the heart work 1Dc into each of the next four stitches. Now work 3Dc into the next stitch and 3Dc into the following stitch. Finally work 1HDc, 1Sc into the next stitch and chain 1 and slip stitch into the final stitch on the right hand side of the centre of the heart. You should be back to the start point of the round. Put your hook into the centre of the heart and pull the yarn through to complete the round.

Third Round

This round follows the same lines as the previous round. Starting with the left hand side of the centre of the heart work two slip stitches then chain 1. Into the next stitch work 1Sc, 1HDc. Work 2Dc into the next stitch then 3Dc into the following stitch. Crochet 2Dc into each of the next three stitches then work 1Dc into the following six stitches. This should bring you to the bottom point of the heart.

Into the bottom of the heart work 1Dc, 1Ch, 1Dc, 1CH, 1Dc. Next work one Dc into each of the next six stitches then work 2Dc into each of the following three stitches. Work 3Dc into the next stitch and 2Dc into the following stitch. Finally work 1HDc, 1Sc into the next stitch at the top of the right hand side of the centre of the heart. Chain1 and slip stitch to finish the round. Again I like to put my hook through the centre of the heart and slip stitch to that point to complete the heart.

three large hearts
three hearts ๐Ÿ™‚

I would like to get this pattern out quickly so I am putting it up without detailed photographs but I will add those over the coming days. The first round of this heart mirrors my original heart pattern which you can find here. I hope you love this new large heart pattern and would love to hear from you if you find the pattern useful. Happy crocheting!

One final point and I am sorry but it is very personal – I have decided that 2023 will be the year I give up drinking alcohol. If you are interested in my journey or considering something similar you can read about it here.

Annie ๐Ÿ™‚

Filed Under: Crochet patterns Tagged With: crochet heart, crochet hearts, free crochet pattern, Free pattern, heart, hearts, stashbuster

Heart full of Rainbows Cushion

May 25, 2020 by A_Sticky_tape_and_string_girl Leave a Comment

This heart full of rainbows cushion is a companion project to my hearts and rainbows blanket. You will be working entirely in DC (UK terms) or SC (US terms). It is a simple project. However you will need to understand how to increase/decrease your stitches. I have suggested a method below but you might have one you prefer. The making-up instructions might be a bit tricky if you are new to crochet. I will put my instructions here and in the final PDF version of the pattern which will be available on Etsy. You can see the hearts and rainbows blanket here.

heart full of rainbows cushion and blanket
free pattern for hearts and rainbows blanket, heart full of rainbows cushion available on my blog

First things first. The yarn used to make the Heart Full of Rainbows Cushion is Lion Brand Yarns, Hometown USA yarn. This is a super chunky yarn which means the work grows really quickly! ๐Ÿ™‚ I love this yarn for that reason and because it has lovely bright colours and is good value for the price. In the UK I buy all my yarn from Wool Warehouse. Note – at this point these are not affiliate links so I am not paid to promote either brand – I just love them!

To make the cushion you will need one ball of each of the colours of the rainbow. For the edging I used White and Black but if you wanted to keep the cost down you could edge the cushion in one of the other colours. You will also need a 9mm crochet hook.

I created a chart for this pattern which I like to print out and mark off as I go. I will write out the instructions long hand in the PDF pattern but if you want to get started, the free download is here:

Heart Full of Rainbows Chart (15977 downloads )

Making the Heart full of Rainbows Cushion

Start at the bottom of the chart by making a chain of 4 using the violet yarn. Turn and work two DC (SC for US terms) starting in the third stitch from the hook. Chain four and turn the work.

Second row – work one DC (SC for US terms) into the third and fourth stitches from the hook. work 2 DC (SC for US terms) into the next two stitches. Chain 2 and turn the work.

Third row – work two DC (SC for US terms) into the first stitch. Work 4 DC (SC for US terms). Work 2 DC (SC for US terms) into the next stitch then chain two and turn the work.

Continue in this manner, increasing the number of stitches on each row to match the chart. Remember to change colour when the chart changes!!

When you get to the decrease rows again there are many methods you can use to decrease. To get a neater edge you can miss the second stitch of the row. You might find it easier to miss the first – this gives a stepped edge but as you are going to be edging the heart that should not be visible. When you chain two and turn at the end of the row simply miss the first stitch and work DC (SC in US terms) into the second. If the decrease is at the end of a row then stop one stitch short chain two and turn.

As you decrease follow the chart again and you will see that at the top of the heart you need to turn the work in the middle of the row. This allows you to complete one side of the top of the heart. You will need to rejoin the yarn in the middle of the work to complete the second side of the heart.

The final stage of each side of the cushion is to edge the heart. I did this in white but you could use whichever colour you like. This step gives you a neat edge to use when you join the two hearts together. Count the stitches you use on each side so that you can match front and back. The edging is entirely DC again (SC in US terms). Try to space your stitches so that the work lies flat without being stretched or pulled. I used the following number of stitches:

Working up the bottom side of the heart violet to Green – 27 stitches

For the straight section, part of the green, yellow and the start of the Orange, I used 10 stitches.

From the start of the decrease and up to the top of the heart I worked 15 stitches.

Work the six stitches across the top of the heart and from the top down to the centre I worked 14 stitches.

In the very centre of the heart where you have two stitches (number 26/27 on the orange row of the chart) work these two together.

Complete the second half of the edging to match the first. Work one round of DC (SC in US terms). At the centre of the heart again where you worked two stitches together, work three together on this round.

When you have finished one heart you will need to start all over again on the second side. I made two matching rainbow hearts but if you are using up scraps you could make the back of the cushion out of a single colour or just use whatever you have!

Making up the Heart Cushion

Now you should have two completed, edged hearts. I suggest you tie in the ends at this point but bear in mind that the back of this work is the inside of a cushion which nobody should ever see so there is no real need to make these ends disappear. The thickness of the yarn makes tying in ends neatly quite difficult. All you really need to do is secure them and make sure that nothing is visible from the front.

To finish the cushion you need to join the two hearts together. I used black for this – if your edging is neat this is a really quick job! Put the two hearts back to back ie with the sides you want to see on the outside. Join in black yarn (or your choice) and work DC (SC in US terms) all the way round putting your hook through the white edge stitches on both sides of the cushion. As you form your DC (SC in US terms) you will see that you are joining front to back.

Don’t join all the way round until you have put your cushion pad into the heart! I have done this – it made me feel very silly but it is easy to forget when you are on the downhill slopes towards a finished project!!

I have a separate post on creating the cushion pad which you can read here. If you want to be able to take your cushion cover off to wash it then you should leave an opening in the side which will need a separate fastening. I would recommend leaving a section of the bottom of one side of the heart. When you are edging just drop the back for a section so that you are only working into the white edge stitches on one heart.

My cushion has washable insides so I didn’t leave any openings to remove the cover.

I hope you like this heart cushion – the rainbow motif has come to stand for thank you to our nurses since I made mine! I have changed my social media image to this heart as my own small thank you. How our world has changed these last few weeks. Here’s hoping we get back to happier times soon.

Happy crocheting!

Annie ๐Ÿ™‚

Filed Under: Crochet patterns Tagged With: crochet, crochet design, cushion, design, free crochet pattern, handmade, heart, quick crochet, quick makes, rainbow, rainbow heart chart

Crochet Hearts – three sizes

February 12, 2020 by A_Sticky_tape_and_string_girl 6 Comments

Here is an update to my crochet hearts pattern which gives you three sizes of heart to make. These lovely little motifs are super quick to make.

Crochet heart in three sizes - free pattern on my blog

You can use the hearts as card toppers or to decorate any craft project. If you add a safety pin to the back you could use these as a simple pin or broach. You could even turn them into earings! I recently used them to make charms as you can see below and read here. I also plan to sell them on my Etsy store if you would like some ready made!

Crochet Heart charm - quick make

The pattern will work in any yarn thickness or type. The ones shown here are in cotton DK and 4 ply but I have also made these in super chunky and used them in a block to make a blanket which you can see here.

Just before I share the pattern I want to share something else! I have decided 2023 will be the year I stop drinking alcohol. If you are interested in my journey and/or considering something similar you can read about it here.

Crochet Heart – UK terms

Size 1 – smallest heart (UK terms)

Make a magic loop, chain 3 and working into the magic loop, 3 dtr, 3tr, chain 1, 1dtr, chain 1, 3tr, 3dtr, chain 2, slip stitch into magic loop and pull the thread to close the centre of the heart. And you are done!

Size 2 – medium heart (UK terms)

Make a small heart as above then…..

Second round – 2 sl stitch into the gap behind the three chain from the first round.  3dc into the next stitch (top of the left side of the heart), 3 dc into the next stitch and 2 dc into the following stitch.   Work 4 dc to take you to the bottom loop of the heart.  3dc into the bottom stitch of the heart, 4 dc, work 2dc, 3dc, 3dc into the next three stitches, 2 sl stitches and one final slip stitch into the centre of the heart. You should have a medium heart!

Size 3 – largest heart (UK terms)

Make a medium heart as above then…..

Third round – 2 slip stitches then 2dc into the next five stitches (around the top of the left side of the heart) 7 dc, 3dc into the bottom stitch of the heart, 7dc, 2dc into the next five stitches, 2 slip stitches and finish off to complete the largest heart.

Crochet Heart – US terms

Size 1 – smallest heart (US terms)

Make a magic loop, chain 3 and working into the magic loop, 3TRC, 3DC, chain 1, 1TRC, chain 1, 3DC, 3TRC, chain 2, slip stitch into magic loop and pull the thread to close the centre of the heart. Your small heart is complete!

Size 2 – medium heart (US terms)

Make a small heart as above then…..

Second round – 2 sl stitch into the gap behind the three chain from the first round.  3SC into the next stitch (top of the left side of the heart), 3 SC into the next stitch and 2SC into the following stitch.   Work 4SC to take you to the bottom loop of the heart.  3SC into the bottom stitch of the heart, 4SC, work 2SC, 3SC, 3SC into the next three stitches, 2 sl stitches and one final slip stitch into the centre of the heart. Stop here if you wanted to make a medium heart – you are done!

Size 3 – largest heart (US terms)

Make a medium heart as above then…..

Third round – 2 slip stitches then 2SC into the next five stitches (around the top of the left side of the heart) 7 SC, 3SC into the bottom stitch of the heart, 7SC, 2SC into the next five stitches, 2 slip stitches and finish off to complete the large heart.

I hope you enjoy this quick make. Let me know what you use yours for. I am always on the look out for ideas!!

HOT off the press – Just added a new heart to the family. This one is a bigger version which works up to 10cm across in a chunky yarn. You can find the pattern here. Hope you like it ๐Ÿ™‚

happy crocheting!

Annie ๐Ÿ™‚

Filed Under: Quick makes Tagged With: card topper, crochet, crochet hearts, crochet motif, Free pattern, heart, heart card topper, hearts, quick crochet, quick makes

Heart Full of Rainbows – Free Crochet Chart

February 2, 2020 by A_Sticky_tape_and_string_girl Leave a Comment

This free crochet chart for a Heart Full of Rainbows Chart is destined to be a cushion pattern. At the moment it is in ‘work in progress’! The chart will work for any project needing a heart graphic where the tension is in similar proportions to the yarn I am using. To make up the heart as shown you need to work in DC (UK terms) or SC (US terms).

The yarn I have for my project is Lion Brand Yarns – Hometown USA. You can see their full range on the US website here. However I buy all my yarns from Woolwarehouse here in the UK. Note at this point in time I am not an affiliate of either business – I just like sharing what I like!

I picked this yarn because it has lovely bright rainbow colours and is very good quality for the price. I wanted to use a super chunky yarn and found only a limited number had all the colours of the rainbow!

The tension on the ball band for crochet on a 9mm hook, is 8 rows and 6.6 stitches to make a 10cm square. The chart would work equally well for knitting but the ratio is different so the shape of the heart would change. The knitting tension square for this yarn has 12 rows to 9 stitches. This means the heart would come out much longer and thinner if used for knitting. I would recommend reducing the rows in each colour by two to get back to a similar shape. I will be turning this into a cushion pattern and will post on that separately with full instructions.

Free Download

Here is the Heart full of Rainbows free crochet chart.

Click on the link below to download the chart.
Heart Full of Rainbows Chart (15977 downloads )

If this tension is not what you need I can adapt the chart quite quickly so let me know what tension you are looking for and I will do my best to work up a chart for you. Leave a message below or email me with your tension requirement.

More free rainbow heart crochet projects

The cushion is a companion project to my Hearts and Rainbows blanket which you can see here. The finished blanket and cushion will be listed on my Etsy Store as will the pattern (once I create the final PDF version). You can get hold of the pattern sooner if you are happy to copy the colours from my photo. The blanket pattern is available for free here.

Filed Under: Crochet patterns Tagged With: crochet, crochet design, free crochet pattern, heart, hearts, rainbow, rainbow heart chart

  • Page 1
  • Page 2
  • Go to Next Page »

Footer

Newsletter

Copyright © 2026 ยท Genesis Sample on Genesis Framework ยท WordPress ยท Log in