• Skip to primary navigation
  • Skip to main content
  • Skip to footer

Stickytapeandstring

Created with WordPress managed by 1&1

  • Craft projects
    • craft business tips
    • craft blog
    • Crochet patterns
    • Upcycling
    • craft with kids
  • Blogging
    • New to blogging
    • Blog diary
  • Bullet Journal
  • About me
  • Welcome!!

Free pattern

Bunny and Carrot Crochet Block

February 28, 2021 by Annie Leave a Comment

Hello and thank you for visiting my little crochet blog.   This is the latest of my bunny themed patterns which were written with Easter in mind but actually work at any time of year.    This bunny and carrot crochet block measures 6 inches/15 centimetres square when worked in chunky yarn.    The pattern works in any weight of yarn but you need to check that the tension has the same proportions (ratio of rows to stitches) if you want it to come up square shaped.    Worst case you will create oblong shaped blocks which might be fine too ?

Bunny and Carrot Crochet Block – Materials

The block pictured here was worked in Stylecraft Special Chunky.   If you have read any of my recent posts you will know this is my current go to yarn.   There is a fab range of colours which you can see here at woolwarehouse which is where I normally buy all my yarn.    The block uses four colours a base colour which I will call Yarn A then a colour for the bunnies Yarn B (for bunny).   Finally, two colours for the carrots which I will call Yarn T for the carrot tops and Yarn C (for carrot) for the carrots themselves.

The colours I have used in the blocks in these photos are:

  • White – Yarn A
  • Mocha – Yarn B
  • Spice – Yarn C
  • Lime – Yarn T

This yarn uses a 6mm hook which means it grows nice and quickly!   In the worked examples I carry the yarn up the side of the work and you might notice that this is visible through the white.   To avoid this, if you don’t mind a few more ends, you can break the yarn and re-join.   You will need to work chain in Yarn A on the bunny and carrot rows though to provide the framework for the block.

Bunny and Carrot Crochet Block – Instructions with UK crochet terms (for US terms please scroll down)

Foundation Chain

Each row of this block will have a starting chain and 21 stitches.   The bunny and carrot patterns use a repeat of three stitches with a one stitch gap and we will have an additional stitch at the edge to make the spacing work.   Chain 24 stitches for the foundation row. 

First Row

Starting into the fourth stitch from the hook, work a row of DC.   This should mean a row of 21DC will take you to the end of the chain.  Chain 2 and turn the work.

Second Row

Our starting chain of 2 forms the first stitch of the row so miss one and starting into the second stitch of the row of DCs again work a row of 21 DC then Chain 2 and turn the work.   If you find it is taking you more than 21DC to complete the row, you might be starting into the first rather than second stitch.  

Third and Fourth Rows

Repeat rows 1 and 2 so that you have four rows of DC with lovely straight edges!   At the end of the fourth row do not work the 2 Chain stitches.   Turn the work and we will put those two chain stitches at the start of the fifth row.

Fifth Row

As you work the first of your two chain to start the row, take up yarn B and lay it across yarn A behind the hook so that when you work the chain, Yarn B is caught up and joined into the work.   Work 2CH then one DC in Yarn A carrying Yarn B along the top of the work as shown.    Pick up Yarn B and work the bunny ear stitch which you will find in the posts via the links below.

Crochet Bunny Stitch – UK crochet terms

Crochet Bunny Stitch – US crochet terms

The bunny ear stitch has a four stitch repeat which should give you five sets of ears then a final 2DC in Yarn A to complete the row.   

If you are working these blocks as shown with the minimum of ends and do not mind the appearance of the carried yarn then break off yarn A at the end of this row and work 4 chain in Yarn B.  

If however, you are not carrying yarn then break off Yarn B and work 3 chain in Yarn A and one in yarn B ready to start the row of bunny bodies.

Sixth Row

Work a row of bunny bodies as shown in the Bunny Stitch post.    This row is worked entirely in Yarn B if you are carrying the yarn.   At the end of the row CH5 and slip stitch to join to the end of the row below and break off Yarn B

If you are not carrying the yarn then join in Yarn B for each bunny and break off Yarn B after each bunny body, working the three chain between in Yarn A.   At the end of the row you will need to make 5CH in Yarn A and join to the row below then break off Yarn A.

Seventh Row

Remember to turn the work so that you are on the right side.   The tail of the starting chain should be on your left as you look at the block.   Join in Yarn A to the gap beside the last bunny and working around the chain stitches make 2CH then 2DC.   Into each of the gaps between bunny bodies work 4DC until the end of the row when you need to work 3DC into the final gap.   Chain 2 and turn the work.

Eighth Row

As with Row 4 work a row of DC starting into the second stitch and it should take you 21DC to complete the row.   Turn the work ready to add in Yarn T for the carrot tops.

Ninth Row

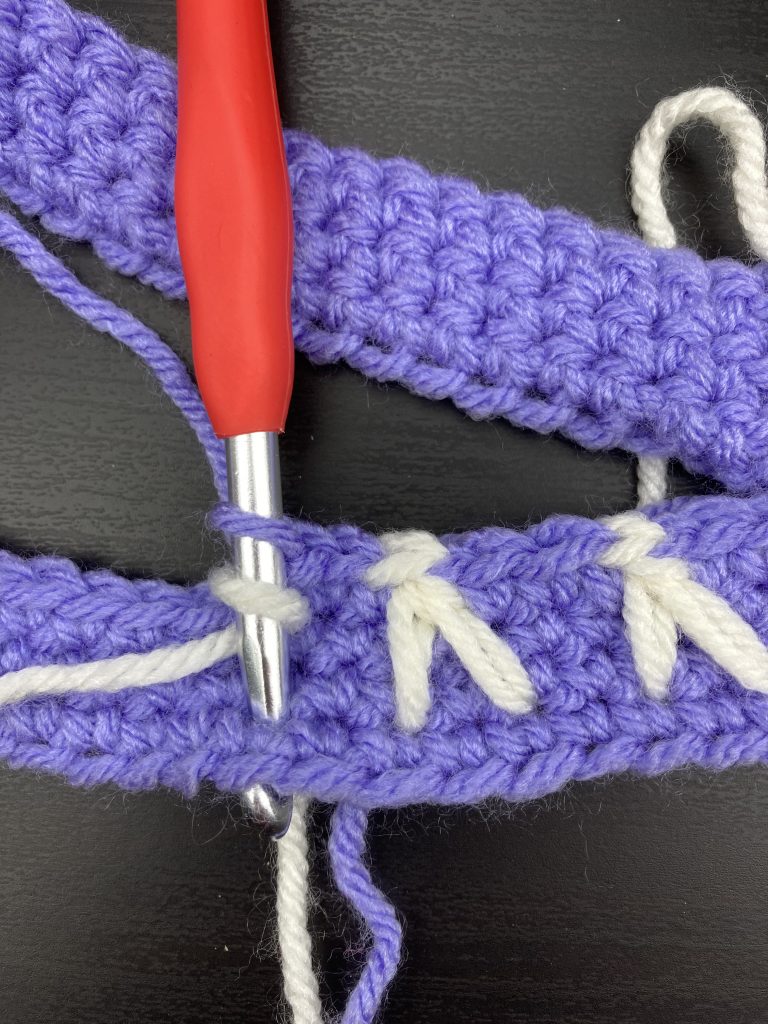
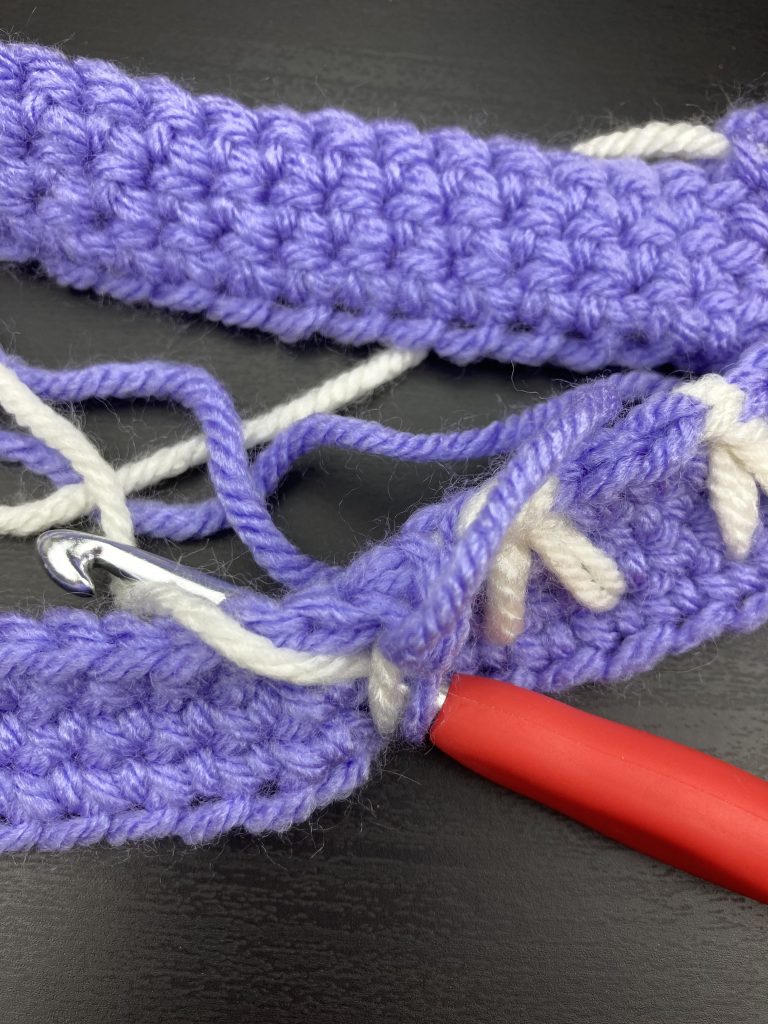
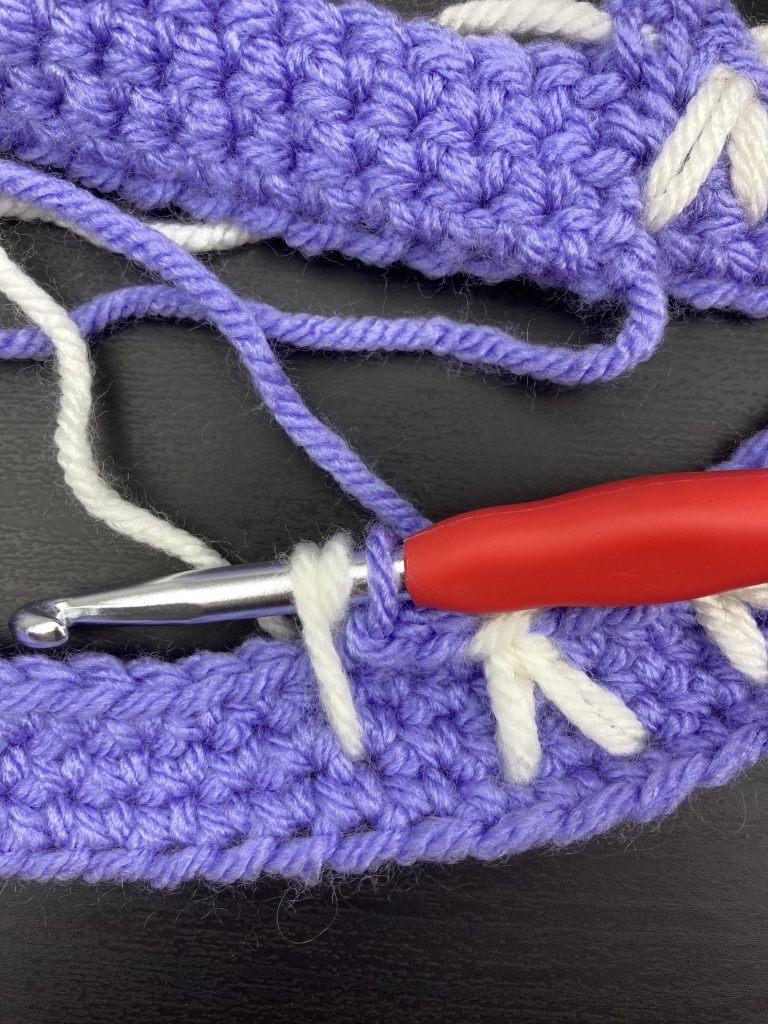
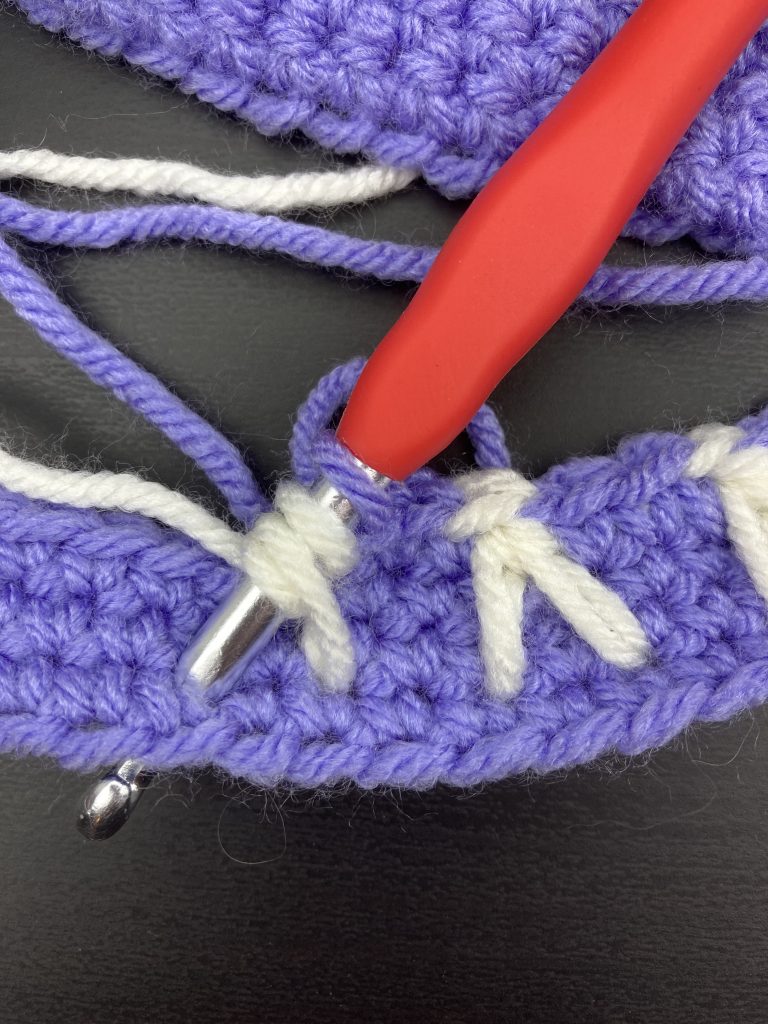
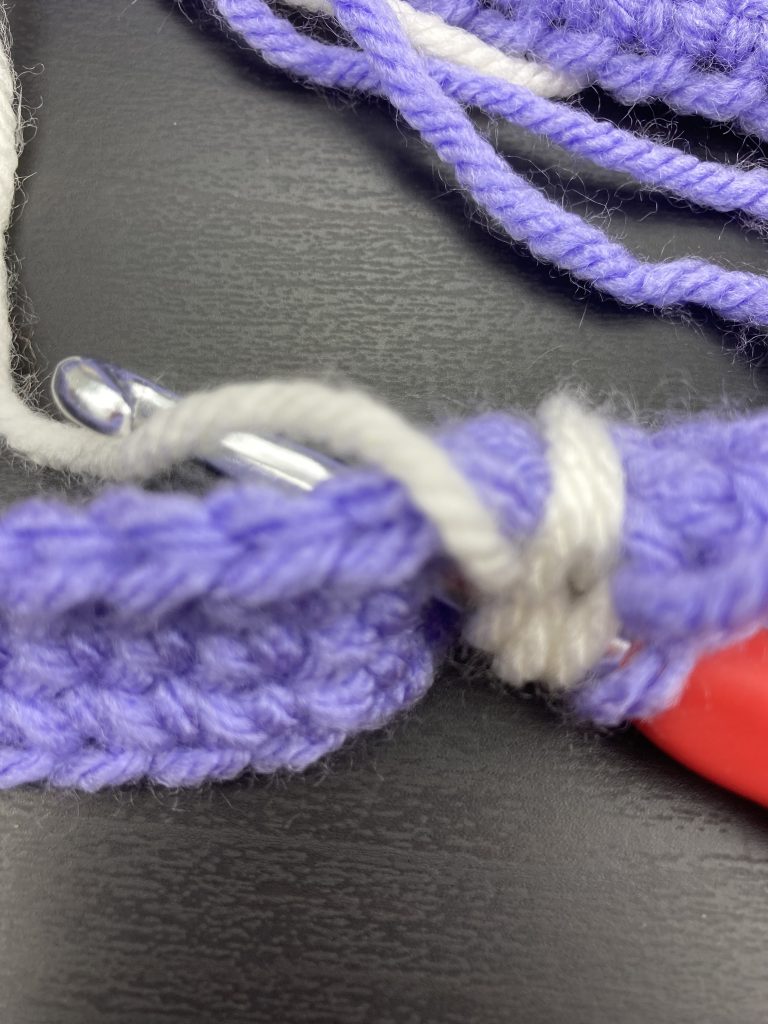
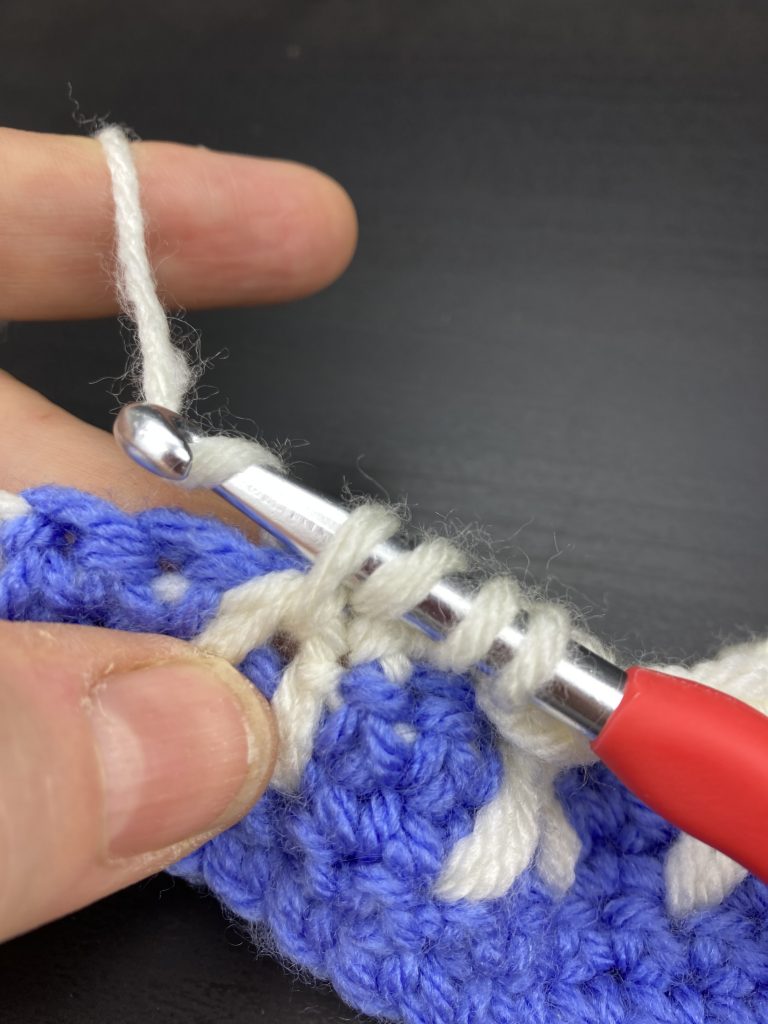
Laying Yarn T over Yarn A work one Chain to join in the yarn then work another two chain in Yarn A.   Work 1Htr into the second stitch on the row below, then * work one chain in Yarn T.    The carrot top is a two stitch treble cluster. 
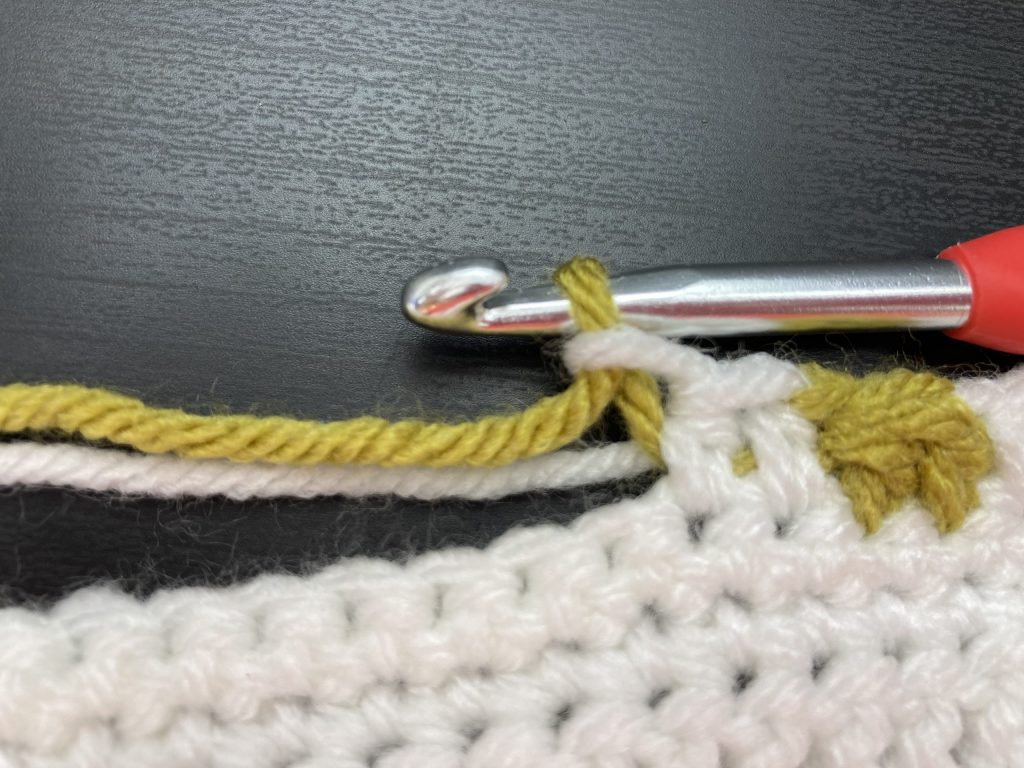
Starting the carrot tops
Start each carrot top with a chain in Yarn T

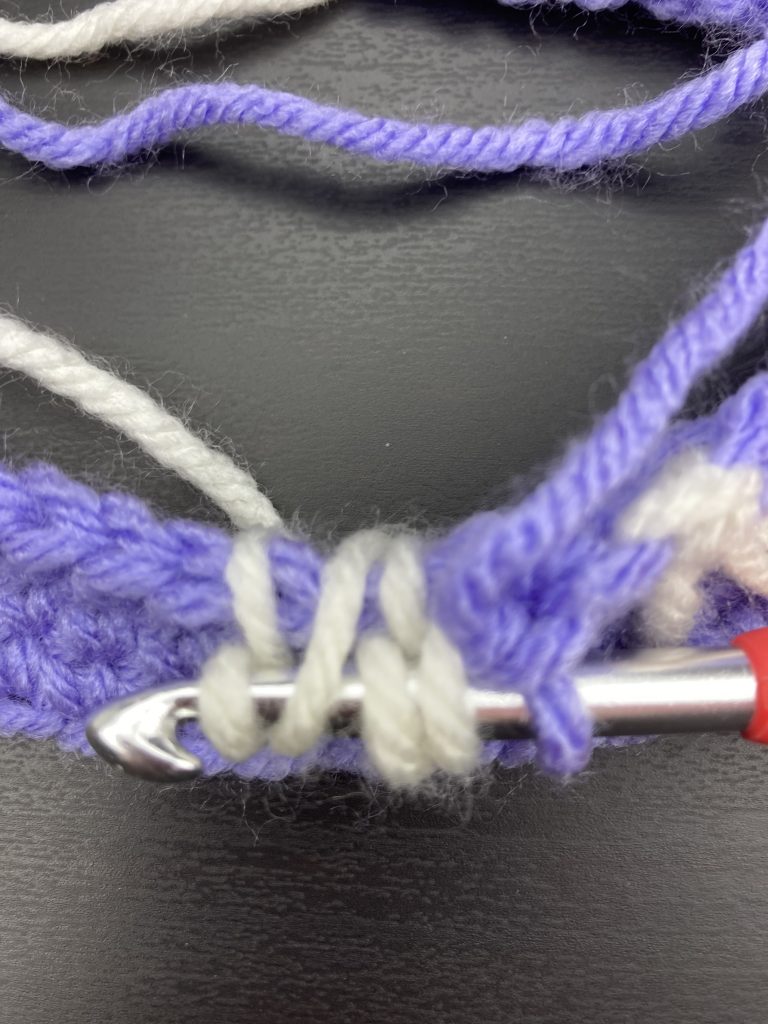
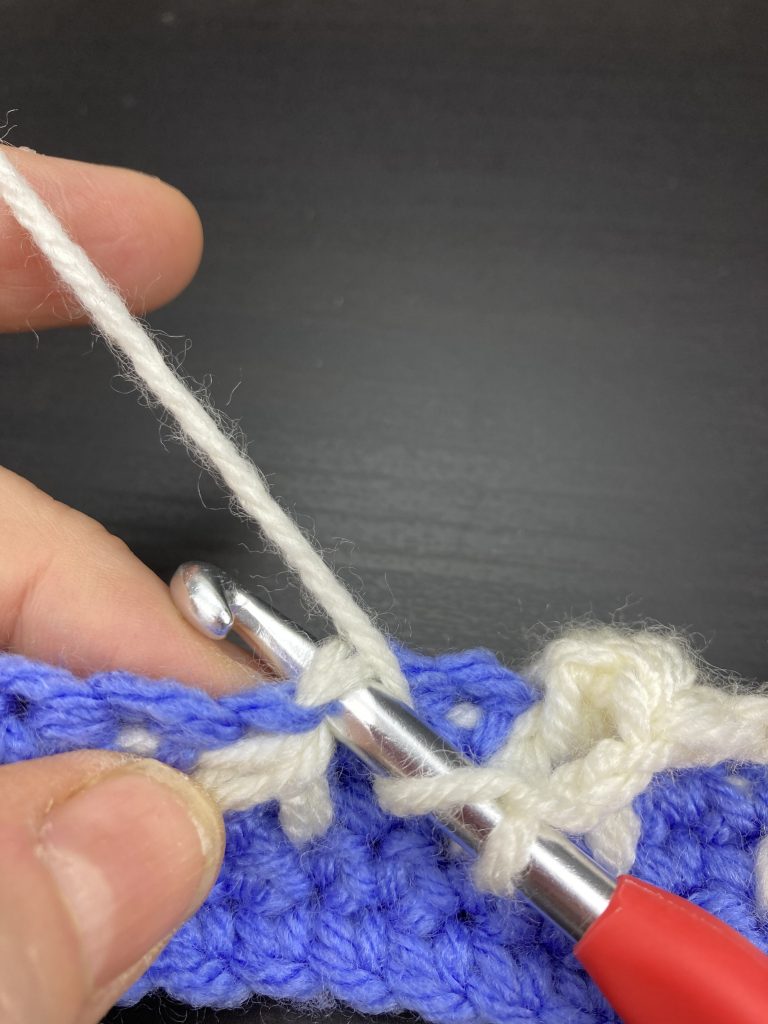
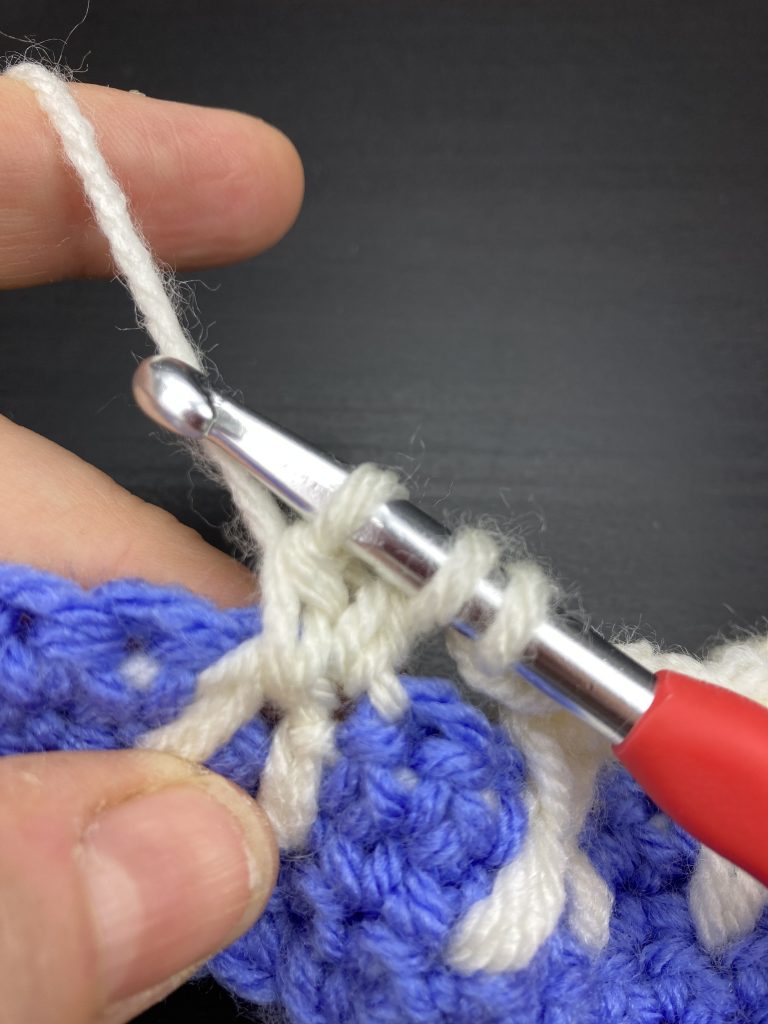
Wrap Yarn T around the hook and put the hook into the third stitch on the row then wrap the yarn round again and pull back through.  Next, wrap Yarn T around again and pull through the first two loops on the hook as though you were working a Tr.  
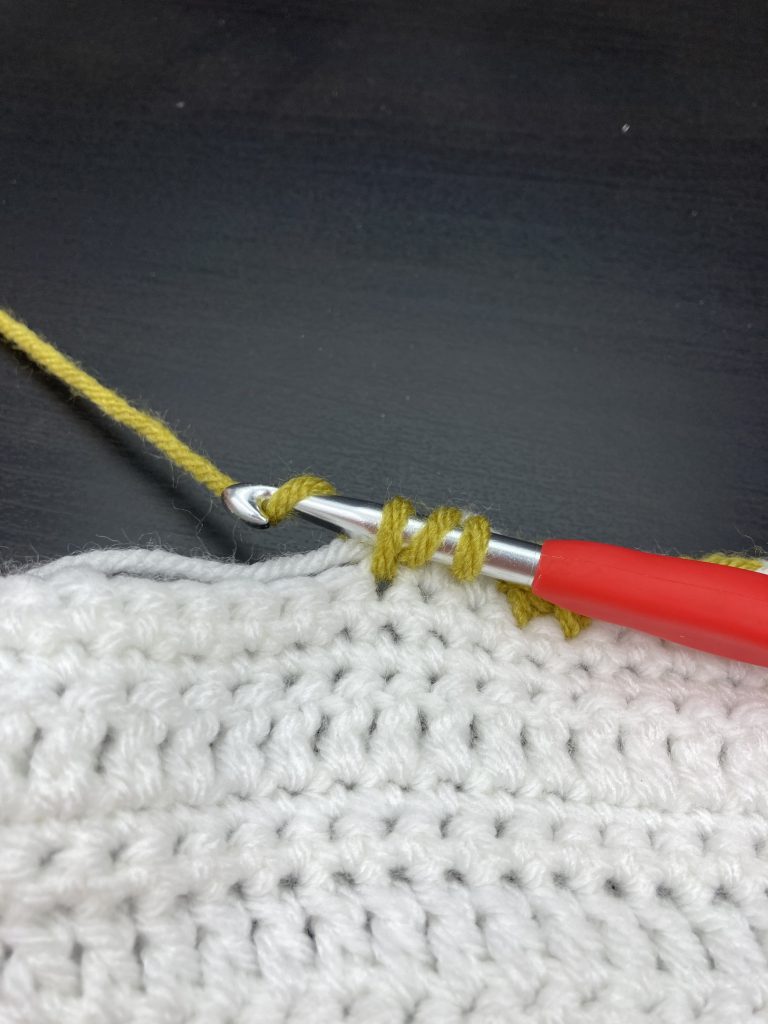
Working the first stitch of the carrot top
working the first stitch of the cluster

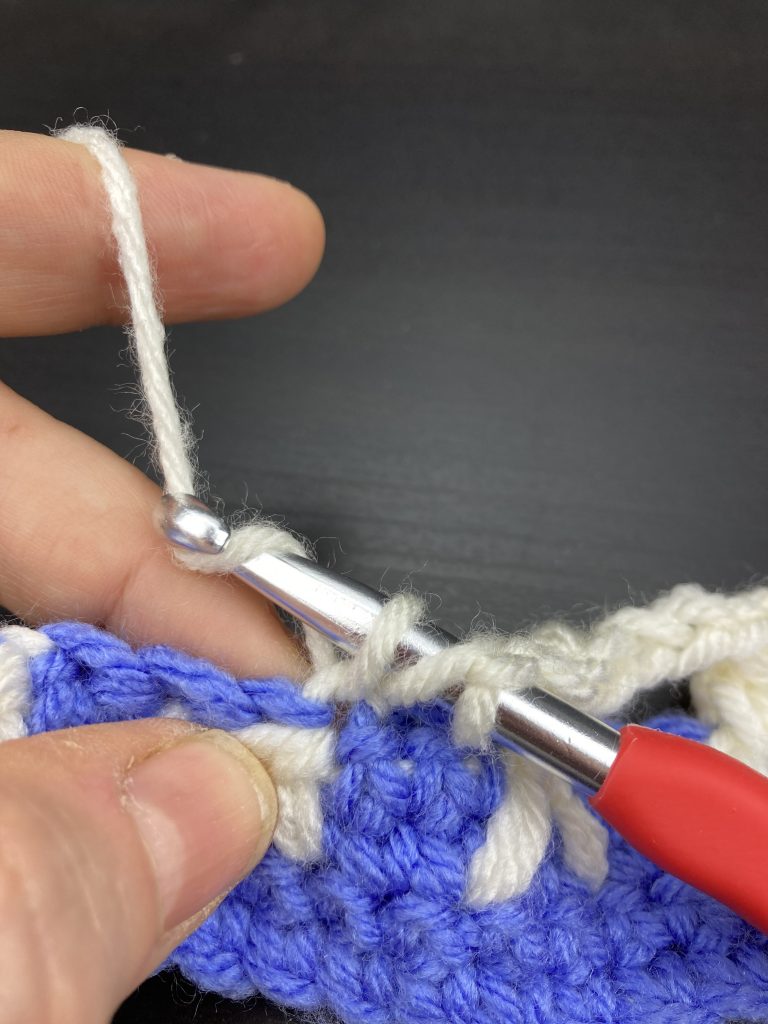
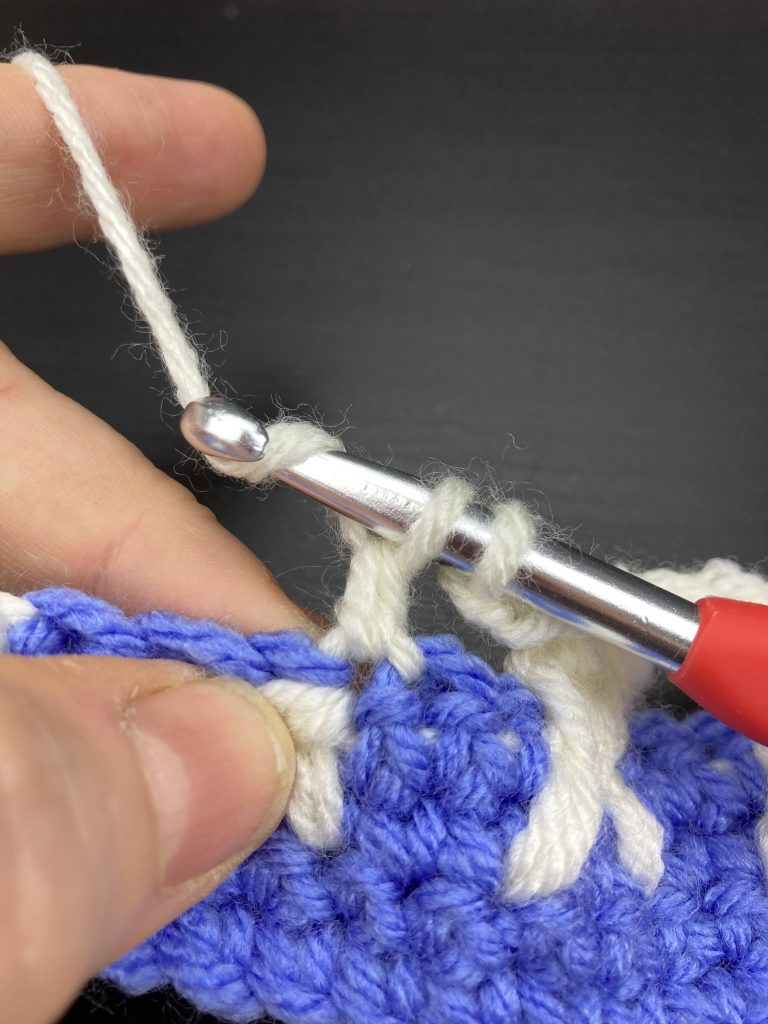
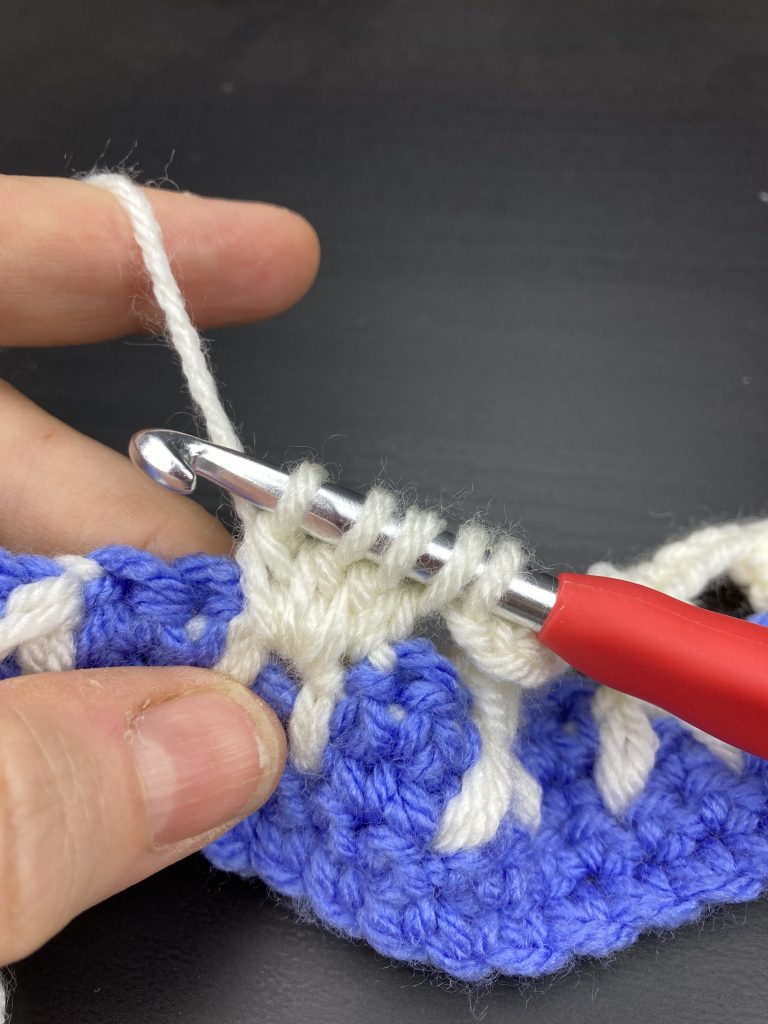
Wrap Yarn T around the hook and put the hook into the fourth stitch on the row and again wrap Yarn T around pull back through, wrap Yarn T round again and pull through the first two loops on the hook. Finally wrap Yarn T round the hook again and pull back through all the loops on the hook.  
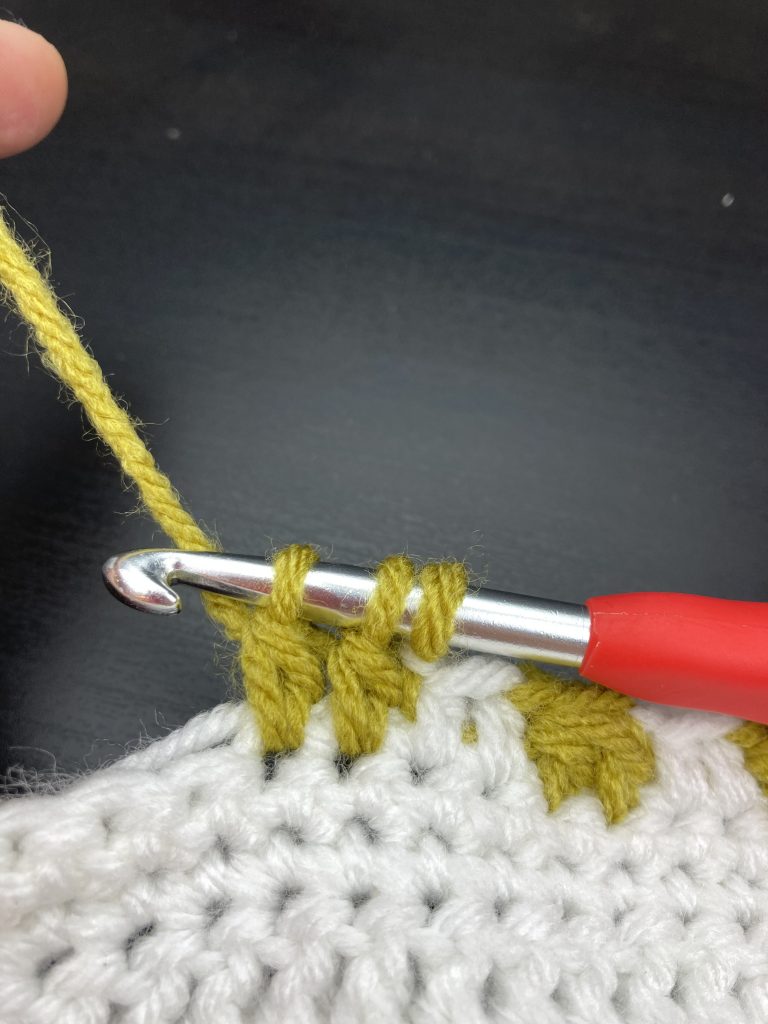
final stage of carrot top
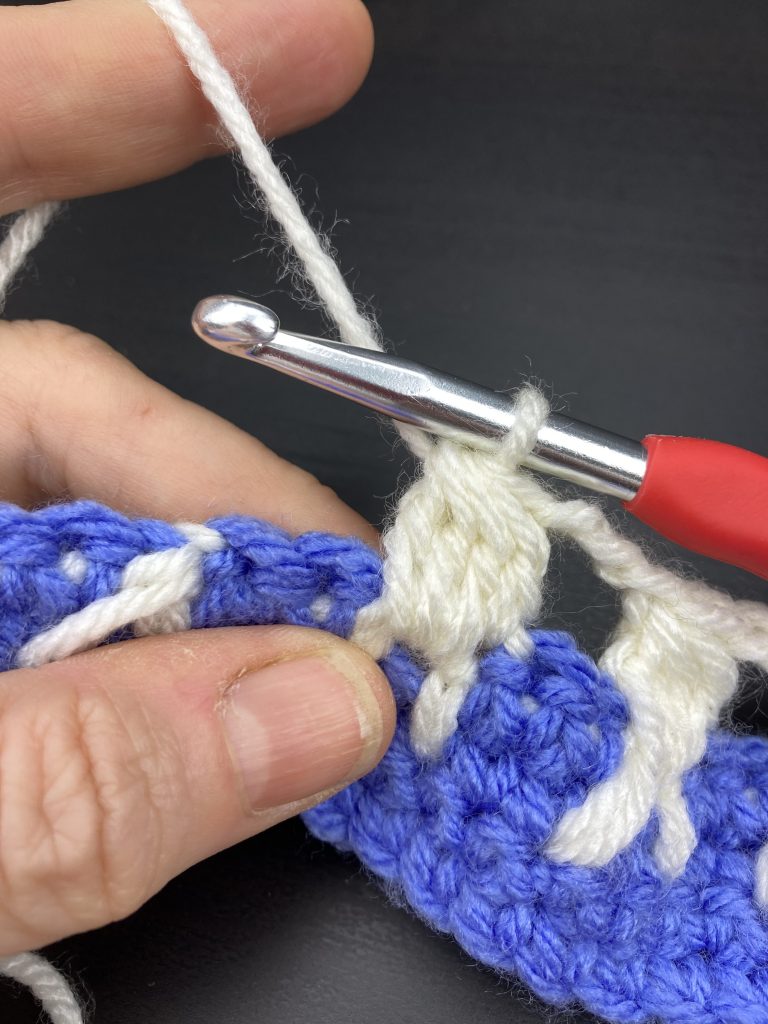
Carrot top just before the final yarn round and pull through to form the cluster

Gently pull Yarn A and Yarn T to ensure the tension is good then pick up Yarn A and work 2 HTR.   Repeat from * to the end of the row.

This row sounds complicated but once you get into the swing of it it is actually quite a quick row to work.   I will aim to put up a video once I can work out the technology but in the meantime I hope the photographs help!

At the end of this row break off Yarn T

Tenth Row – wrong side of the work

This row presents the same choice as with the bunny bodies row.   It is similar in that we will be working a row of TR clusters this time in Yarn C.  

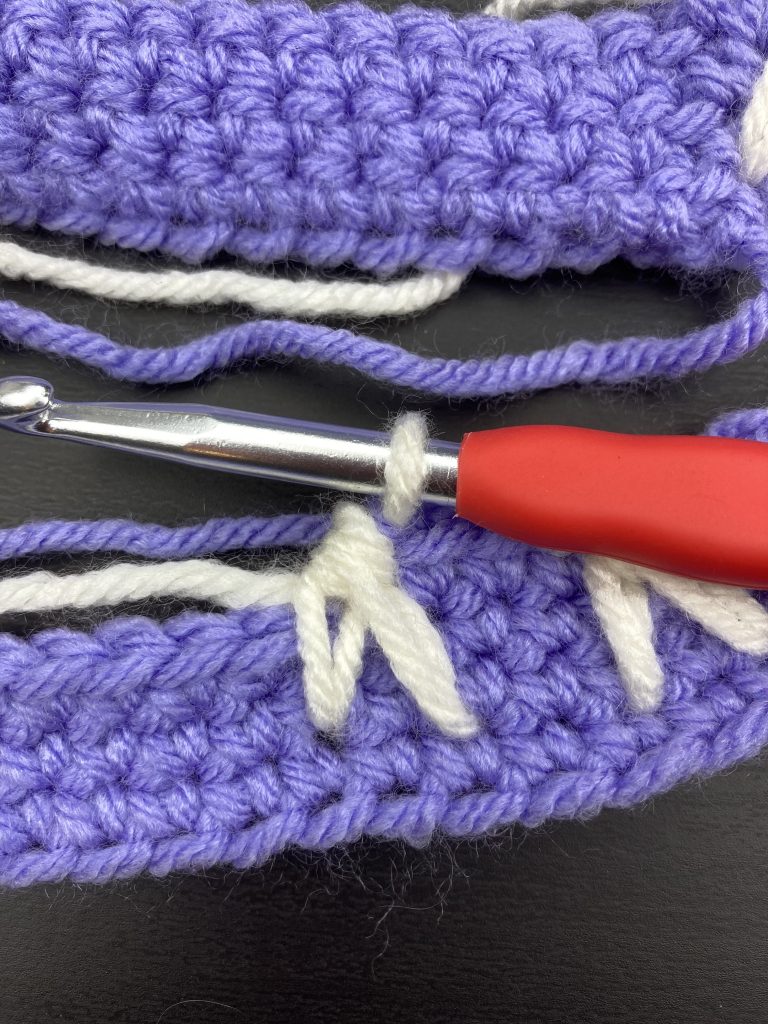
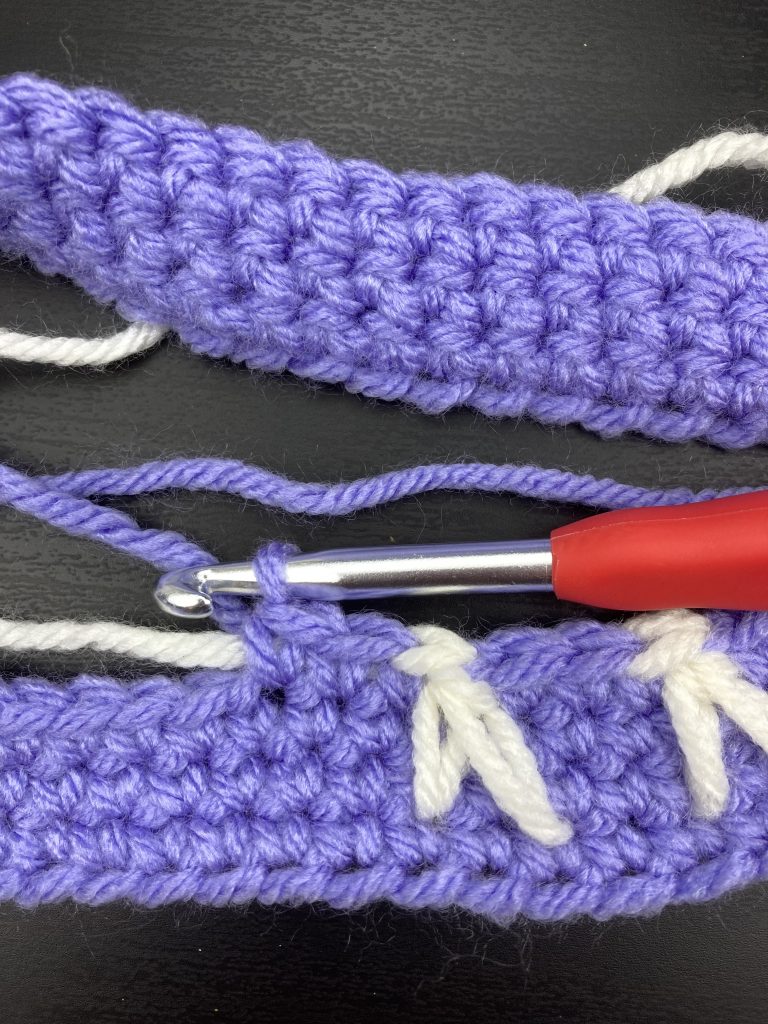
If you are carrying the yarn and ok with the way that that looks then you need to break off Yarn A, join in Yarn C and work 4CH.    Make the carrots by working a four treble cluster in the same way you worked the cluster for the bunny bodies.   This time the first stitch goes into the first stitch on the previous row in Yarn T as shown below.
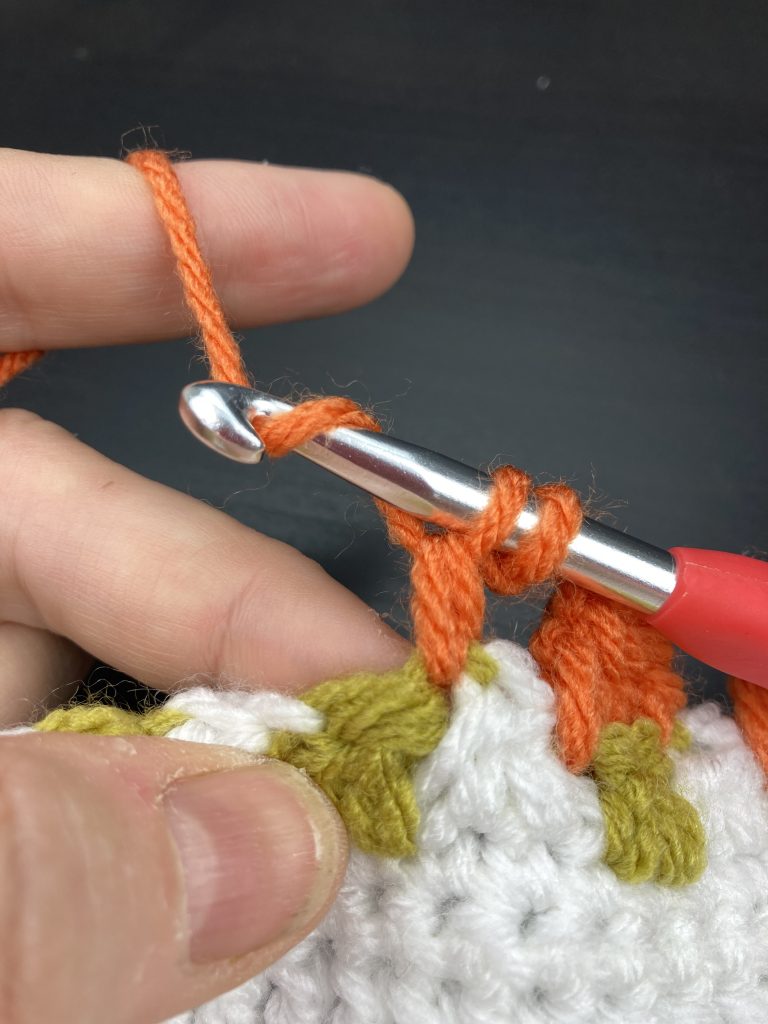
adding the carrot stage 1
adding the first of the cluster of stitches that make the carrot

The second and third stitches go into the next and larger stitch in Yarn T on the row below.  Finally work the last Tr of the cluster into the gap beneath the chain stitch in Yarn T just on the other side of the carrot top.   Wrap the yarn around the hook and pull back through all the stitches till you have one loop on the hook.
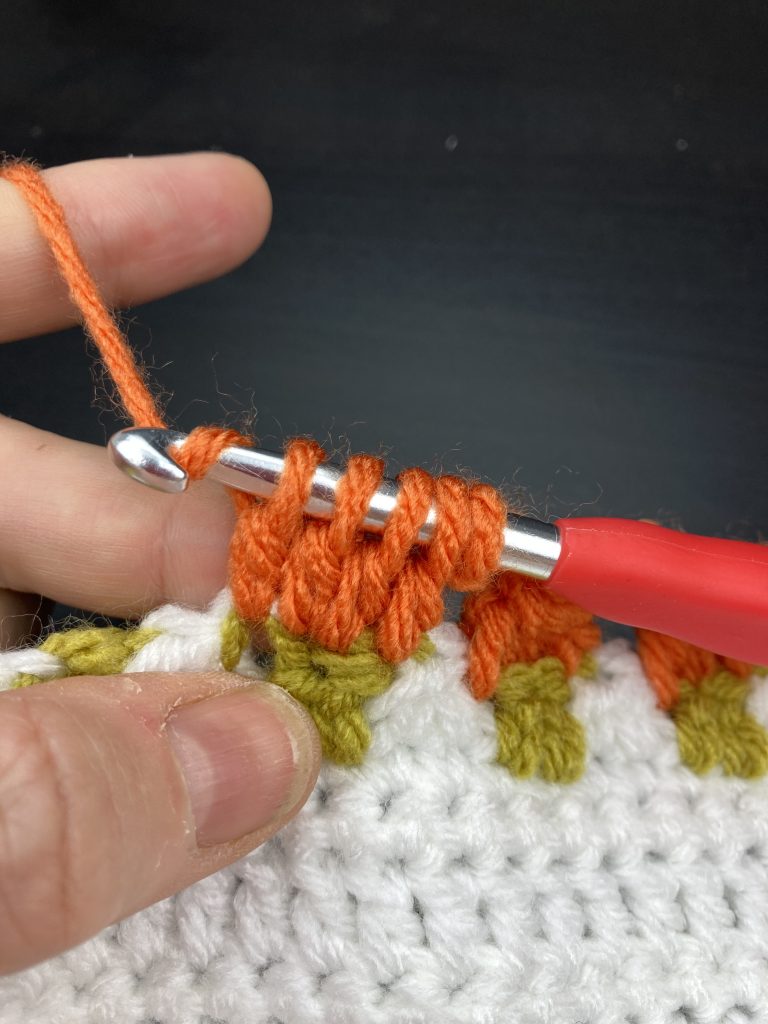
four stitch cluster carrot
four stitches that form the carrot. Just before final yarn round and pull through

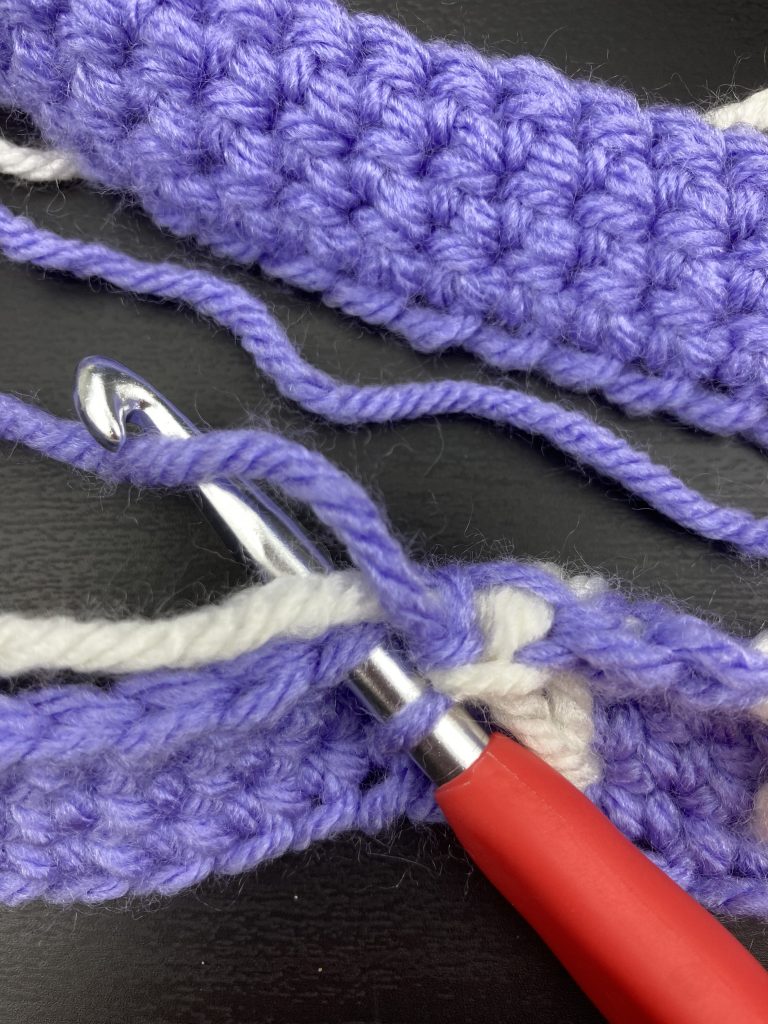
Work three chain and start the next carrot!   At the end of the row CH4 and join to the end of the previous row.
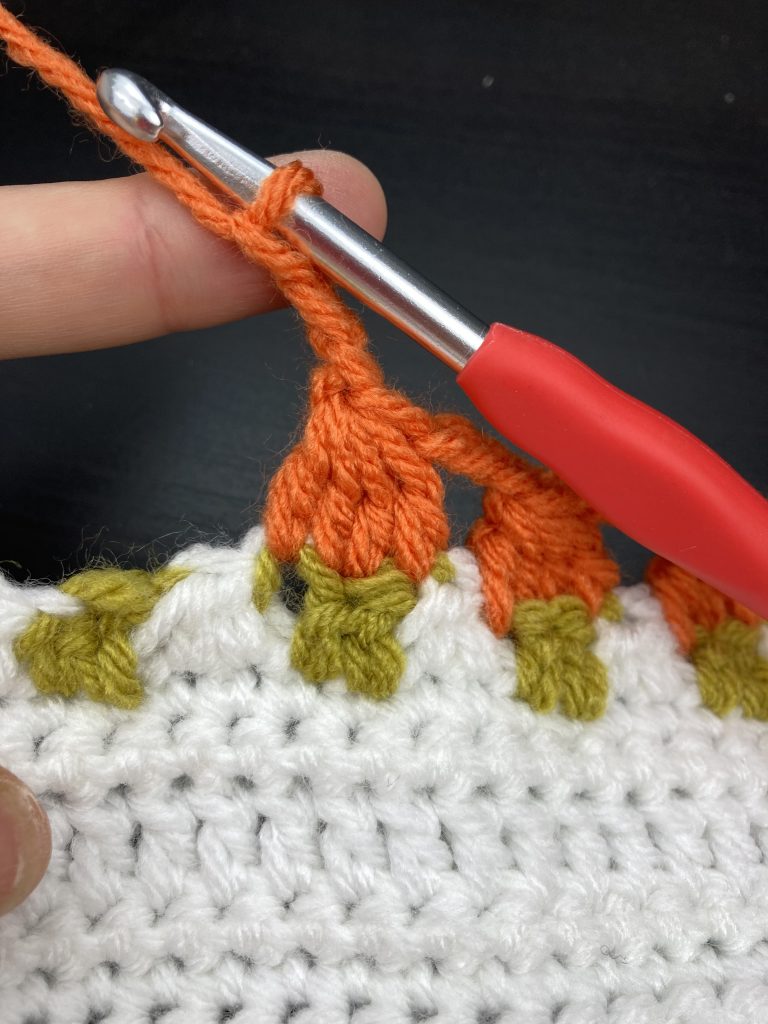
chain stitch after carrot stitch
chain 3 between each carrot

If you are not carrying the yarn then work 4CH in Yarn A and join in Yarn C separately for each carrot, working the 3CH between carrots in Yarn A.   As I said, this method will result in A LOT of ends to finish off!

Eleventh Row

Work this row as Row 7 again making sure you are on the right side of the work.

Row 12 – 14

Work these in Yarn A starting with 2CH then work 21DC which should complete the row.

Row 15 – 16

Repeat rows five and six to add another row of bunnies.

Row 17 and 18

Repeat rows seven and eight.

Row 19

Work a final row of DC with 2CH to start the row.  Leave Yarn A attached and you are ready to work the border.

Bunny and Carrot Crochet Block – Border worked on the right side.

First round

CH2 then turn the block so that the bunnies are running vertically and you are working along the side of the block.   Along the side of the block work 21 DC evenly spaced along the piece.   As a guide you should have worked 10 DC by the time you are alongside the middle of the carrot row.  

At the end of the row chain 2 turn the block through 90 degrees and work 22 DC into the starting row, ending the row with 2CH.

Turn the block again and work 22 DC spaced evenly along the other second side of the block.   At the end of the row CH2 and work 22 DC along the top of the block then CH2 and slip stitch to join to the starting chain.

Second Round

Work a round of DC with 2CH at each corner.  Start the round with 2CH and end with a slip stitch to join.
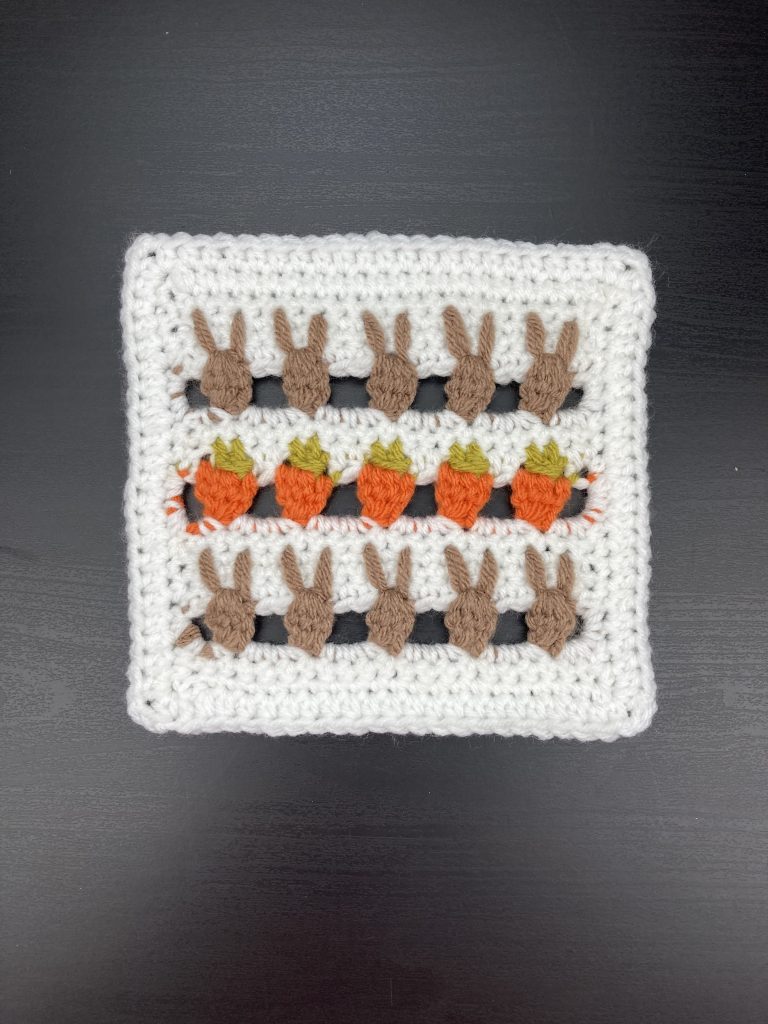
Bunny and Carrot Crochet Block

Bunny and Carrot Crochet Block – Instructions with US crochet terms (for UK terms please scroll up)

Foundation Chain

Each row of this block will have a starting chain and 21 stitches.   The bunny and carrot patterns use a repeat of three stitches with a one stitch gap and we will have an additional stitch at the edge to make the spacing work.   Chain 24 stitches for the foundation row. 

First Row

Starting into the fourth stitch from the hook, work a row of SC.   This should mean a row of 21SC will take you to the end of the chain.  Chain 2 and turn the work.

Second Row

Our starting chain of 2 forms the first stitch of the row so miss one and starting into the second stitch of the row of SCs again work a row of 21 SC then Chain 2 and turn the work.   If you find it is taking you more than 21SC to complete the row, you might be starting into the first rather than second stitch.  

Third and Fourth Rows

Repeat rows 1 and 2 so that you have four rows of SC with lovely straight edges!   At the end of the fourth row do not work the 2 Chain stitches.   Turn the work and we will put those two chain stitches at the start of the fifth row.

Fifth Row

As you work the first of your two chain to start the row, take up yarn B and lay it across yarn A behind the hook so that when you work the chain, Yarn B is caught up and joined into the work.   Work 2CH then one SC in Yarn A carrying Yarn B along the top of the work as shown.    Pick up Yarn B and work the bunny ear stitch which you will find in the posts via the links below.

Crochet Bunny Stitch – US crochet terms

The bunny ear stitch has a four stitch repeat which should give you five sets of ears then a final 2SC in Yarn A to complete the row.   

If you are working these blocks as shown with the minimum of ends and do not mind the appearance of the carried yarn then break off yarn A at the end of this row and work 4 chain in Yarn B.  

If however, you are not carrying yarn then break off Yarn B and work 3 chain in Yarn A and one in yarn B ready to start the row of bunny bodies.

Sixth Row

Work a row of bunny bodies as shown in the Bunny Stitch post.    This row is worked entirely in Yarn B if you are carrying the yarn.   At the end of the row CH5 and slip stitch to join to the end of the row below and break off Yarn B

If you are not carrying the yarn then join in Yarn B for each bunny and break off Yarn B after each bunny body, working the three chain between in Yarn A.   At the end of the row you will need to make 5CH in Yarn A and join to the row below then break off Yarn A.

Seventh Row

Remember to turn the work so that you are on the right side.   The tail of the starting chain should be on your left as you look at the block.   Join in Yarn A to the gap beside the last bunny and working around the chain stitches make 2CH then 2SC.   Into each of the gaps between bunny bodies work 4SC until the end of the row when you need to work 3SC into the final gap.   Chain 2 and turn the work.

Eighth Row

As with Row 4 work a row of SC starting into the second stitch and it should take you 21SC to complete the row.   Turn the work ready to add in Yarn T for the carrot tops.

Ninth Row

Laying Yarn T over Yarn A work one Chain to join in the yarn then work another two chain in Yarn A.   Work 1HDC into the second stitch on the row below, then * work one chain in Yarn T.    The carrot top is a two stitch DC cluster. 

Starting the carrot tops
Start each carrot top with a chain – YarnT

Wrap Yarn T around the hook and put the hook into the third stitch on the row then wrap the yarn round again and pull back through.  Next, wrap Yarn T around again and pull through the first two loops on the hook as though you were working a DC.  

Working the first stitch of the carrot top
working the first stitch of the cluster

Wrap Yarn T around the hook and put the hook into the fourth stitch on the row and again wrap Yarn T around pull back through, wrap Yarn T round again and pull through the first two loops on the hook. Finally wrap Yarn T round the hook again and pull back through all the loops on the hook.  

final stage of carrot top
Carrot top just before the final yarn round and pull through to form the cluster

Gently pull Yarn A and Yarn T to ensure the tension is good then pick up Yarn A and work 2 HDC.   Repeat from * to the end of the row.

This row sounds complicated but once you get into the swing of it it is actually quite a quick row to work.   I will aim to put up a video once I can work out the technology but in the meantime I hope the photographs help!

At the end of this row break off Yarn T

Tenth Row – wrong side of the work

This row presents the same choice as with the bunny bodies row.   It is similar in that we will be working a row of 4DC clusters this time in Yarn C.  

If you are carrying the yarn and ok with the way that that looks then you need to break off Yarn A, join in Yarn C and work 4CH.    Make the carrots by working a four treble cluster in the same way you worked the cluster for the bunny bodies.   This time the first stitch goes into the first stitch on the previous row in Yarn T as shown below.

adding the carrot stage 1
adding the first of the cluster of stitches that make the carrot

The second and third stitches go into the next and larger stitch in Yarn T on the row below.  Finally work the last DC of the cluster into the gap beneath the chain stitch in Yarn T just on the other side of the carrot top.   Wrap the yarn around the hook and pull back through all the stitches till you have one loop on the hook.

four stitch cluster carrot
four stitches that form the carrot. Just before final yarn round and pull through

Work three chain and start the next carrot!   At the end of the row CH4 and join to the end of the previous row.

chain stitch after carrot stitch
chain 3 between each carrot

If you are not carrying the yarn then work 4CH in Yarn A and join in Yarn C separately for each carrot, working the 3CH between carrots in Yarn A.   As I said, this method will result in A LOT of ends to finish off!

Eleventh Row

Work this row as Row 7 again making sure you are on the right side of the work.

Row 12 – 14

Work these in Yarn A starting with 2CH then work 21SC which should complete the row.

Row 15 – 16

Repeat rows five and six to add another row of bunnies.

Row 17 and 18

Repeat rows seven and eight.

Row 19

Work a final row of SC with 2CH to start the row.  Leave Yarn A attached and you are ready to work the border.

Bunny and Carrot Crochet Block – Border worked on the right side.

First round

CH2 then turn the block so that the bunnies are running vertically and you are working along the side of the block.   Along the side of the block work 21 SC evenly spaced along the piece.   As a guide you should have worked 10 SC by the time you are alongside the middle of the carrot row.  

At the end of the row chain 2 turn the block through 90 degrees and work 22 DC into the starting row, ending the row with 2CH.

Turn the block again and work 22 SC spaced evenly along the other second side of the block.   At the end of the row CH2 and work 22 SC along the top of the block then CH2 and slip stitch to join to the starting chain.

Second Round

Work a round of SC with 2CH at each corner.  Start the round with 2CH and end with a slip stitch to join.

Bunny and Carrot Crochet Block

There you have it – a completed Bunny and Carrot Crochet Block.    I hope you like it.   I plan to use it in a baby blanket so will be trialling it in DK and also in an Easter throw.

If you like the bunny stitch there are a few other patterns I have already put out that use this stitch.   These include headbands and hats with a scarf and beanie hat to follow.    Please join my mailing list or check back in here another day to find my latest free patterns.   Happy crocheting!

Annie ?
Filed Under: Crochet patterns Tagged With: bunny crochet, crochet, crochet afghan, crochet blanket, crochet block, crochet lapghan, crochet square, easter, Easter Bunny, Easter crochet, free crochet pattern, Free pattern, Rabbit crochet

Crochet Bunny Stitch using US crochet terms

February 16, 2021 by Annie Leave a Comment

Hello and thank you for visiting my blog. I am really excited to be sharing with you this new free pattern for crochet bunny stitch using US crochet terms. The stitch is a bit fiddly at first but I promise you that you will speed up once you get into the swing of it. There are lots of photos below to help you follow the instructions and I am planning to provide a video tutorial eventually. I don’t currently know how to do those (sorry!) but I am working on it.

I have a series of posts planned to share free patterns I have designed using the crochet bunny stitch. At the moment these include headbands, cushion covers and two types of hat. I am also working on an Easter blanket pattern and a bunny block which will be available on my blog later in the year. Please keep checking back or sign up to my mailing for these.

First things first. The pictures here show the stitch being worked in Stylecraft Special Chunky yarn using a 6mm hook. I buy all my yarn from Woolwarehouse because I love love love their website, range and service. You will need two colours for this stitch. One for the background which we will call yarn A and one for the bunnies, yarn B.

Free Pattern for Crochet Bunny Stitch using US crochet terms (for UK terms follow this link)

Foundation row

This stitch uses a repeat of four stitches so make your foundation chain a multiple of four stitches plus a minimum of three. This will allow you to have three plain stitches at either end of the work, after the last bunny! If you want a wider border at either side of your bunnies then add more stitches to your chain. The bunny sits on the third stitch of the repeat and his ears are on stitches two and four.

When you are happy with the length of your foundation chain, chain two more and turn. These two chain stitches form the first stitch on the following row.

First row

Work a row of SC starting by working into the third chain from the hook then at the end of the row chain two and turn.

Second row

Work a row of SC, starting by working into the second stitch on the row below then at the end of the row, chain two and turn.

Third row

Work a row of SC, starting by working into the second stitch on the row below then at the end of the row, join in yarn B by placing it across yarn A as you chain two and turn.

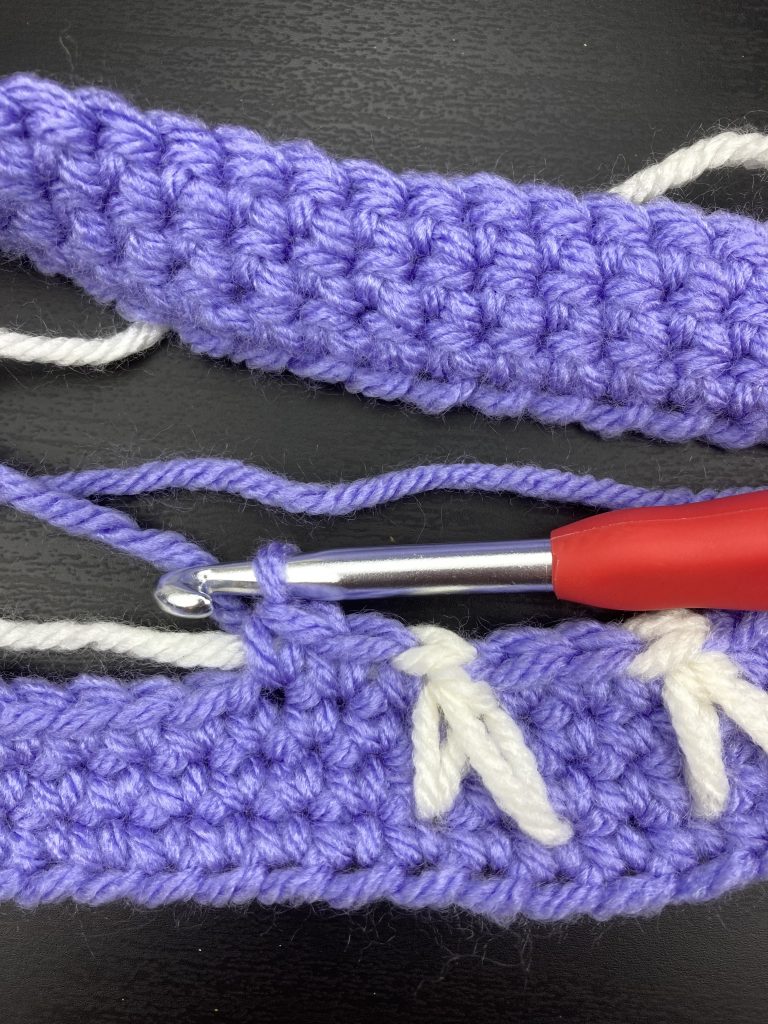
Time to get interesting! On this next row we will add the ears 🙂 We will be alternating yarn A and yarn B. Take your time with this row and make sure that each time you switch yarn the tension is even. Place the yarn that is not being used along the top of the work. This allows your stitches to enclose it and it is carried along but hidden, as you can see in the pictures below.

Fourth row

Work two SC in yarn A, starting into the second stitch of the row. Remember to place yarn B against the top of the work as you work each SC. You can see in the picture that yarn B is carried along the work. The picture below shows the positioning of the yarn as you start the stitch.

bunny stitch start point
shows the position of the yarn at the start of stitch
Now for the ears!

Hold yarn A against the top of the work then wrap yarn B around your hook. Insert your hook into the stitch two rows down and one stitch behind the position of your last stitch.

crochet bunny stitch step 1
crochet bunny stitch – yarn round and push hook in two rows down and one stitch back

With your hook through to the back of the work, wrap yarn B round the hook then pull back through to the front.

crochet bunny stitch step 2
wrap the yarn round the hook at the back of the work
crochet bunny stitch step 3
pull the yarn through to form the first ear!

You should have three loops on the hook, one in yarn A and two in yarn B.

Second Ear coming up!

Now wrap yarn B around the hook again then insert the hook into the stitch two rows down and two in front of the position of your first ear stitch. Note this will be two stitches along from the one you worked into in the first part of this stitch. This part is the second ear and you should see one clear stitch between the ears as shown below.

crochet bunny stitch step 4
yarn round and push the hook through two rows down and two along from the first ear
crochet bunny stitch step 5
wrap yarn round the hook at the back of the work

With your hook through to the back of the work, wrap yarn B round the hook and pull back through to the front. You should now have five loops on the hook, one in yarn A and four in yarn B.

crochet bunny stitch step 6
after the second ear has been formed your hook should look like this

Wrap yarn B around the hook and pull back through all the loops on the hook leaving you with one loop on the hook and a completed ear stitch.

crochet bunny stitch step 7
wrap the yarn around and pull through all the loops on the hook to form the ear stitch

Hold yarn B against the top of the work then work 3 SC in yarn A, carrying yarn B along as shown below.

crochet bunny stitch step 8
work 3SC in yarn A holding yarn B against the top of the work to carry it along
crochet bunny stitch step 9
work 3 SC in yarn A to complete the pattern repeat of four stitches

These four stitches form the bunny ears. Repeat as many times as you need to complete the row. Remember to keep an even tension by pulling the yarn gently each time you change colour. When you work your second pair of ears you should leave a gap of one stitch.

Fifth Row

Break off Yarn A because we will only be using yarn B on this row. Next time we need yarn A will be at the other end of the work. Work 5 chain stitches.

Each bunny is a four DC cluster stitch with the first DC being worked into the stitch in yarn B on the previous row. Work the remaining three DCs into the row below just between the ears. This is described in stages below with pictures.

Give your bunny a body!

To work a cluster of DC * start by wrapping your yarn round the hook then pushing it into the stitch in yarn B on the previous row.

Crochet bunny stitch step 10
start the four stitch cluster by wrapping the yarn around the hook and pushing your hook into the stitch in yarn B on the previous row

Wrap the yarn round then pull through two loops on the hook to complete half of the DC stitch. This leaves two loops on the hook.

Crochet bunny stitch step 11
yarn round and pull through two loops
Crochet bunny stitch step 12
to leave two loops on the hook

Now start your second treble of the cluster. Wrap the yarn around the hook then insert it into the row below, just between the bunny ears. We are working on the wrong side of the piece on this row. It is important to check that your hook is coming through in the correct place between the ears so remember to check both sides!

crochet bunny stitch step 13
yarn round and push the hook between the bunny ears, yarn round and pull through
crochet bunny stitch step 14
half way through the four stitch cluster with three loops on the hook

Wrap the yarn around the hook and pull back through then you will have four loops on the hook. Next, wrap the yarn round and pull through two of loops to complete half of the second DC then leaving three loops on the hook.

Half way there on the bunny body!

Repeat twice more each time wrapping the yarn around then putting the hook in between the ear stitches. Wrap the yarn round and pull through, wrap the yarn round again then pull through two loops to complete half the third and fourth DC of the cluster. You should have five loops on the hook.

crochet bunny stitch step 15
with the last stitch of the four stitch cluster on the hook

Wrap the yarn around the hook then pull back through all five loops on the hook and you have completed your bunny.

crochet bunny stitch final step
yarn round and pull back through all the loops on the hook to complete the cluster

Chain 3 and repeat from * until you get to the end of the row. At the end of the row chain five then put a slip stitch into the end stitch of the previous row. This completes the row of bunny bodies.

Sixth Row

Join in yarn A and work 2 chain then work 2 SC into the gap below the chain on the previous row.

Work 4 SC into the gap between the first two bunnies then, keeping the tension even, continue to work 4SC into each gap between bunnies till you reach the end of the row then work 3 SC into the gap after the final bunny. Chain 2 and turn the work.

Seventh Row

Work a row of SC.

You are are done and you should be looking at a little row of bunnies 🙂

I hope that you like this free pattern for crochet bunny stitch using US terms and that you find the photos are helpful. The post is very long, so I have posted the free pattern using UK crochet terms separately . Really excited to share that I am working on producing a video in case the photos are not enough.

I haven’t seen anything like this stitch out there which is why I spent time creating this. I am happy for anyone to use it and would be excited to see your projects but please please please credit me and link back to my blog rather than putting up your own tutorials. That way I will be able to keep my little blog going and spend time creating more stitches and free patterns!

I do have patterns to follow which include crochet bunny stitch using US terms to make headbands, hats, bags, cushions, a crochet block and finally a blanket. Keep checking in or join my mailing list if you want to get hold of those. I will also update this post with links as I complete each pattern.

Happy crocheting!

Annie 🙂

Filed Under: Crochet patterns Tagged With: bunny stitch, crochet bunny, crochet bunny stitch, crochet rabbit, Easter bunny stitch, free crochet pattern, Free pattern, rabbit stitch, us crochet terms, us instructions

Log Cabin Love Blankets

January 31, 2021 by Annie Leave a Comment

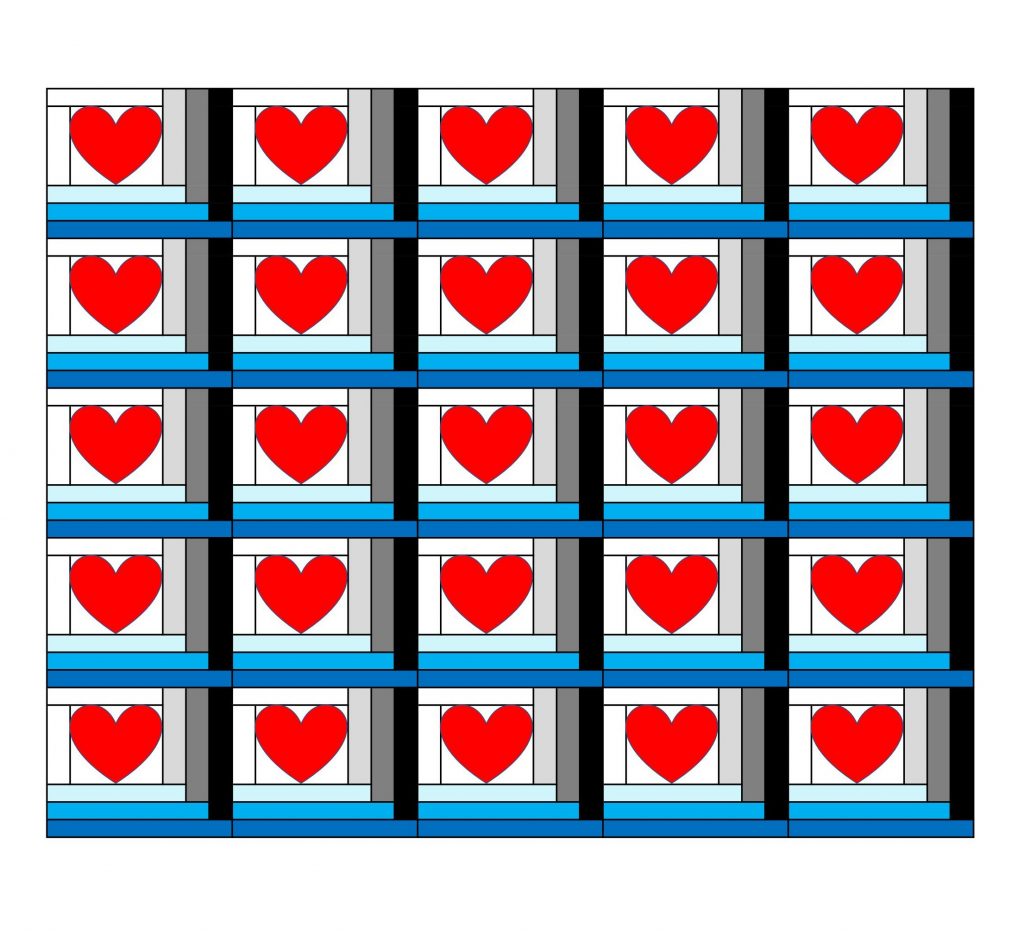
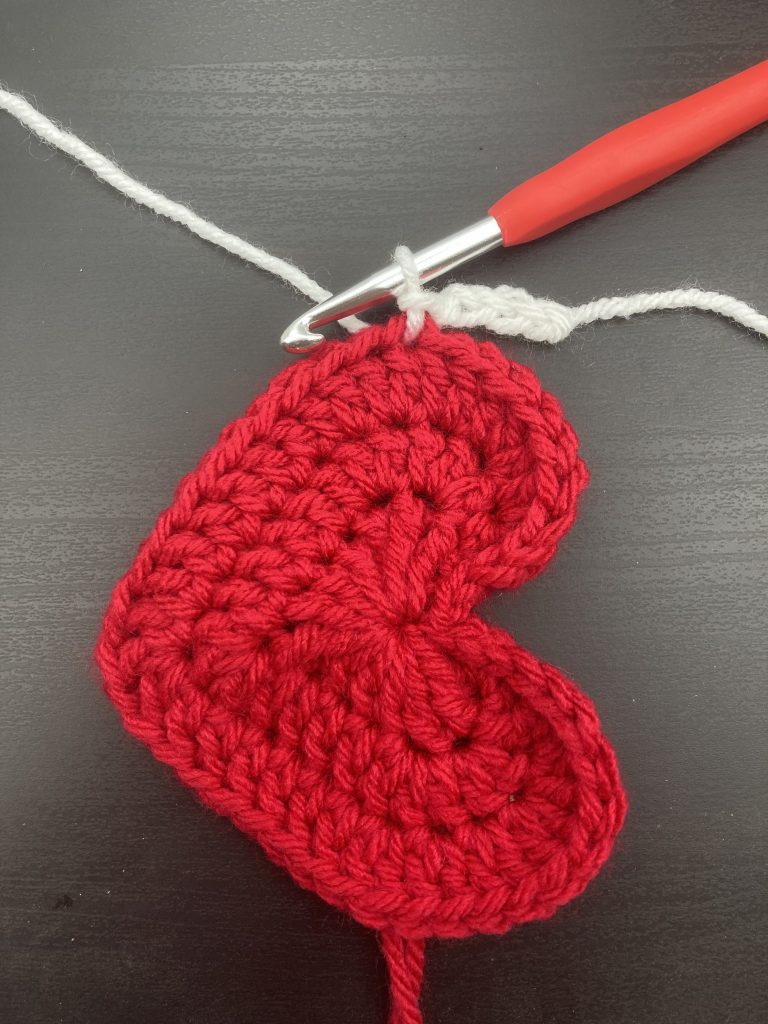
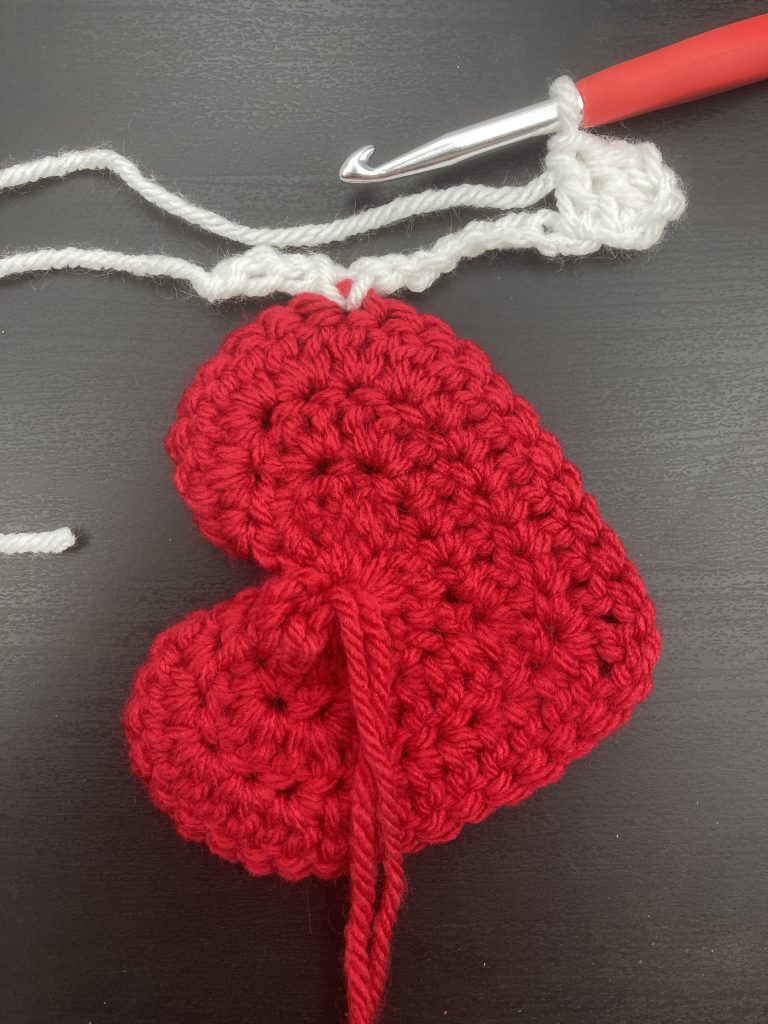
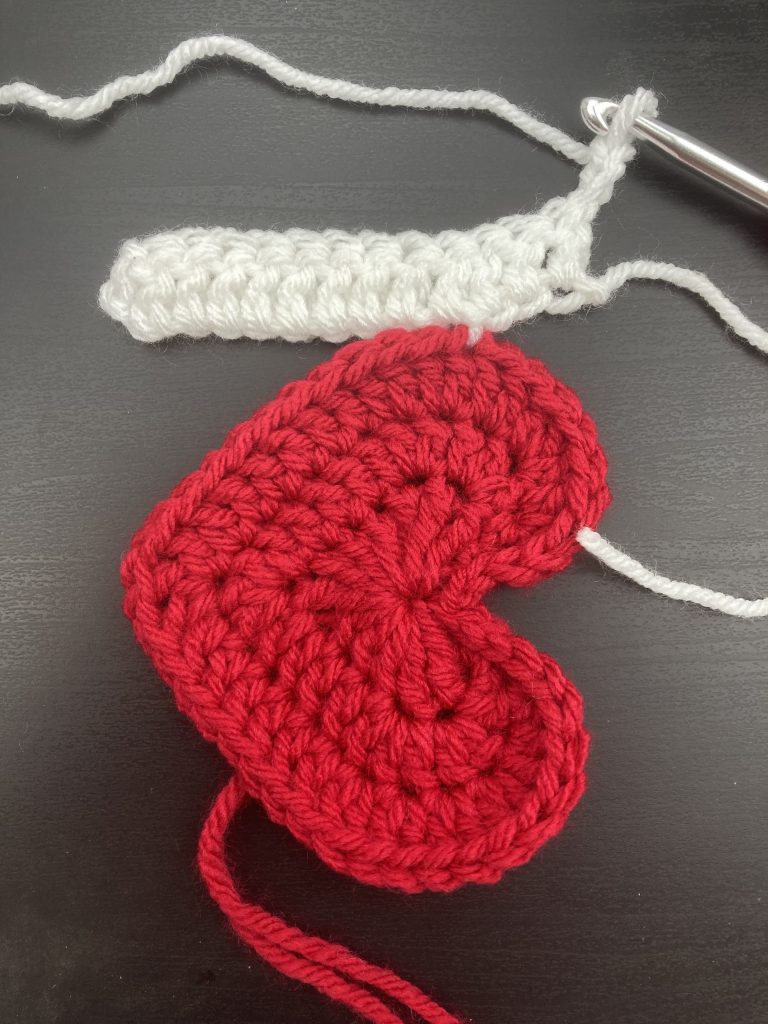
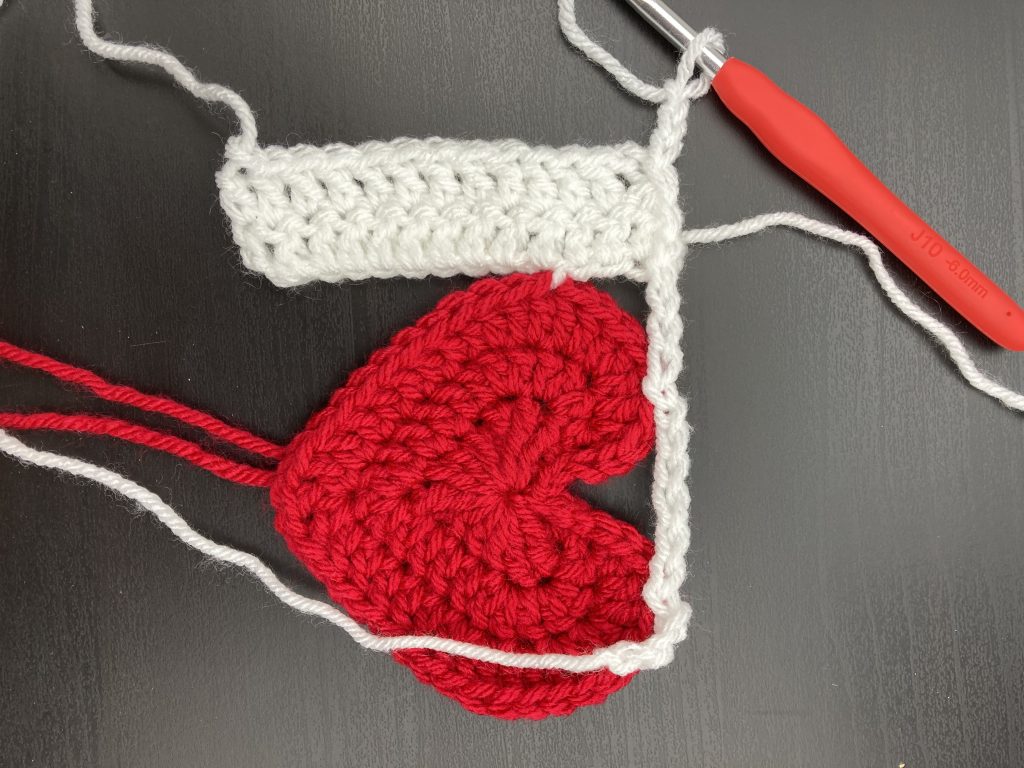
In this post I am sharing the love and making my Log Cabin Love crochet blocks into Log Cabin Love Blankets! I have two suggested designs to share with you and some pics of my blanket as it progresses.

Firstly – if you are starting with this post, you need the link to the block pattern which is here

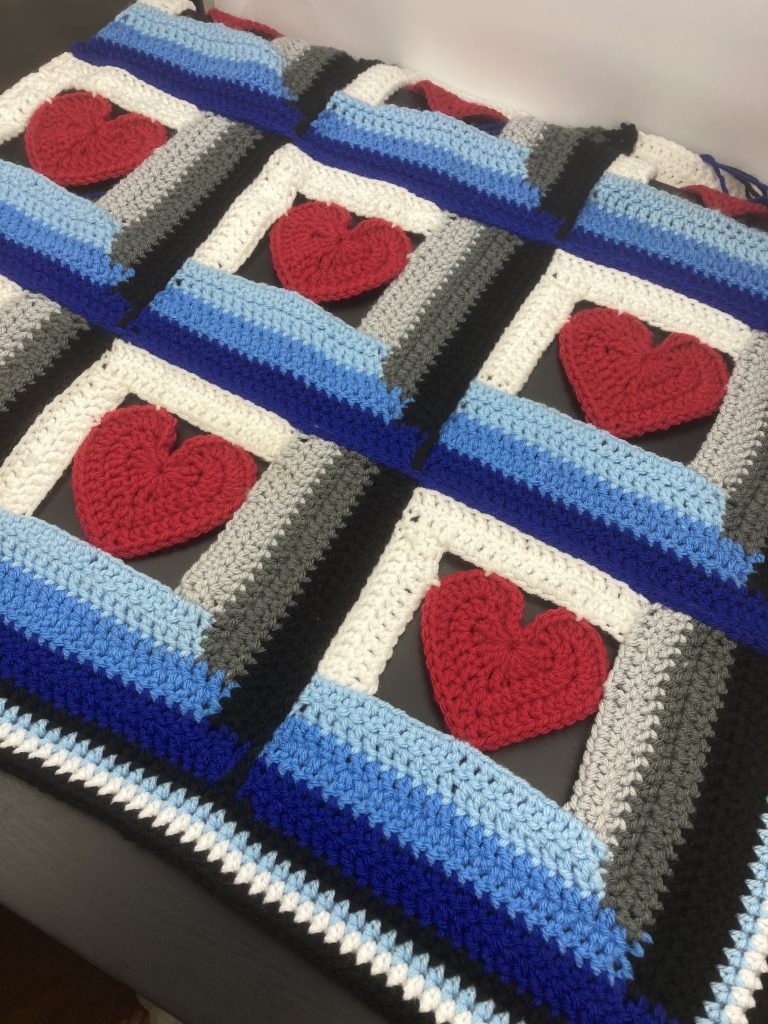
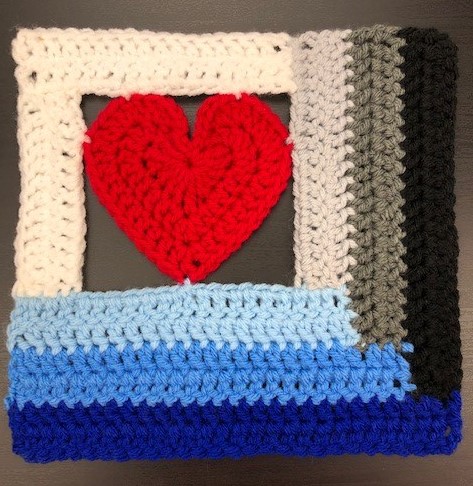
The first blanket design I am sharing is based on the colours in my original block. In this version I have worked the blocks identically. The yarn is my favourite Stylecraft Special Chunky which you can see here at my favourite UK yarn store – Woolwarehouse.

The colours I have used are as follows: Panels 1 and 2 – White 1001, Panel 3 – Silver 1203, Panel 4 – Cloud Blue 1019, Panel 5 – Graphite 1063, Panel 6 – Aster 1003, Panel 7 – Black 1002 and Panel 8 – Royal 1117.

The hearts themselves are worked in Lipstick 1246.

log cabin love blanket
Log Cabin Love blanket

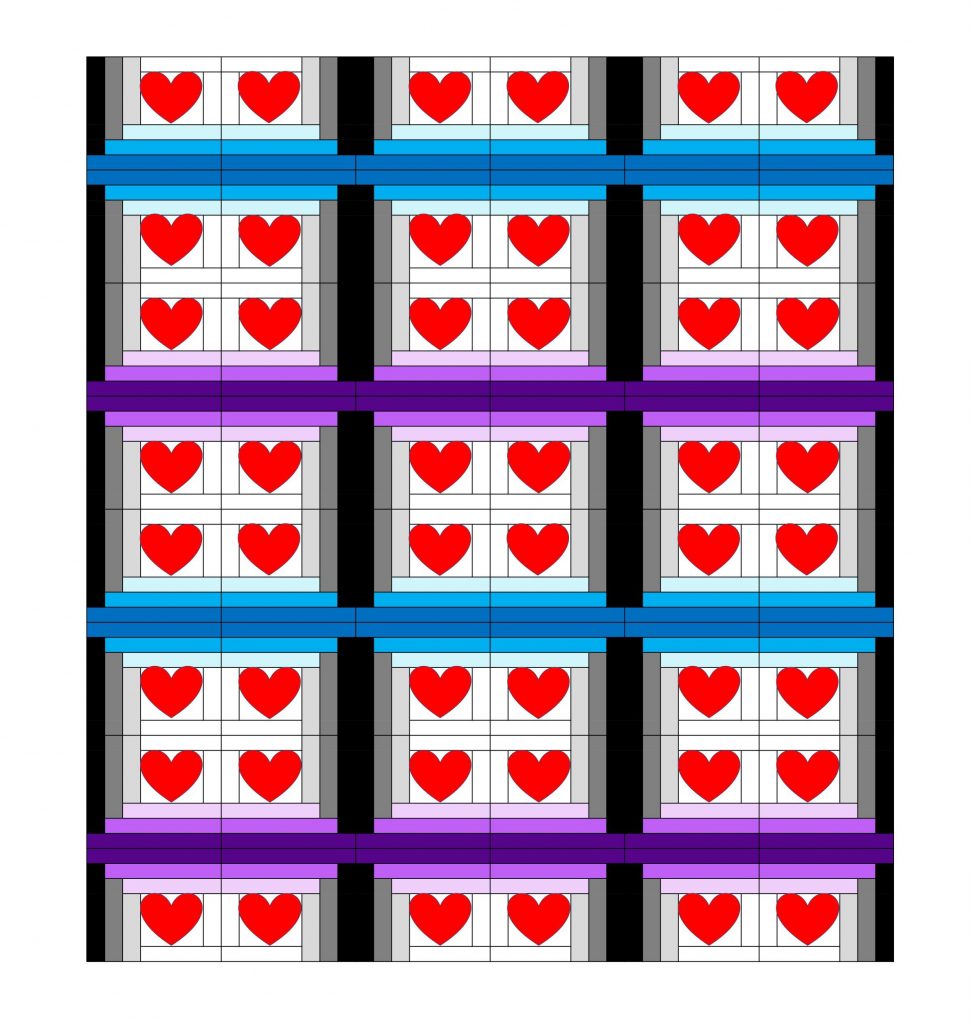
The second layout I have tried requires a flipped version of the block. You can see the effect that that produces in this picture.

log cabin love blanket v2
log cabin love blanket with flipped squares

If you would like me to share the pattern for the flipped block then please leave a comment and I will put that version up on this blog.

Edging the log cabin love blanket

For the edging I worked four rows of half Trebles (HDc in US terms) in black then pale blue, white and finally black again. As an additional option you could add a row of small hearts. I am planning to try this and will post additional pictures when I have completed the border.

log cabin love blanket
log cabin love blanket – basic edging

I hope you enjoy making these log cabin love blankets. Please share pictures of your work if you do use this pattern. I am happy for anyone to use or share my patterns but please include a link back to this blog if you do. Happy crocheting!

Annie 🙂

Filed Under: Crochet patterns Tagged With: crochet, crochet afghan, crochet blanket, crochet blocks, crochet lapghan, crochet project, free crochet pattern, Free pattern, log cabin, log cabin love heart, love heart, stashbuster

Log Cabin Love crochet block

January 24, 2021 by Annie Leave a Comment

Here is my latest heart themed block. This one is a great stash buster! You can use any scraps of yarn you have to make the log cabin love crochet block. However, the yarn does need to be roughly the same weight.

To make the examples shown here I have used Stylecraft Special Chunky and a 6mm hook. You can see the range here where I buy all my yarn at Woolwarehouse.

It is possible to mix different yarn types and I can cover this in a separate post if you would find it helpful. Please leave a comment to let me know.

NOTE – This pattern will be a lot easier to follow when I add photos which will follow in the coming week – before end Jan 21. If you find it hard to follow please come back when the photos are up. 🙂

Log Cabin Love crochet block pattern – UK crochet terms

NOTE – for US terms simply work DC where the pattern states Tr.

The heart of the pattern (see what I did there?) is the crochet heart. To make the heart you need to follow this link to my new large crochet heart pattern. The link takes you to another page on my blog where you will find the free pattern in both UK and US crochet terms. I made a few of these hearts then started to build the log cabin panels around them.

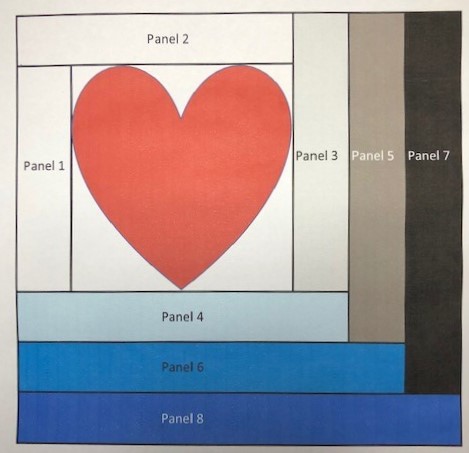
This diagram shows you the order in which the panels are worked.

log cabin love block diagram
log cabin love block panels

First panel

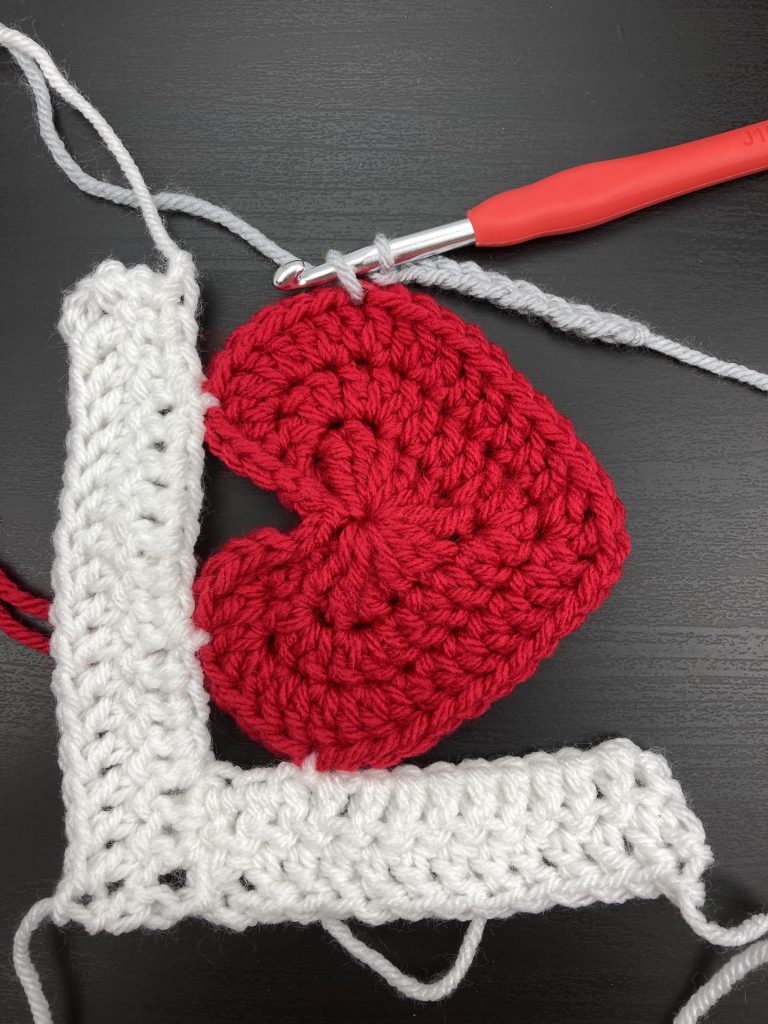
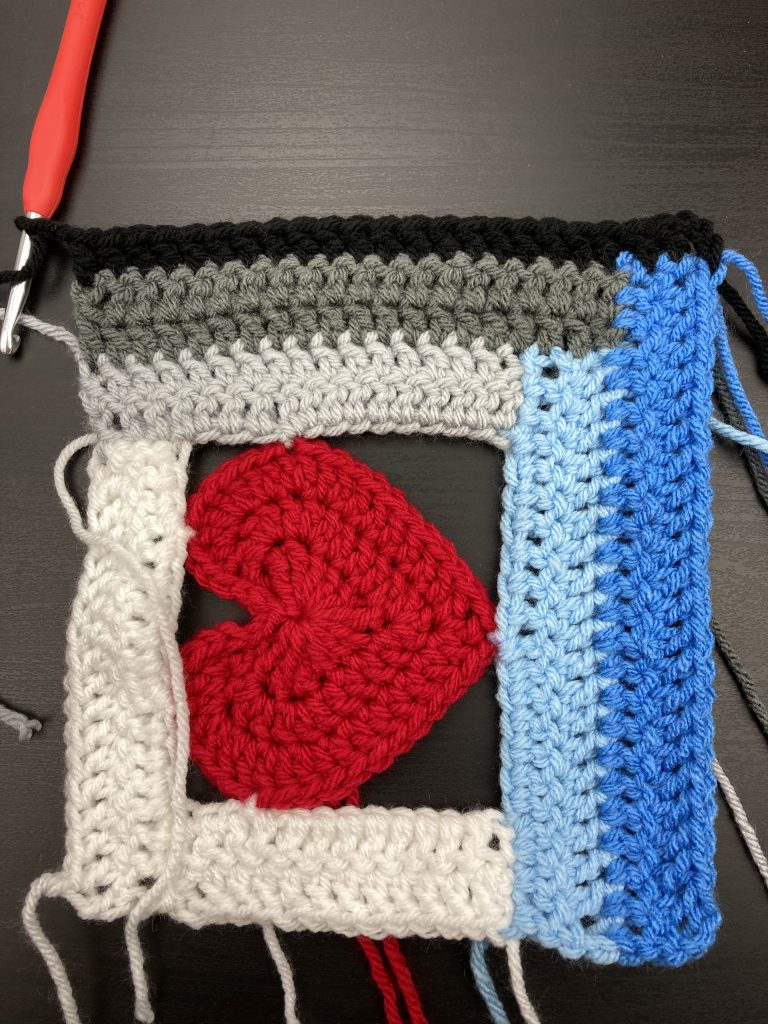
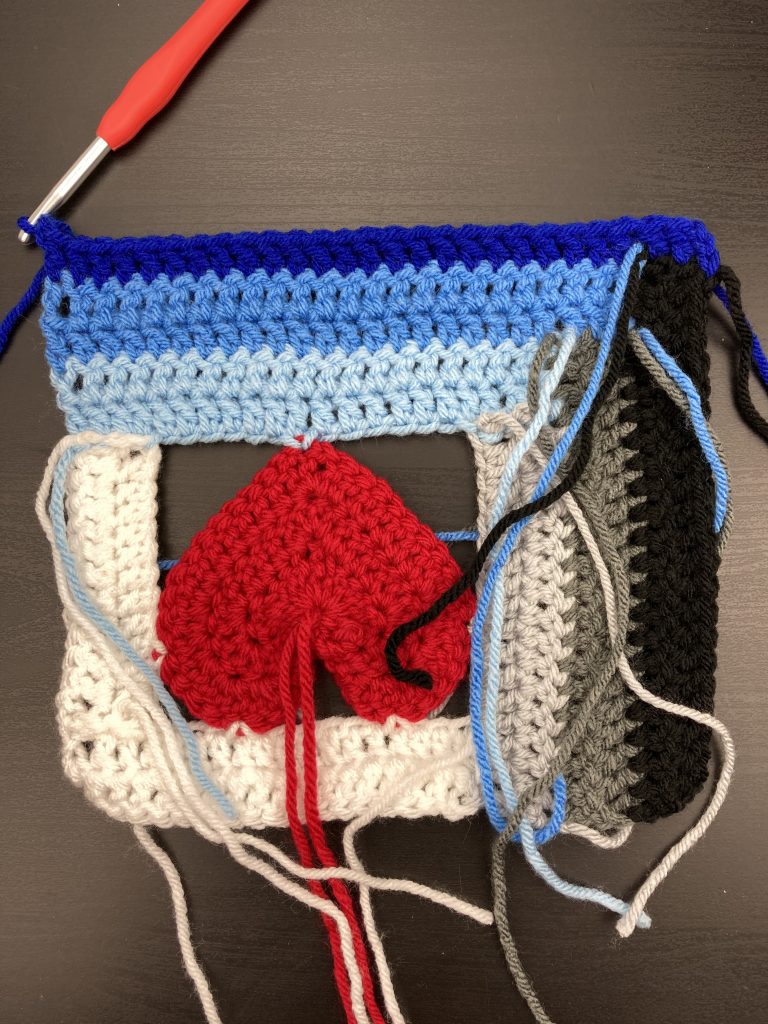
With your crochet heart face up this panel sits down the left hand side of the heart. We will be working from top to bottom of the block. The first four blocks have foundation rows made of chain stitch or slip stitches. This is because they frame the heart and are not joined to anything else in places.

First row
log cabin love panel 1
start by adding foundation for panel 1

Make a loop to start and chain 3. Count the stitches up the left side from the bottom of the heart with the bottom stitch being #1, slip stitch into #13 to attach your chain to the heart. Continue with 12 more chain. Turn the work ready for the second row.

log cabin love panel 1 - second row
starting the second row of panel 1
Second row

(wrong side facing) work 1Tr into the fourth chain from the hook. Continue working Tr along this row, 7 more Tr will take you to the slip stitch on the edge of the heart. Work 1 Tr into this stitch then 1Tr into each of the three chain stitches to reach the end of the row. CH3 and turn the work ready for the final row of this first panel.

log cabin love block - end of second row of panel 1
3CH at end of second row of panel 1
Third row

(right side facing) miss the first stitch and work 12 Trs to take you to the end of the row. Fasten off the yarn.

Second panel

With your crochet heart face up this panel sits across the top of the heart. We will be working from right to left of the block.

First row

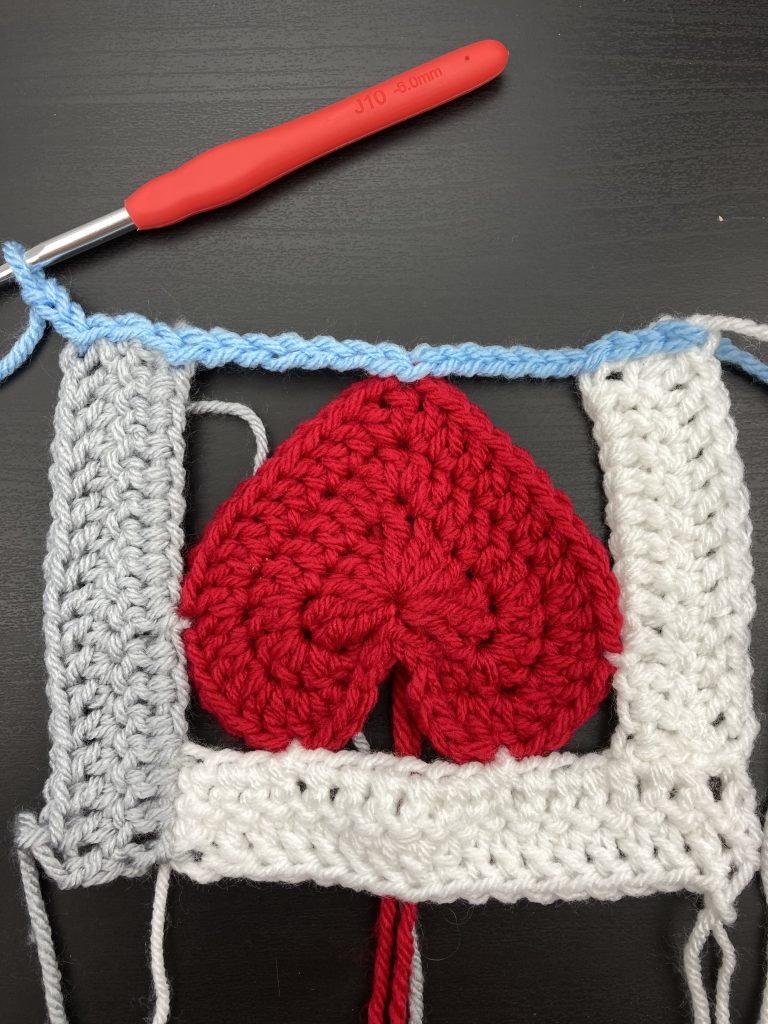
Make a loop to start and chain 3. Slip stitch into the top of the right side of the heart to attach your chain to the heart. Continue with 6 more chain stitches then slip stitch to attach the chain to the top of the left side of the heart. Chain 3 then slip stitch into the edge of the top of panel 1 and work 3 more slip stitches across the top of block 1 to take you to the top left hand corner of the log cabin love block. Chain 3 and turn the work ready for the second row.

adding the second panel of the log cabin love block
foundation row for the second panel
Second row

(wrong side facing) miss the first stitch then work 3Tr into the slip stitches across the top of block 1. Work 3Tr into the three chain stitches then one Tr into the slip stitch at the top of the left side of the heart. Work 6Tr into the middle chain section then 1 Tr into the slip stitch at the top of the right side of the heart. Finally work 1Tr into each of the three chain stitches to reach the end of the row. CH3 and turn the work ready for the final row of the second panel.

Third row

(right side facing) miss the first stitch and work 17 Tr to take you to the end of the row. Fasten off the yarn.

Third panel

With your crochet heart face up this panel sits down the right hand side of the heart. We will be working from the bottom to the top of the block.

First row

Make a loop to start and chain 9. Count the stitches up the right side from the bottom of the heart with the bottom stitch being #1, slip stitch into #13 to attach your chain to the heart. Continue with 3 more chain then slip stitch into the bottom corner of panel 2 and work 3 more slip stitches across the end of panel 2. Turn the work ready for the second row.

adding the third panel of the log cabin love block
start the 3rd panel with a chain then slip stitch to the heart
Second row

(wrong side facing) miss the first stitch and work 3 Tr into the slip stitches on the previous row. Work 1Tr into each of the 3CH then one Tr into the slip stitch at the right side of the heart. Finally work into the Chain 9 Tr to reach the bottom of this panel. CH3 and turn the work ready for the final row of this third panel.

Third row

(right side facing) miss the first stitch and work 16 Tr to take you to the end of the row. Fasten off the yarn.

Fourth panel

With your crochet heart face up this panel sits across the bottom of the heart. We will be working from left to right across the bottom of the block.

First row

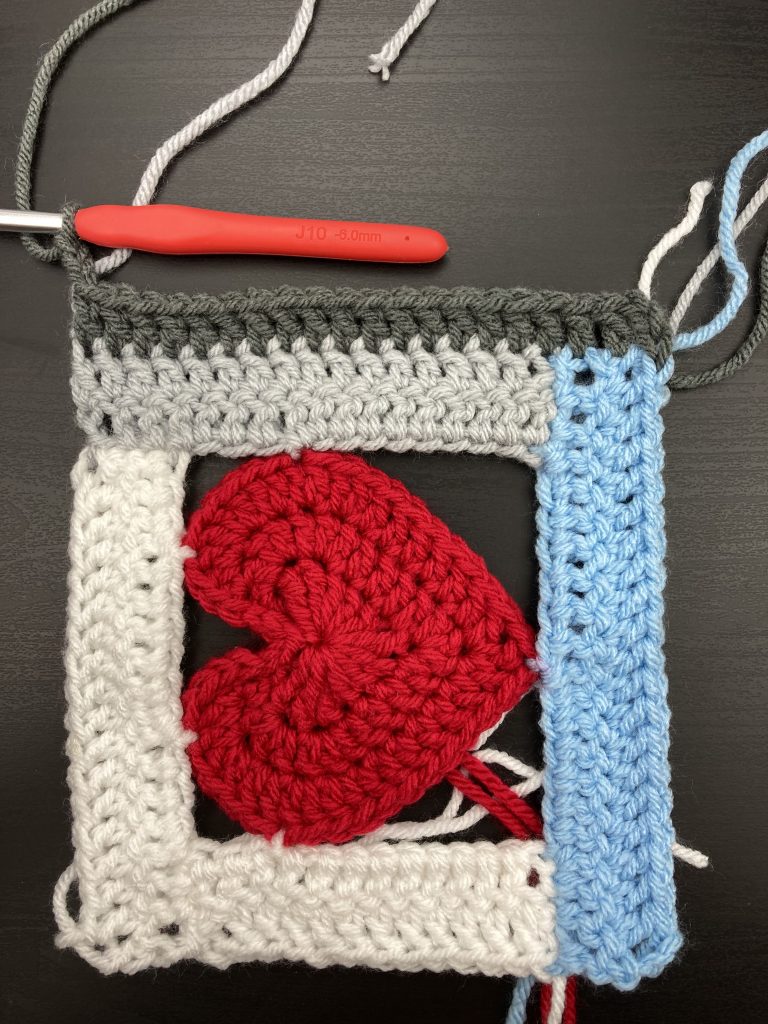
Attach your yarn to the outside corner of the bottom of panel 1. Slip stich 4 across the bottom of panel 1 then chain six and work one slip stitch into the bottom of the heart. Chain 6 and work four slip stitches across the bottom of panel 3. Chain 3 and turn the work ready for the second row.

foundation row for the fourth panel of the log cabin love block
foundation row for the fourth panel of the block
Second row

(wrong side facing) Miss the first stitch then work 3Tr into slip stitches across the bottom of panel 3. Continue working 6 Tr into the chain and 1 Tr into the slip stitch at the bottom of the heart. Work 6 Tr into the chain and four Tr into the slip stitches across the bottom of panel 1 to reach the end of the row. CH3 and turn the work ready for the final row of this fourth block.

Third row

(right side facing) miss the first stitch and work 20 Tr to take you to the end of the row. Fasten off the yarn.

Fifth panel

With your crochet heart face up this panel sits along the right side of the block next to panel 3. We will be working from the bottom to the top of the block. Things get easier now with no need for a foundation row.

First row

(right side facing) Attach your yarn to the bottom right corner of the work – at the corner of panel 4 and chain 3. Work 2 Tr into the end of panel 4 then work 17 Tr along panel 3. Chain 3 and turn the work ready for the second row.

fifth panel of the log cabin love block
adding the fifth panel
Second row

(wrong side facing) miss the first stitch and work 19 Tr to take you to the end of the row. Fasten off the yarn.

Sixth panel

With your crochet heart face up this panel sits across the bottom of the block below panel 4. We will be working from the right to left side of the block.

First row

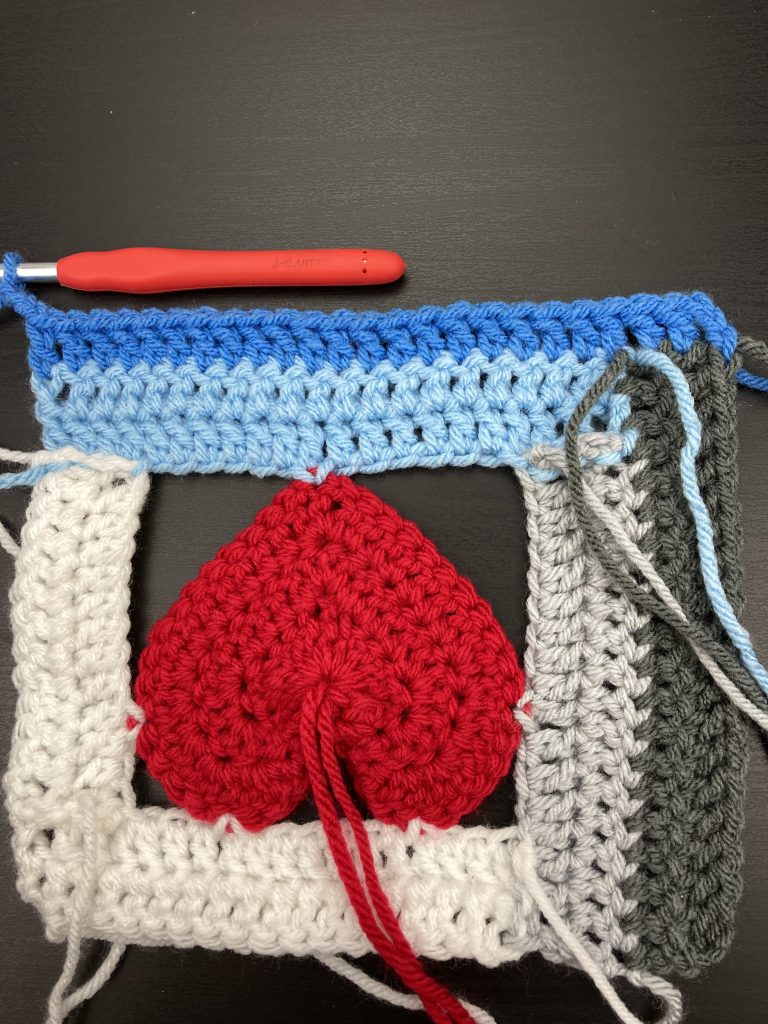
(wrong side facing) Attach your yarn to the bottom right corner of the work – at the corner of panel 5 and chain 3. Work 2 Tr into the end of panel 5 then work 21 Tr along panel 4. Chain 3 and turn the work ready for the second row.

sixth panel of the log cabin love block
adding panel six to the block
Second row

(right side facing) miss the first stitch and work 23 Tr to take you to the end of the row. Fasten off the yarn.

Seventh panel

With your crochet heart face up this panel sits along the right side of the block next to panel 5. We will be working from the bottom to the top of the block.

First row

(right side facing) Attach your yarn to the bottom right corner of the work – at the corner of panel 5 and chain 3. Work 2 Tr into the end of panel 5 then work 20 Tr along panel 3. Chain 3 and turn the work ready for the second row.

adding panel seven to the log cabin love block
adding panel seven to the block
Second row

(wrong side facing) miss the first stitch and work 22 Tr to take you to the end of the row. Fasten off the yarn.

Eighth panel

With your crochet heart face up this panel sits across the bottom of the block below panel 6. We will be working from the right to left side of the block.

First row

(wrong side facing) Attach your yarn to the bottom right corner of the work – at the corner of panel 7 and chain 3. Work 2 Tr into the end of panel 7 then work 24 Tr along panel 6. Chain 3 and turn the work ready for the second row.

adding the final panel to the log cabin love block
adding the final panel!
Second row

(right side facing) miss the first stitch and work 26 Tr to take you to the end of the row. Fasten off the yarn.

Log Cabin Love crochet block

I hope you love this Log Cabin Love crochet block and have fun making log cabin blankets to share the love. I have some suggested blanket layouts which I will post separately but I wanted to get his pattern out there! Happy crocheting!

Annie 🙂

Filed Under: Crochet patterns Tagged With: crochet, crochet block, crochet blocks, crochet design, crochet heart, crochet heart block, crochet log cabin block, crochet project, free crochet pattern, Free pattern, log cabin block

Little Padded Hearts

January 10, 2021 by Annie Leave a Comment

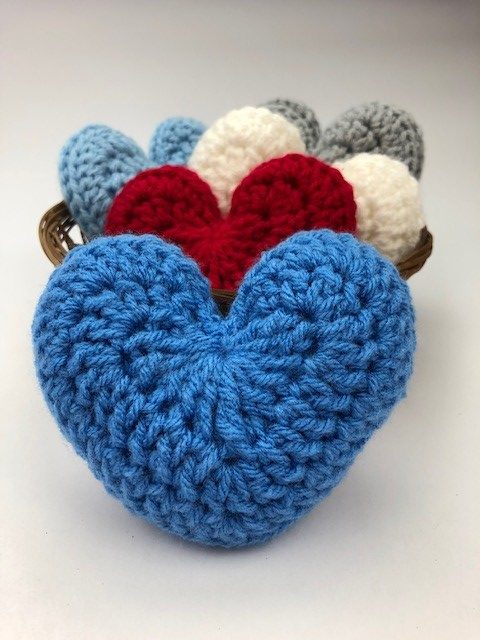
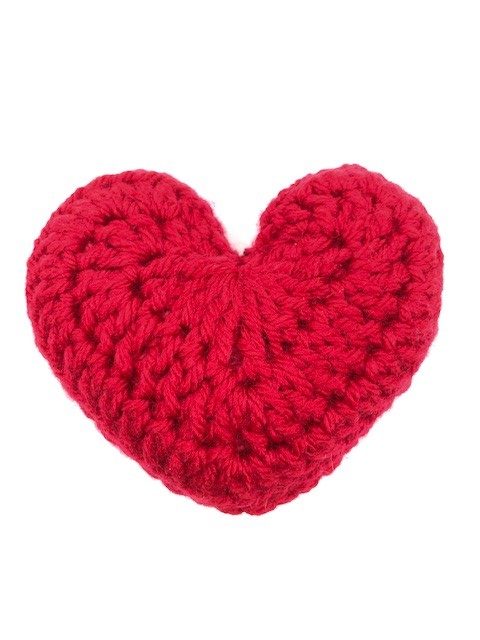
I have been having a bit of fun with my heart patterns. These little padded hearts are one of the things I have made. They are based on the new large heart pattern I shared earlier this month. These hearts are about 11cm across when made in chunky yarn. You can use them for decoration, bunting or as gifts.

basket of little hearts
little padded hearts

The first heart I made was a blue one with my thoughts firmly on the National Health Service here in the UK as they battle through one of the worst periods in their history. It doesn’t feel like there is much we can do to help but I have read posts by doctors and nurses on twitter saying they appreciate the show of solidarity as we all add blue hearts to our profiles.

To make your own padded heart you need to follow the new large heart pattern which you will find here. The hearts I made use Stylecraft Special Chunky which you can see here from Woolwarehouse. I don’t have any relationship with either brand but I love the quality and value of the Stylecraft yarns and I really value the service and range offered by Woolwarehouse.

The examples you can see here are worked on a 6mm hook. It takes about six or seven minutes to make each side of the heart. Factoring in making up time and a cup of tea, it takes roughly 25 mins to produce a padded heart 🙂

To make your little padded heart, first make two hearts following the large heart pattern. When you finish the second, either leave the yarn attached or pull out a long length before cutting the yarn off. You will use this to make up the padded heart.

Making up your Little Padded Hearts

The examples you can see here have been joined using a crochet hook. I used a wool needle to finish them off and join the last few stitches. If you are a regular reader you will have seen me recommend Knit Pro wool needles before. I cannot believe it took me so long to find these little needles. They make such a difference to the time it takes to finish off ends and make projects up.

The beauty of these little padded hearts is that you don’t really need to weave in ends. Just pull them through to the wrong side of the heart, fasten them off securely and pop them inside as part of the stuffing!

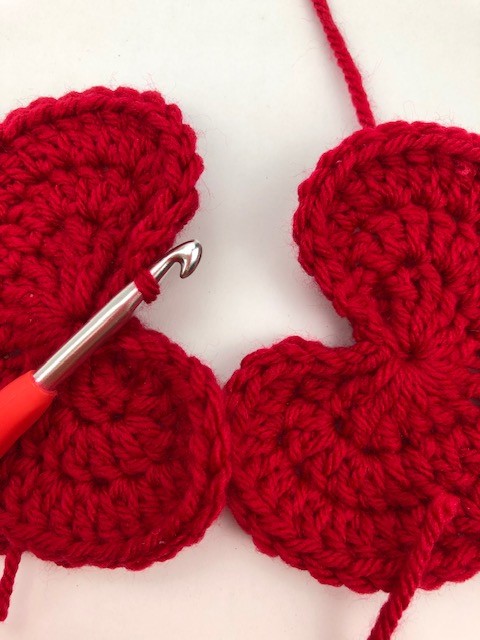
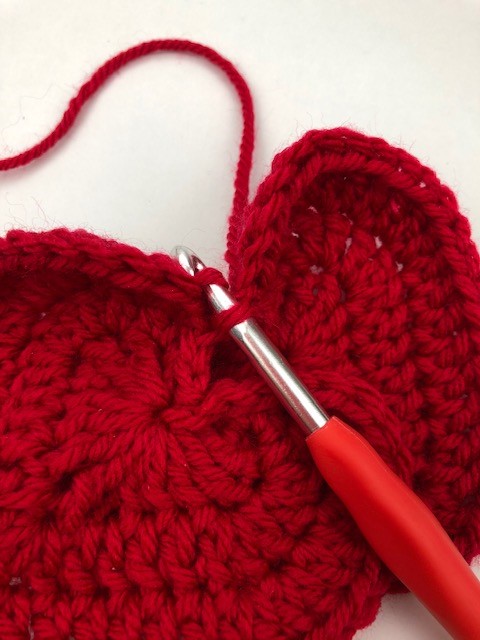
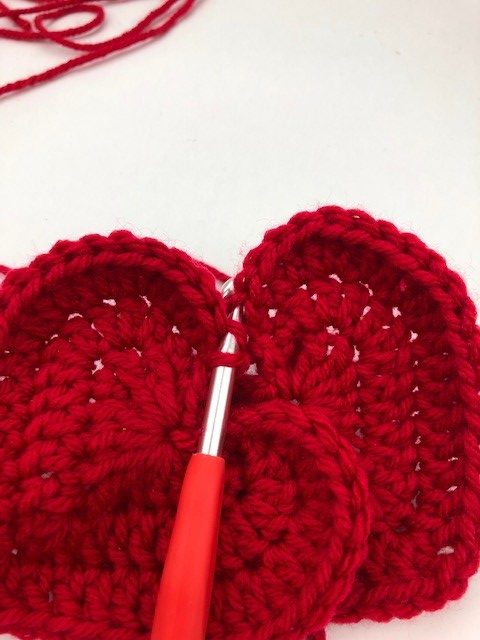
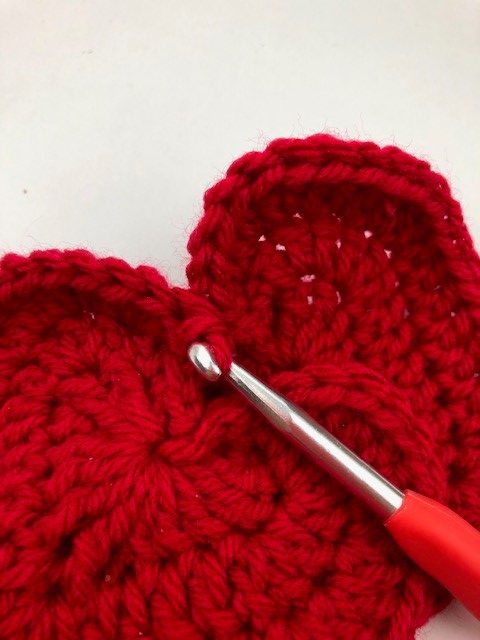
Start the making up as shown below. Place the two hearts right side up in front of you. Push your hook into the outer strand of the edge stitch on the right side of the centre of the left heart. Appreciate this sounds very complicated. You might find it easier to follow the pictures below!

showing how to join the hearts 1 of 9
pick up stitch from outer edge of left heart
shows how to join two hearts 2 of 9
pick up stitch from outer edge of right hand heart

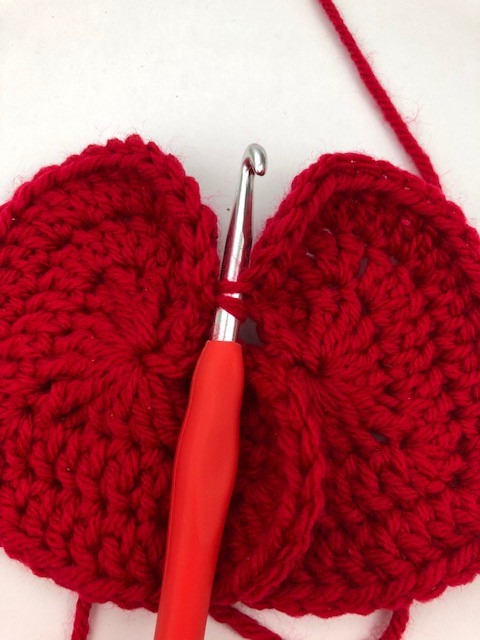
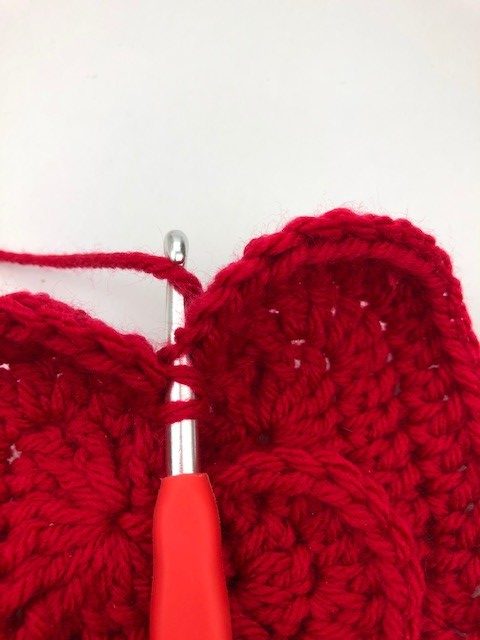
Next push your hook into the outer strand of the edge stitch on the right side of the centre of the right heart. This bit is fiddly but it does get easy once you get going I promise. Pull the yarn through both looks so that your two hearts are joined and you have a loop of yarn on the hook.

joining two hearts 3 of 9
wrap your yarn around the hook
joining two hearts 4 of 9
pull the yarn through so you have a loop on the hook

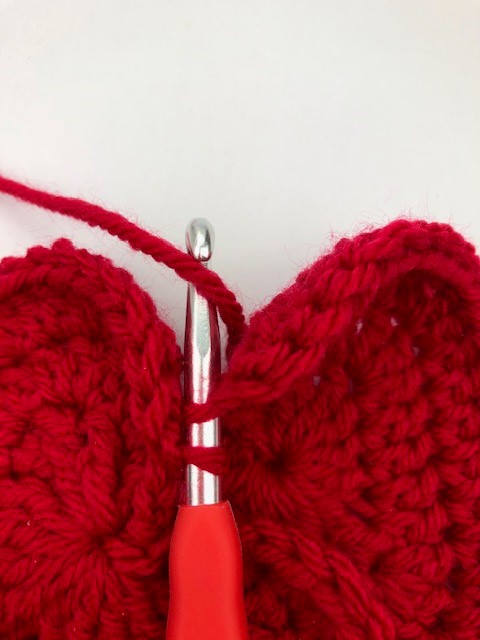
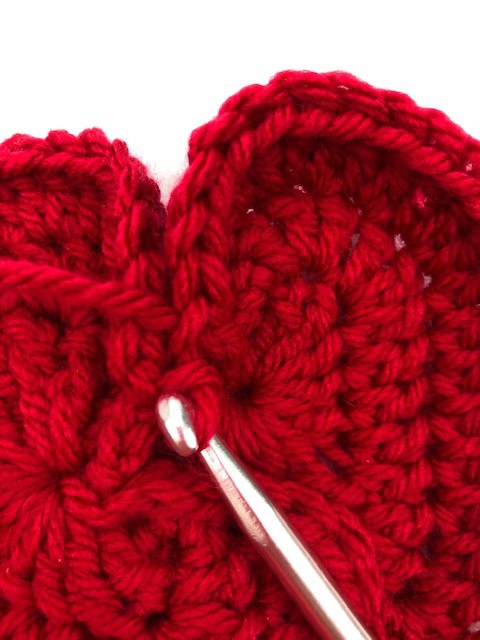
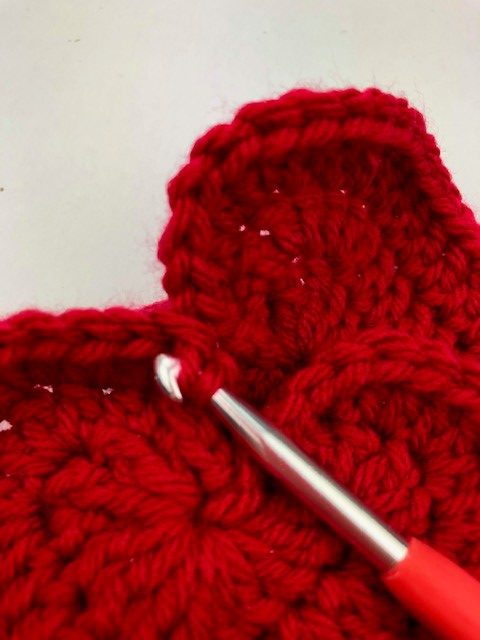
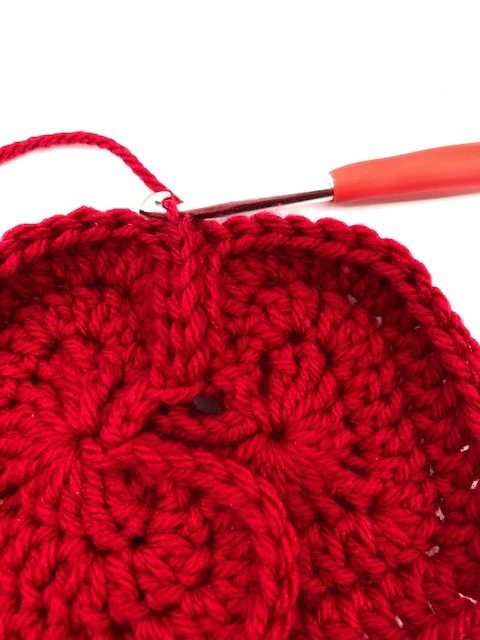
Repeat the process above but going into the outside edge of the next stitch on both hearts so that you have two loops on your hook. Pull the second loop through the first and you will start to make the joining seam. It should look like a row of raised chain stitches going round the edge of the hearts.

joining two hearts 5 of 9
repeat the process picking up a stitch on the left heart
joining two hearts 6 of 9
pick up the next stitch from the right hand heart
joining two hearts 7 of 9
wrap your yarn around the hook
joining two hearts 8 of 9
pull the yarn through the two stitches from either side of the heart
joining two hearts 9 of 9
finally pull the yarn through the loop on the hook

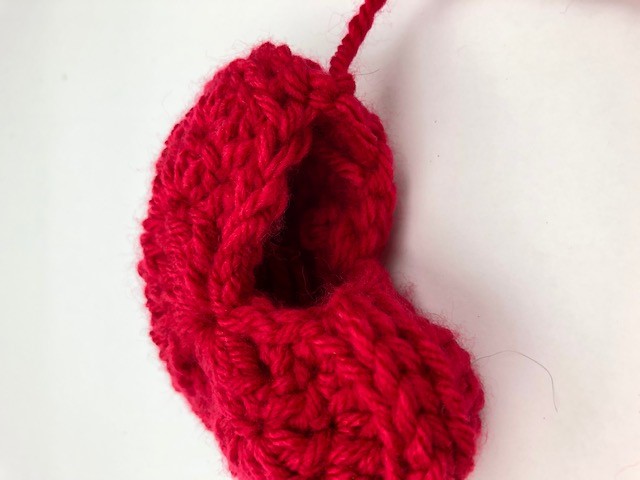
Keep going like this until you get round the whole heart and stop with a few stitches to go so that you can stuff the heart. As you stitch keep an eye on both sides to make sure you are working in the same stitches on both sides.

shows the start of the joining seam
your joining seam should look like this

Secure the end by pulling it through the last loop. Stuff the heart then use the remainder of the yarn to stitch up the final bit of the seam.

leaving a gap to stuff the heart
leave a gap to stuff the heart then join with a wool needle

I hope you love these little padded hearts! I will make a few more and list them on my Etsy store in time for Valentines day. Happy crocheting!

Annie 🙂

little padded heart

Filed Under: Craft projects, Crochet patterns Tagged With: crochet, crochet heart pattern, crochet pattern, free crochet heart pattern, free crochet pattern, Free pattern, heart, little padded heart, valentine

New Large Heart Pattern

December 28, 2020 by Annie Leave a Comment

My heart patterns go down so well with you all that I have decided to create a new one! I am actually working on a new blanket design that needed a larger version. Hoping to release that blanket pattern in the coming weeks. I am sharing the new large heart pattern now in case you want to use it for Valentines day 🙂

I am using Stylecraft Special chunky yarn which is my current favourite. It is really good values and comes in a great range of colours. I get all my yarn from Woolwarehouse here in the UK. The pattern will work in any yarn. However, you might find the proportions are slightly different if you use a yarn of different tension.

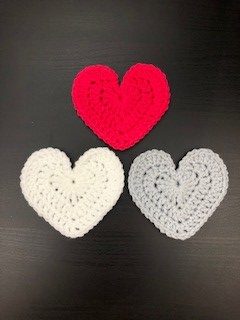
three hearts  - new large heart pattern

New Large Heart Pattern – UK terms

First round

Make a magic loop and work into the loop as follows: 3CH, 3DTr, 3Tr, CH, DTr, CH, 3Tr, 3Dtr, 3CH, slip stitch into the loop to finish the round. Pull the magic loop closed to form the heart.

Second round

Working up the left side of the top of the heart, one slip stitch and one chain. Into the next stitch work 1DC, 1Htr. Crochet 3Tr into the next stitch and 3Tr into the following stitch. Work 1Tr into the next four stitches which should bring you to the bottom point of the heart. Crochet 3Tr into the bottom point. Working up the right hand side of the heart work 1Tr into each of the next four stitches. Now work 3Tr into the next stitch and 3Tr into the following stitch. Finally work 1HTr, 1Dc into the next stitch and chain 1 and slip stitch into the final stitch on the right hand side of the centre of the heart. You should be back to the start point of the round. Put your hook into the centre of the heart and pull the yarn through to complete the round.

Third Round

This round follows the same lines as the previous round. Starting with the left hand side of the centre of the heart work two slip stitches then chain 1. Into the next stitch work 1Dc, 1Htr. Work 2Tr into the next stitch then 3Tr into the following stitch. Crochet 2Tr into each of the next three stitches then work 1Tr into the following six stitches. This should bring you to the bottom point of the heart.

Into the bottom of the heart work 1Tr, 1Ch, 1Tr, 1CH, 1Tr. Next work one Tr into each of the next six stitches then work 2Tr into each of the following three stitches. Work 3Tr into the next stitch and 2Tr into the following stitch. Finally work 1Htr, 1Dc into the next stitch at the top of the right hand side of the centre of the heart. Chain1 and slip stitch to finish the round. Again I like to put my hook through the centre of the heart and slip stitch to that point to complete the heart.

new large heart pattern
New large heart pattern

New Large Heart Pattern – US terms

First round

Make a magic loop and work into the loop as follows: 3CH, 3Tr, 3DC, CH, Tr, CH, 3DC, 3Tr, 3CH, slip stitch into the loop to finish the round. Pull the magic loop closed to form the heart.

Second round

Working up the left side of the top of the heart, one slip stitch and one chain. Into the next stitch work 1SC, 1HDc. Crochet 3Dc into the next stitch and 3Dc into the following stitch. Work 1Dc into the next four stitches which should bring you to the bottom point of the heart. Crochet 3Dc into the bottom point. Working up the right hand side of the heart work 1Dc into each of the next four stitches. Now work 3Dc into the next stitch and 3Dc into the following stitch. Finally work 1HDc, 1Sc into the next stitch and chain 1 and slip stitch into the final stitch on the right hand side of the centre of the heart. You should be back to the start point of the round. Put your hook into the centre of the heart and pull the yarn through to complete the round.

Third Round

This round follows the same lines as the previous round. Starting with the left hand side of the centre of the heart work two slip stitches then chain 1. Into the next stitch work 1Sc, 1HDc. Work 2Dc into the next stitch then 3Dc into the following stitch. Crochet 2Dc into each of the next three stitches then work 1Dc into the following six stitches. This should bring you to the bottom point of the heart.

Into the bottom of the heart work 1Dc, 1Ch, 1Dc, 1CH, 1Dc. Next work one Dc into each of the next six stitches then work 2Dc into each of the following three stitches. Work 3Dc into the next stitch and 2Dc into the following stitch. Finally work 1HDc, 1Sc into the next stitch at the top of the right hand side of the centre of the heart. Chain1 and slip stitch to finish the round. Again I like to put my hook through the centre of the heart and slip stitch to that point to complete the heart.

three large hearts
three hearts 🙂

I would like to get this pattern out quickly so I am putting it up without detailed photographs but I will add those over the coming days. The first round of this heart mirrors my original heart pattern which you can find here. I hope you love this new large heart pattern and would love to hear from you if you find the pattern useful. Happy crocheting!

Annie 🙂

Filed Under: Crochet patterns Tagged With: crochet heart, crochet hearts, free crochet pattern, Free pattern, heart, hearts, stashbuster

  • Go to page 1
  • Go to page 2
  • Go to page 3
  • Interim pages omitted …
  • Go to page 6
  • Go to Next Page »

Footer

Newsletter

Copyright © 2022 · Genesis Sample on Genesis Framework · WordPress · Log in