• Skip to primary navigation
  • Skip to main content
  • Skip to footer

Stickytapeandstring

Created with WordPress managed by 1&1

  • Craft projects
    • craft business tips
    • craft blog
    • Crochet patterns
    • Upcycling
    • craft with kids
  • Blogging
    • New to blogging
    • Blog diary
  • Bullet Journal
  • About me
  • Welcome!!

Uncategorized

Recycled ties make great face masks

August 24, 2020 by Annie Leave a Comment

Everyone’s lives have changed in the last few months, beyond recognition. I used to spend five hours a day commuting to a job in the city. I love my job but I didn’t love the commute. The train would be crammed with folks in office wear, lots of shirts and ties. My hubby retired some time ago and I have a collection of old shirts and ties in my stash – waiting on inspiration! Inspiration has come – in the form of face masks. Recycled ties make great face masks!

We have been told in the UK that masks are compulsory now on public transport and in shops.

There are lots of patterns available on Pinterest and tutorials showing you how to make your masks. Most of the patterns are for pleated masks or fitted masks. This link will take you to the best patterns I found which were over at craftpassion.

I wanted to make comfy masks with a pretty pattern on one side and cotton fabric for comfort on the side in contact with the face. You see where the inspiration came from. I looked at the ties in my stash. Mostly made from patterned silk or synthetic fabric, they are perfect for the outer layer. Most of the old shirts I have are made of cotton which is ideal for the inner layer – happy days.

Recycle your fabric

The shirts were mainly put on the recycle pile when the collar fabric started to show wear. The ties show wear at the sections in the knot just below the chin where they come into contact with stubble!! This means that there is a lot of perfectly viable fabric in both the shirts and the ties. ๐Ÿ™‚

Recycle tie fabric

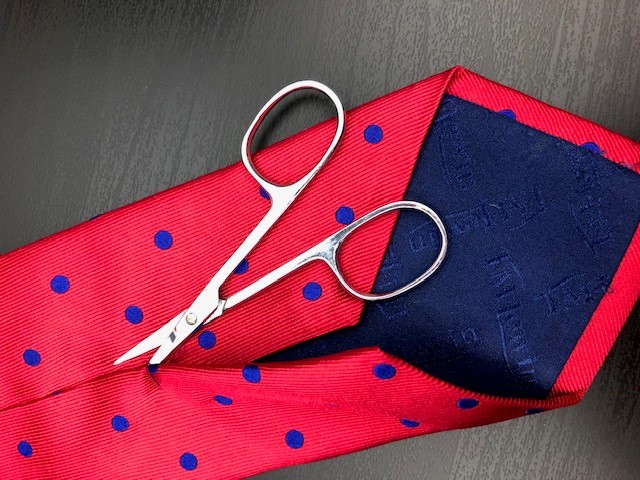
First job was to recycle the tie fabric – I expected this to be harder than it was! Ties, as it turns out, are not held together by very much! However, there are probably many different constructions out there. If you are buying from a charity shop or thrift store do check the back to make sure you are not buying one with a more difficult construction. The description below relates to the type of tie I was dealing with.

ties for recycling
Selection of ties for recycling

Carefully unpick the back seam. There is lining at both ends of the tie. However, there is no point in doing additional work to remove seams and lining if you can just cut them off. I didn’t want to cut too early and risk the fabric fraying so I chose to leave these lined sections as they were at this stage. At the centre of the tie, running the full length, there is a piece of interfacing. However, the interfacing is not attached to the fabric of the tie. This makes it very simple to remove.

unpick the back seam of the tie
unpicking the back seam

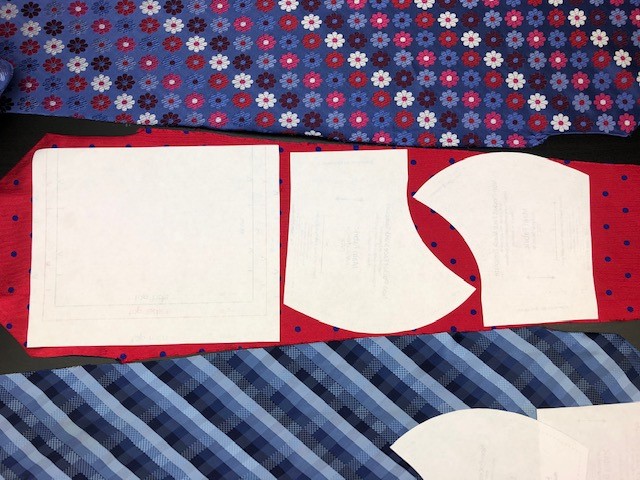
You can see below I ended up with three pieces of beautiful fabric from my ties. Each piece is large enough to make the front of two masks, one of each type. In the picture below you can see how the pattern pieces look laid out on the fabric.

patterns laid out on tie fabric
laying out the pattern pieces

Note – if you need to wash your masks on a high temperature then tie fabric might not be suitable. If this is the case I would suggest using two pieces of shirt fabric of different colours/patterns.

Recycle shirt fabric

When it comes to recycling the shirts I recommend salvaging the reusable elements first. Buttons always come in handy and I usually keep these on the band rather than picking them off the fabric. It is possible that you will be able to use the band of buttons and button holes as they are which saves you a lot of work!! Cuffs and collars can be retained whole as well although I normally find that those are the areas that show wear so are not usable.

Again – there is no real benefit to unpicking all the seams of the shirt. Unpicking takes a lot of time and does not normally result in a bigger usable piece of fabric. Simply cut the seams away to give flat sections of fabric. You will also need to cut along any darts. Always press the fabric before you use it unless it is lying perfectly flat.

The other element of these face masks is elastic or ties. There are many recycling options for these.

  • use elastic recovered from other recycled garments
  • cut old t-shirt fabric on the bias/diagonally to give a stretchy strip
  • use stockings or tights
  • use bias tape recycled from other garments to make ties

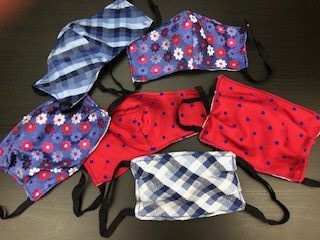
Here is a picture of my work. How do you like my recycled ties and shirt masks? I hope you will agree that they are a great way to make something useful from garments that would otherwise have been thrown away. Recycled ties make great face masks! If you like recycling you can read some of my yarn recycling tips here.

face masks from recycled ties
face masks made from recycled shirts and ties

I really hope we don’t have to wear these masks for long but I suspect we will be getting quite a lot of use out of them the way things are. Good luck everyone and stay safe!

Annie. ๐Ÿ™‚

Filed Under: Uncategorized

Crochet Rainbow Bunting

August 9, 2020 by Annie Leave a Comment

This post contains a free pattern and instructions for my Crochet Rainbow Bunting. I made this bunting with the scraps left over from the Heart Full of Rainbows cushion which you can see here, and the Rainbows and Hearts blanket which you can see here! My life has been full of chunky rainbows for some time and I probably need to move on! ๐Ÿ™‚

This bunting is a very quick make because the yarn is so thick. I used Lion Brand Yarns – HomeTown USA which is a super chunky yarn and a 9mm hook. It is quite possible to make five flag bunting with tassels, as shown below, in one evening.

I buy all my yarn in the uk from Wool Warehouse because I love their customer service and the fabulous range they hold. At the time of writing I am not an affiliate of theirs I just love their website! The colours I used were as follows:

  • Cincinati Red – 113
  • Syracuse Orange – 133
  • Pittsburgh Yellow – 158
  • Green Bay – 130
  • Detroit Blue – 105
  • Fort Worth Blue – 109
  • Mineapolis Purple – 147
crochet rainbow bunting

Crochet Rainbow Bunting Pattern

For each flag you will be starting at the bottom – the violet part of the rainbow! We will be changing colour every two rows. The ends of the violet band will not be woven in. We are going to use them to attach the tassel and the ends will be added to the tassel. The amount you need to leave is no different to the normal length you would use to tie in really. I normally leave 6 to 8 inches.

Crochet Rainbow Bunting – UK terms (please scroll down for US crochet terms)

Begin with Purple

Foundation – chain four. Three of these chains will be the equivalent of a Treble.

First row – work one Tr into the first chain. This treble along with the three chains form two posts on this row. Chain two and turn the work.

Second row – work 2DC. The first Dc is worked into the top of the Tr on the previous row and the second into the top of the starting chain.

Join in the dark blue.

Third row – chain 3 (this will form the equivalent of one treble on this row). Work 1Tr into the first of the two stitches on the previous row. Work 2 Trebles into the next stitch. Chain two and turn the work.

Fourth row – work a row of 4 Dc one into each of the stitches on the previous row (including the starting chain)

Join in the light blue

Fifth row – chain 3 into the first stitch (this will form the equivalent of one treble on this row). Work 2Tr into each of the next two stitches. Work 1 Tr into the final stitch of the row. Chain two and turn the work.

Sixth row – work a row of 6 Dc, one into each of the stitches on the previous row (including the starting chain)

Join in the Green

Seventh row – chain 3 into the first stitch (this will form the equivalent of one treble on this row). Work 2Tr into the next stitch and work 1 Tr into the next two stitches. Finally work two Tr into the next stitch and one Tr into the final stitch on the row. Chain two and turn the work.

Eighth row – work a row of 8 Dc, one into each of the stitches on the previous row (including the starting chain).

Join in the Yellow

Eighth row – chain 3 into the first stitch (this will form the equivalent of one treble on this row). Work 2 Tr into the next stitch and work 1 Tr into the next four stitches. Finally work two Tr into the next stitch and one Tr into the final stitch on the row. Chain two and turn the work.

Ninth row – work a row of 10 Dc, one into each of the stitches on the previous row (including the starting chain).

Join in the orange

Tenth row – chain 3 into the first stitch (this will form the equivalent of one treble on this row). Work 2 Tr into the next stitch and work 1 Tr into the next six stitches. Finally work 2Tr into the next stitch and one Tr into the final stitch on the row. Chain two and turn the work.

Eleventh row – work a row of 12 Dc, one into each of the stitches on the previous row (including the starting chain).

Join in the red

Twelfth row – chain 3 into the first stitch (this will form the equivalent of one treble on this row). Work 2 Tr into the next stitch and work 1 Tr into the next 8 stitches. Finally work 2 Tr into the next stitch and 1 Tr into the final stitch on the row. Chain two and turn the work.

Thirteenth and final row – work a row of 14 Dc, One into each of the stitches on the previous row (including the starting chain).

Crochet Rainbow Bunting – US terms (please scroll up for UK crochet terms)

Begin with Purple

Foundation – chain four. Three of these chains will be the equivalent of a Treble.

First row – work one Dc into the first chain. This Dc along with the three chains form two posts on this row. Chain two and turn the work.

Second row – work 2Sc. The first Sc is worked into the top of the Dc on the previous row and the second into the top of the starting chain.

Join in the dark blue.

Third row – chain 3 (this will form the equivalent of one Dc on this row). Work 1Dc into the first of the two stitches on the previous row. Work 2 Dc into the next stitch. Chain two and turn the work.

Fourth row – work a row of 4 Sc one into each of the stitches on the previous row (including the starting chain)

Join in the light blue

Fifth row – chain 3 into the first stitch (this will form the equivalent of one Dc on this row). Work 2Dc into each of the next two stitches. Work 1 Dc into the final stitch of the row. Chain two and turn the work.

Sixth row – work a row of 6 Sc, one into each of the stitches on the previous row (including the starting chain)

Join in the Green

Seventh row – chain 3 into the first stitch (this will form the equivalent of one Dc on this row). Work 2Dc into the next stitch and work 1 Dc into the next two stitches. Finally work two Dc into the next stitch and one Dc into the final stitch on the row. Chain two and turn the work.

Eighth row – work a row of 8 Sc, one into each of the stitches on the previous row (including the starting chain).

Join in the Yellow

Eighth row – chain 3 into the first stitch (this will form the equivalent of one Dc on this row). Work 2 Dc into the next stitch and work 1 Dc into the next four stitches. Finally work two Dc into the next stitch and one Dc into the final stitch on the row. Chain two and turn the work.

Ninth row – work a row of 10 Sc, one into each of the stitches on the previous row (including the starting chain).

Join in the orange

Tenth row – chain 3 into the first stitch (this will form the equivalent of one Dc on this row). Work 2 Dc into the next stitch and work 1 Dc into the next six stitches. Finally work 2Dc into the next stitch and one Dc into the final stitch on the row. Chain two and turn the work.

Eleventh row – work a row of 12 Sc, one into each of the stitches on the previous row (including the starting chain).

Join in the red

Twelfth row – chain 3 into the first stitch (this will form the equivalent of one Dc on this row). Work 2 Dc into the next stitch and work 1 Dc into the next 8 stitches. Finally work 2 Dc into the next stitch and 1 Dc into the final stitch on the row. Chain two and turn the work.

Thirteenth and final row – work a row of 14 Sc, One into each of the stitches on the previous row (including the starting chain).

Finish off the Crochet Rainbow Bunting

The problem with anything made with rainbow colours is the number of ends you have to weave in!! Hiding ends in chunky yarn is not easy but I highly recommend a little gadget by KnitPro – their wool needles. With these little beauties I found making up much quicker!

We are going to add tassels to the bottom of each flag – they help the flags hang better and look soooo lovely. Finish off all the ends but leave the start thread at the bottom and when you finish off the other purple end just take it down to the bottom too and leave it hanging there – we need about five inches or so – depending on the length of your tassels.

crochet rainbow bunting flags

Add the Tassels

Cut two lengths of each of the coloured yarn. I used pieces about 10 inches long. Make yours twice the length you want your finished tassels to be. Line up all the coloured lengths together matching the ends so they look neat. Don’t worry if some of them are sligthly different lengths – you can give the tassel a hair cut at the end. Put the lengths of yarn across the bottom of one of the flags at right angles to the flag.

Take the two strands of purple yarn and put one under and one over the bundle of lengths of yarn. Tie these two ends right in the middle of the bundle of yarn.

Next fold the bundle into two so they are hanging down from the flag in the position of the tassel. Take a single strand of one colour of yarn and wrap it around the top of the tassel about an inch from the top. This makes the top ball of the tassel. Tie this yarn tightly and thread the ends into the tassel to lose them.

Give the tassel a haircut if needed to level off the bottom. You could wait until they are all completed to do this. That way you can level across the whole set of flags.

Making up the Crochet Rainbow Bunting

This could not be more simple or quick! Work a nice tight chain as long as you need before the first flag.

If you want you can put a loop on the end by working six chain then form a ring by putting a slip stitch into the starting chain before carrying on in chain to the length you need.

When you get to the position you want to place the first flag work a row of 14 Dc (14 Sc in US terms) across the top of the red stripe at the top of the flag. At the end of the flag work in chain until you are happy with the spacing then pick up and work Dc across the top of the next flag.

At the end of the final flag work another chain to complete the bunting. Add another loop at the end if you are putting loops on to help you hang the bunting.

And that is all there is to it! I hope you love this quick make as much as I do. Happy Crocheting!

Annie ๐Ÿ™‚

Filed Under: Uncategorized

Design your own crochet sampler blanket.

July 18, 2020 by Annie Leave a Comment

This post will give you everything you need to know to be able to design your own crochet sampler blanket.

The photographs with this post are of my Spring Flower Blanket. I cannot share my pattern for this blanket as I did not write it down! This is still something that you could do yourself though….. interested? Read on!!

To make a Sampler Blanket

First step – pick your yarn

You will need to make some decisions here. Or maybe you will have some constraints and not need to make any decisions at all.

Yarn choice – are you lucky enough to be choosing new yarn or are you using yarn from your stash? You could be using recycled yarn – see my series of posts on yarn recycling here, Yarn recycling #1, Yarn recycling #2, Yarn recycling #3.

I chose four main colours for my project plus black for the edging and highlights. If you are picking yarn then consider the fact that all the colours will need to work together in pairs as well as overall. Otherwise you are restricting your options with the patterns and stitches you can use.

You might be working with a much larger number of colours if you are using oddments of yarn. If this is the type of project you are starting then consider splitting the yarn into groups of light/dark or by colour groups as part of a bigger design. This gives you the option of an overall design based on two tones with lots of variety in the detail. Eg an overall design that is just two colour types, blue or green. Where the actual blue is from a mix of any you have as is the green. Does that make sense? Or where you have every section either from your light group or your dark group.

Part of the decision on yarn has to be the weight you will work in. If you have mixed weights in the yarn you are using you will need to double up some of the strands and work with the largest gauge. If in doubt make a set of sample squares using the same hook and number of stitches and varying the number of strands of yarn you use until you get to squares of equal size where the feel of the square is similar.

TIP – If the squares are too dense and stiff then you probably need to reduce the number of strands of yarn. If you cannot reduce the number of strands then you should go up a hook size or two. If the square is too open and loose feeling, try adding another strand of yarn or going down a hook size.

Second Step – What size blanket will you make?

What will you use your blanket for? To an extent the yarn choice will influence the type of blanket you make. If you have a thick yarn it won’t really work for a cot blanket but might be perfect for a lapghan for those cold evenings! Next, you will need to check you have sufficient yarn to make a blanket of the size you would like. If you are lucky enough to have lots of yarn then you can skip this step. If not, you can use your tension square for to estimate the maximum size of blanket you can make. Although the measurement will not be very accurate so please allow a lot of wriggle room!

This next bit is the calculator….. you can download a template here to make this a bit easier.

Yarn Calculator (24 downloads)

To calculate approximate size of the blanket you can make. Work up a tension square and weigh it with the most accurate scales you have. We will call this weight B – write down this weight. Write down the size of the sample square in square centimetres – Size A. Multiply the length of your sample by its width. If your sample square is 10 x 10 centimetres then your size A is 100 square centimetres.

TIP – the stitch you use to work up the sample square is very important. If you use a ‘dense’ stitch then the square will be heavier and use more yarn than an open or lacy stitch would use. This is one of the reasons that this calculator gives a very rough guide. If you stick to one stitch or stitch pattern and use that for the sample square it will be much more accurate.

Next, take the total volume of yarn you have and weigh it – write this down as weight T. Divide this total weight by the weight of the sample square which will give you another number – write this down as Factor F.

To work out the approximate size of blanket your yarn will make multiply the value you wrote down as Factor F by the number your wrote for size A. This gives you the maximum total area in square centimetres that the yarn will make. If you divide this by the width of your desired blanket size you will get the maximum length your yarn will make. This download gives you a table of typical blanket sizes which might help you.

Blanket Sizes (25 downloads)

Once you have your size you will need to work out the number of stitches that will make up the width of the blanket. To do this take your desired width and divide by the width of the tension square. If you are working from the tension square on a ball band this will normally mean dividing by 10. Multiply by the number of stitches on one row of your tension square and you have the number of stitches on a row of your blanket. The download takes you through this calculation step by step. The method works whether you have a ball band or not!

My Spring Flower Blanket is worked in DK yarn and has 250 stitches across each row.

Design your own crochet sampler blanket.
Spring Flower Crochet Sampler Blanket

Start the blanket

Start with a long chain. The chain needs to have the number of stitches you calculated above for one row, plus two more.

First row. Work DC into the third stitch from the hook and each chain to the end of the work. Try hard to keep the chain straight – it can twist quite easily and this will result in a twisted, misshapen edge. Not the end of the world if this happens – you can improve matters with the edging later but best to avoid twisting if you can.

Once you get to the end of the first row – you are on your own! No not really but you can decide where you want to go from here. I suggest a few rows at least of DC/Trebles for stability (SC/DC in Us terms). Alternate colours as and when you choose.

Blanket Ideas

  1. You could keep the stitch simple and base your design around the colours. Working every row in DC (SC in US terms) will be quite slow and will produce a blanket with quite a dense texture. You could choose trebles (DC in US terms) or a more complicated stitch. The design would be based around alternating the colours – stripes or ombre.
  2. Design the blanket in panels based on one or two stitches. Choose at least one fairly basic stable stitch like DC or Trebles (SC or DC in US terms) and alternate these in panels whilst also rotating the colours you have into an overall pattern.
  3. Work the blanket as a sampler using any stitch you fancy and alternating colours as you go. This is the approach I have taken with most of my Spring Flowers Blanket. I have also incorporated a fourth complication.
  4. break up the work by including a row of squares or other motifs. To do this you will need to divide the total number of stitches by the number of stitches in the square or motif. This will allow you to work out how many of the squares or motifs you need. This is quite a lot of additional complication and more making up work. The only thing I would say if you are going down this route is remember to allow for any joining stitches if you are adding a row of squares or other motifs!

As I am writing this I can see that there are more ideas in my head than will fit into this post. I would like to tell you about the stitches that work well and add some tips based on my experience making this blanket. There is also the choice of edging to consider! ๐Ÿ™‚ I will plan some follow up posts!!

If the idea of designing your own blanket feels too ambitious (I promise it isn’t) start by keeping things simple. Go for a small lapghan size and maybe only use one or two stitches – alternate one row of trebles with a row of DC (DC and SC in US terms) and change the colour every six rows – that would give you a bit of texture and a striped blanket. It would be your design based on your colour and stitch choices. It would be unique (unless you make more than one the same ๐Ÿ™‚ )

I hope you find the calculator helpful. Please let me know if you have any questions by leaving a comment below or email me. I would love to see examples of your work when you do design your own blanket.

Happy Crocheting!

Annie ๐Ÿ™‚

Filed Under: Uncategorized

Crochet Chain Garland

May 31, 2020 by Annie Leave a Comment

In an attempt to help reduce plastic pollution, I have been making sustainable decorations including this crochet chain garland. This is another fun, quick, easy make. I made the example here in sustainable cotton as part of a set of decorations I designed with weddings or girls bedrooms in mind.

Crochet Chain Garland with ‘table confetti’ hearts

If you like the little ‘table confetti’ hearts, the pattern for those is here.

This idea would also work with bright colours and different weights of yarn. The pattern is a fab stash buster as you can mix and match any colours you have. Each link in the chain requires only a small amount of yarn. I plan to make a super chunky version with the left over yarn from all my rainbow projects which you can see here

Crochet Chain Garland Pattern

Note – this pattern uses DK weight yarn and a four mm hook. However it can be adjusted to any yarn weight – instructions at the bottom.

For the first link.

Chain 35 and join to the first chain with a slip stitch.

First round – chain two. Work DC into the each chain (SC in US terms). Finish the round with a slip stitch to join to the top of the first stitch.

Second round – chain three. Work TR (DC in US terms) into each of the DC on the previous row. (SC in US terms). Again finish the round with a slip stitch.

Third and final round – work a round of DC (SC in US terms) as round 1. Finish with a slip stitch and tie off the yarn. You have made your first link.

Second and all subsequent links

Start with a chain the same length as your first link. If you are using the same weight yarn as I used that means a chain of 35. The only difference between this and the first link is that we need to join to the rest of the garland. To do this, thread the chain through the first link before you make the slip stitch into the first chain to form the loop.

Continue to form this link in the same way as you made the first. Each link in the chain is free to move through its neighbours. They are not attached – just threaded together.

And that is it! Continue for as many links as you like. Make patterns with the colours or make them happily random with any remnants from your stash!

Changing the pattern to suit different weights of yarn.

Consider what size of link will work best for the yarn weight. I find that links work well when the length of the link is eight to ten times the height. You can work out how many stitches it takes to make the size you require based on the tension square instructions on the ball band.

Example – Super Chunky – Lion Brand Yarns – Hometown USA. The ball band has a 10cm tension square of 12 rows x 9 stitches. The pattern gives the equivalent of four rows so the links would be c 3.3 cm high.

I want each link to be 8 to 10 times as long as they are tall so I need them to be 27cms which means 30 stitches. This is super chunky yarn so these chains will be HUGE – but I hope that gives you the method to use to adjust the pattern.

Hope you enjoy making these happy garlands!

Annie. ๐Ÿ™‚

Filed Under: Crochet patterns, Uncategorized Tagged With: bunting, crochet, crochet design, crochet garland, free crochet pattern, Free pattern, handmade, sustainable decorations, sustainable wedding, wedding

Yarn Salvage #3 – how best to use the yarn

April 27, 2019 by Annie Leave a Comment

Yarn recycling is fun, rewarding and good for the planet! In my two earlier posts I gave you tips on garment selection and salvage. Yarn Salvage #3 – How best to use the yarn….. will give more advice on how to process the yarn you collect and the best way to use the yarn. You can see the earlier posts here Yarn Salvage Tips #1 and Yarn Salvage Tips #2

There are a number of different aspects to yarn that influence how you treat it and the type of project it is suited to. The three main aspects I will cover here are yarn weight, ply and content.

Yarn Weight – wpi

This is an important aspect of the yarn when it comes to determining the type of project you can use the yarn for. We measure Yarn Weight in ‘wraps per inch’. You can pay a lot of money for a gadget that works out the wpi for any yarn. It really isn’t difficult though and in my view not worth spending hard earned cash on! Wraps per inch is the number strands of yarn that will fit into one inch. The strands should sit next to each other comfortably. There should be no overlap or stretch.

To make your own gadget to measure wpi you need a pen, ruler and piece of wood – ideally something rounded like a broom handle. We use an old clothes peg ๐Ÿ™‚

Take the ruler and place two marks on the wood one inch apart. Draw lines around the wood at the places you have marked. You are already ready to use the tool!

Take the yarn you want to assess and wrap it around the tool. Place the first strand of yarn just inside the first mark you made. Wind the yarn round the tool without stretching the yarn. Each strand of yarn should sit alongside the previous strand with no overlap. When the yarn wrapped around the tool reaches the second mark, stop winding. Count the number of wraps of yarn between the two markers. This is your wraps per inch for the yarn or wpi.

Yarn Ply

Ply is the number of individual strands that make up a yarn. Sometimes the strands are twisted so that the yarn handles as one strand. Sometimes you unravel a garment and find that the yarn is made up of several strands that have not been twisted. You can choose whether to separate out the strands or keep the yarn as multi-strand. What you choose to do will depend on the type of yarn and the type of project you want to use it for. I keep detailed records of recovered yarn. I write down the wpi and where the strands are not twisted, also note the ply. This gives me good information when planning projects.

Yarn content

The easiest way to identify the yarn content is to take the information from the garment label when you recover the yarn. I try to select garments with an element of natural fibre. When combining yarn in a project I try to match fibre types. This is not always possible. Yarn content will impact the way the yarn changes over time. It will also have a big impact on the way the yarn washes. If you have a project made from recycled yarn always wash on a wool/cool setting and dry flat. This is particularly important when combining more than one salvaged yarn.

Unravelled yarn often has a lot of ‘kinks’. When you crochet or knit with the yarn these kinks will disappear. If they bother you you can try to reduce them. I say ‘try’ because this method will produce varied results according to the yarn composition. The lower the percentage of natural fibre the less effective this method will be.

Flattening kinks in yarn containing natural fibres

Firstly, turn the yarn into hanks rather than balls. There are expensive machines that make this job easier but we are trying to save cash! You can wind yarn into hanks using your own arm winding the yarn between the base of your thumb and elbow. You can also use the back of a chair or enlist the help of a small human! I find small humans to be helpful and compliant until they hit teenage years. Teenagers are less than inspired by the idea of helping wind yarn ๐Ÿ™‚

Once the yarn is in hanks soak them in warm water – NOT HOT (unless you want to end up with felt). You can add wool washing liquid or powder. The kinks should begin to relax in the water. You may have to leave the yarn soaking for a few hours. Rinse and dry the yarn either flat on a towel or hanging over a bath. Do not squeeze or ring out the yarn. Finally you will need to reball the yarn for use.

Using the recycled yarn

Now you have added all this recycled yarn to your stash what will you make? It is possible to use the yarn recovered from one garment to make another garment. However, it is likely that during the recovery process some yarn will have been lost. This means that you might need to top up the quantity of yarn from one garment in order to have enough to make another.

You can top up the recovered yarn with yarn from your stash. You could buy some yarn to contrast or compliment the recovered yarn. Or you could combine different yarns that you have recovered into one project.

Most patterns are designed for yarn of a particular weight or wpi as above. One of the latest patterns I wrote was for a super chunky yarn worked up on a 9mm hook. I wanted something that would grow and complete quickly! I decided to use this pattern as an example of how I work with recycled yarn.

Much of the yarn I salvage has a high wpi. This is because most yarn used in the industrial manufacture of garments is lightweight around 14 wpi. I prefer to work with a heavier yarn, aran or chunky weight around 7 or 8 wpi. However, you can combine the yarns you recover to produce a heavier weight yarn. This is what I did in my latest project. The resulting yarn can look startling different to its component parts.

Hearts and Stripes Recycled Blanket

Here is my recycled project. The pattern is one I designed myself and is available for free here. The yarns I used are different ply and composition but worked up very easily as one yarn. Remember to test the wpi of your combined yarn before starting the project. I expected the crochet to be difficult and that the yarn would split but this was not the case. Finishing off the ends was the only part that I found more difficult but with a little extra patience and care even that was not too much of a challenge. Here are the recycled yarns I started with.

Salvaged yarn

I combined the recycled yarn with some super chunky white yarn from my stash. This was left over from a previous project. As you can see the finished result looks quite different to the four yarns that went into the work.

yarn salvage - how best to use the yarn

There are many ways to choose yarn for your projects. For me, there is nothing better than laying out all the balls of recovered yarn on the floor and playing with the colour combinations. This is how I get inspiration for my next project. Group the yarn by colour and see what works! Happy recycling!!

Annie ๐Ÿ™‚

Filed Under: Uncategorized, Upcycling Tagged With: crochet blanket, recycling, recycling yarn, super chunky yarn, yarn, yarn combining, yarn salvage

Hair accessory

June 24, 2018 by Annie Leave a Comment

Hello!    I wanted to share this free pattern for a hair accessory with you.    Most of my making time at the moment is going into a large blanket made of smaller squares.   I am spending all my time making these squares and finishing off the ends.    The work is a stash buster in its own right as it uses small quantities of yarn to make each square.   However, I am still finding myself with some very small oddments and it hurts me to thrown those away so I have come up with this design to use even the smallest pieces of left over yarn!    Here is the finished result.


Instructions – Hair Accessory.

To make this you need small oddments of yarn, an elastic hair band/tie and the size of crochet hook appropriate to your yarn.   In my case I am using left over Drops Paris yarn which takes a size 5mm hook.

Start by making a magic loop that goes through the middle of the hair band.   I found this a bit of a mind bend to start with!   I am including a picture below so that you can lay your work down and copy mine if that helps!

Work 12 DC (SC US) into the magic loop.    You might need to vary this according to the weight of your yarn.   It doesn’t really matter how many stitches you put into the loop as long as you can pull it tight to circle the hair band – see below.

Without breaking the yarn work a chain to the length you require.   This will form one of the ‘ribbons’ in the final item.   If you are using light/acrylic yarn then the ribbon will spiral so you may need a longer chain.   In the yarn I am using the ribbons do not curl much and I used a chain of between 12 and 16 in the finished piece pictured.

When you have the chain to the length you require work back along the chain either using slip stitches or DC (US terms SC).   The SC will give the effect of a cord, DC (SC US) will give a thicker strip.    Finish off the strip with a slip stitch into the outer edge of the DCs in the magic loop.  This will reinforce the join between the ring and the strips and make the item more robust.

Join in other colours to the DC’s in the magic ring and repeat the steps above to add more strands to the accessory.   Keep these close together on one side of the ring so that the other side can sit against the wearers head without making it uncomfortable.

Finish the piece by sewing in the ends but this need not take long as you can run the loose ends down the length of the ribbons very quickly!    And that is it – you can play with colours – match them to other garments or use any random oddments in your stash!    These could look lovely on flower girls if they were worked all in cream/white or could be made to match the colours of flowers or bridesmaids dresses.

Hope you have a go at this and enjoy the results as much as I did.    I think it is a really fun way to use up tiny scraps of yarn and a lovely break from big projects.  Happy crocheting!

Annie ๐Ÿ™‚

Filed Under: Craft projects, Crochet patterns, Uncategorized Tagged With: commuter crochet, Craft, crochet, design, Free pattern, girls, hair, hair accessory, handmade, kids, stash busting, yarn

Footer

Newsletter

Copyright © 2021 ยท Genesis Sample on Genesis Framework ยท WordPress ยท Log in