• Skip to primary navigation
  • Skip to main content
  • Skip to footer

Stickytapeandstring

Created with WordPress managed by 1&1

  • Craft projects
    • craft business tips
    • craft blog
    • Crochet patterns
    • Upcycling
    • craft with kids
  • Blogging
    • New to blogging
    • Blog diary
  • Bullet Journal
  • About me
  • Welcome!!

blankets

Yarn salvage

September 2, 2018 by Annie Leave a Comment

Hello, I am here to share my latest obsession!    Getting lots of yarn for very little money through yarn salvage and recycling…….. what’s not to like?!

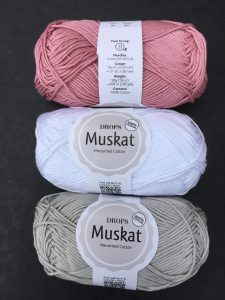
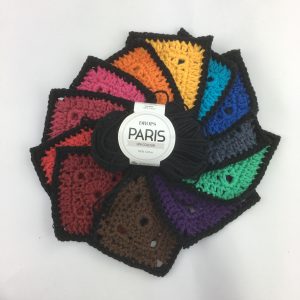
This project started with me worrying about the cost of the yarn I am using to develop projects and patterns for the blog.   Even using cheaper yarns like my well loved Drops Paris, the cost mounts up when you are making a large blanket.   Crochet seems to ‘eat’ far more yarn than knitting, or is that just me?

I gave some thought to sources of cheap yarn and began to wonder about Charity shops/Thrift stores and yarn salvage.  

Yarn Salvage and recycle!

After a bit of research I can tell you that woollen/knitted garments typically cost between £2 and £5 in these outlets.   If the yarn could be salvaged that would be quite a lot of yarn for a very low cost.   One problem is that it is the wrong season currently with warmer temperatures shops are not selling much knitwear but we still managed to find some candidate garments.

I say we because I decided to rope my Mum into this project.   I remember from my childhood that she really enjoys undoing knots and taffles.   Turns out Mum also quite likes rummaging through Charity/Thrift shops for bargain items of knitwear!   A knitter herself for many years Mum understands the construction of garments.   This is a big help when choosing pieces for yarn salvage.

We are now some way into our project.    Mum has sourced some 15 garments and we have learned which types work best and the types to avoid.    Here are our tips for garment selection.

TOP TIPS for Garment Selection when Recycling yarn

1. Look at the washing label – that gives you the yarn type, % composition wool, acrylic etc.  This info is normally on the reverse of the label

2. Inspect the seams.  The shoulders will normally be overlocked (zigzag stitching over both joined edges on the inside of the seam).   This isn’t a problem but if you see this type of seam elsewhere on the garment this usually means the knitted fabric has been cut and joined which means there will be a break in the yarn on every row.   This gives very short lengths of yarn.   Avoid!

3. Unless you fall in love with a particular yarn, go for jumpers rather than jackets/cardigans.  Jumpers are normally easier to unpick.   Jackets and cardigans can be very difficult to deal with where the front band is attached and again are sometimes cut, resulting in short lengths of yarn.

4. Look at the texture.   Unravelling thicker yarn is generally easier than the finer ones.

5. Large garments often cost the same as smaller ones as pricing tends to be per garment.   The larger the garment the greater the quantity of yarn you can recover!

Read on for more tips on garment selection

6. Charity shops are seasonal.   Many will not display knitted garments in summer but it is always worth a look.   Lighter weight items will probably still be available.

7. One you have a stock, bear in mind the colours and weight of your yarns – look for items you can combine.

8. Shops have sales.    Even though these outlets are incredibly cheap to start with there are times when they discount.   There are also sometimes discount rails where items have been in store for a time and not sold.   Keep an eye out for sales!

9. Make sure you are looking in the right kind of shop.   Shops selling vintage or retro garments will be selecting stock based on the style and age of the garment and will be charging a much higher price than the average Charity Store.

10. Do not be put off by the style of a garment.   You will not be wearing it!  An item that is not attracting buyers in its current form might be made of very attractive yarn!

Recovering the yarn

We also learnt how best to recycle the yarn and to work out what to do with the yarn we recovered.   I will cover these in a later post.

The first few garments we bought are shown in the photos below.    When you start to take the garments apart you have to be very careful not to snip the yarn.   However, if you do snip the yarn in error it just gives shorter lengths or smaller balls which can still be used – depending on the project you select.

first garment for yarn salvage project
second garment for yarn salvage project
third garment for yarn salvage project

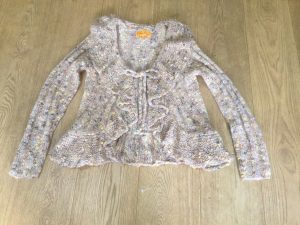
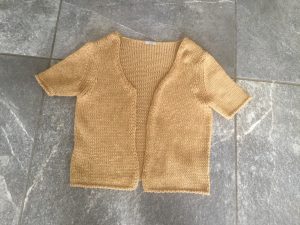
Yarn Salvage – Unpicking the garments

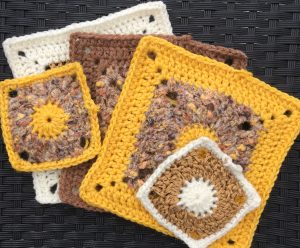
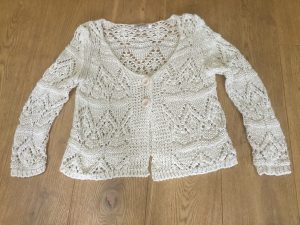
The first garment we unpicked was the flecked cardigan.   This one gave me the inspiration for a blanket project.    We picked creams and browns to go with it and unpicked the other two garments shown.    These photos show the quantity of balled yarn we ended up with.   More than 1kg of yarn for £6, not bad eh? On the subject of money a bit of small print I am obliged to share. Adverts and banners in this post are affiliate links. If you click on them I might receive a small payment which supports my blog and allows me to keep posting. Right – on to the interesting stuff. CHEAP YARN and free patterns!!

yarn salvage project - recycled yarn
yarn salvage project more recycled yarn
recycled yarn from yarn salvage project

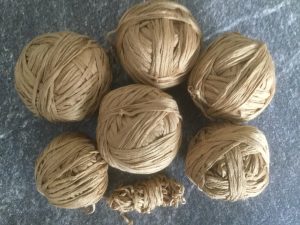
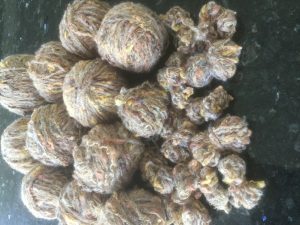
The yarn is more or less Aran weight.   I will include more on how to identify the weight in the next post.   I used to have an obsession with knitting cabled sweaters so have a lot of oddments of plain aran yarn in my stash.    Some of the oddments were in similar colours to the yellow/orange flecks in the ‘inspiration’ yarn.   I put these oddments from my stash with the salvaged yarn to give me a large enough quantity to produce a blanket.

Yarn Salvage – Using the recycled yarn!

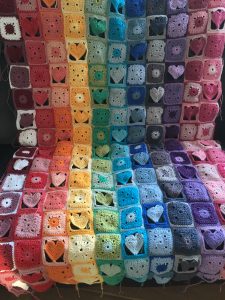
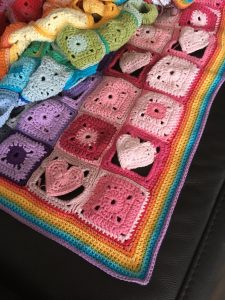
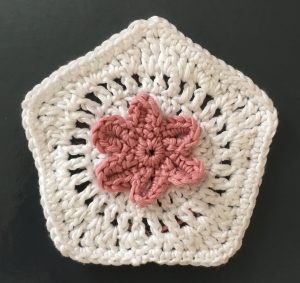
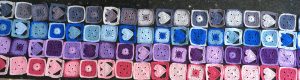
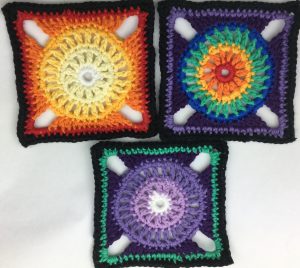
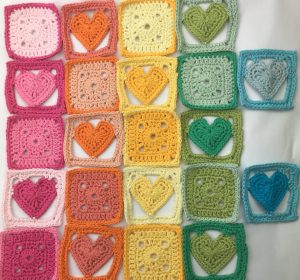
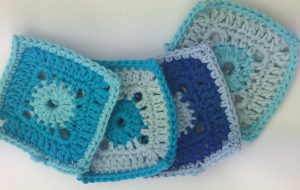
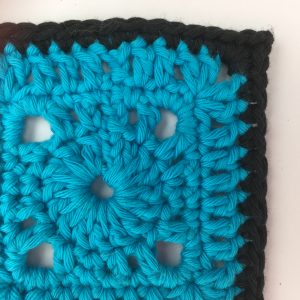
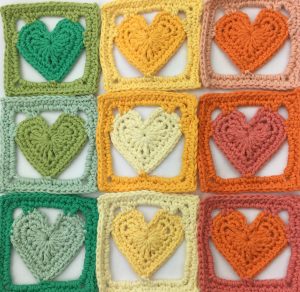
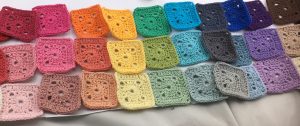
Next in my yarn salvage project, I came up with a block pattern that I can scale up and down to make three different sizes of square.   The pattern(s) are shown at the bottom of the post.    These are some of the blocks I have completed so far.

sample squares from salvaged yarn

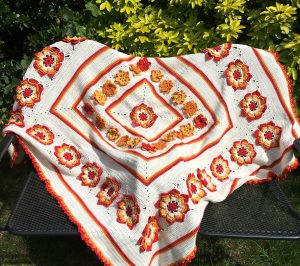
Finally, turning this blanket into a whole family project, my husband designed a layout for the blocks.

blanket layout of different sizes of recycled yarn squares

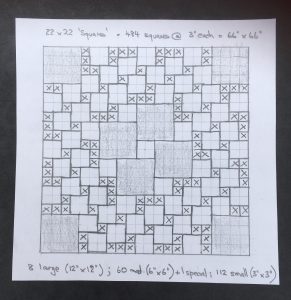
Here are the patterns I am using for the three sizes of block.  I might need to amend these when it comes to stitching up if the weights of the yarn result in size differences.   I will either block them to the correct size or add additional rows to increase the size!   The change of colour instruction in these patterns shows you how I am working – you can change colour whenever you like or make the blocks solid colour.   It really depends on the yarn you have from your own yarn salvage project.

Instructions in UK terms – please SCROLL DOWN for US terms

Large Square – UK terms

1st round – make a magic loop, 2Ch, 9Dc slip stitch to join to the start point
2nd round – Ch3, 2Tr in each stitch, Tr, slip stitch to join to the start point
Change colour
3rd round – Ch2, Dc in each stitch (19), slip stitch to join to the start point
4th round – Ch3, 2xTr cluster, Ch1, (3Tr cluster Ch1)x 19. Slip stitch to join to the start point
5th round – Ch2, 3HTr, (2Tr, DTr, chain 3, DTr, 2Tr, 4HTr) x 3, 2Tr, DTr, chain 3, DTr, 2Tr, slip stitch to join to the start point.
Change colour
6th round – Ch2, Htr round, 2HTr, 1Ch 2HTr, in each corner, slip stitch to join to the start point.
7th round – Ch2, Tr round 2Tr, 1Ch, 2Tr in each corner, slip stitch to join to the start point.
Change colour
8th round – Ch2, Htr round, 2HTr 1Ch 2HTr, in each corner, slip stitch to join to the start point.
9th round – Ch2, Tr round 2Tr, 1Ch, 2Tr in each corner, slip stitch to join to the start point.
Change colour
10th round – Ch2, Htr round, 2HTr, 1Ch, HTr, in each corner, slip stitch to join to the start point.
11th round – Ch2, Tr round 2Tr, 1Ch, 2Tr in each corner, slip stitch to join to the start point.
Change colour
12th round – Ch2, Htr round, 2HTr, 1Ch, 2HTr, in each corner, slip stitch to join to the start point.
13th round – Ch2, Tr round 2Tr, 1Ch, 2Tr in each corner, slip stitch to join to the start point.
Change colour
14th round – Ch2, Htr round, 2HTr, 1Ch, 2HTr, in each corner, slip stitch to join to the start point.
15th round – Ch2, Tr round 2Tr, 1Ch, 2Tr in each corner, slip stitch to join to the start point.
16th round – Ch2, Htr round, 2HTr, 1Ch, 2HTr, in each corner, slip stitch to join to the start point.
Change colour
17th round – Ch2, Htr round, 2HTr, 1Ch, 2HTr, in each corner, slip stitch to join to the start point.

Medium sized square – UK terms

1st round – Make a magic loop, 2Ch, 9Dc slip stitch to join to the start point
2nd round – Ch3, 2Tr in each stitch, Tr, slip stitch to join to the start point
Change colour
3rd round – Ch2, Dc in each stitch (19), slip stitch to join to the start point
4th round – Ch3, 2xTr cluster, Ch1, (3Tr cluster Ch1)x 19. Slip stitch to join to the start point.
5th round – Ch2, 3HTr, (2Tr, DTr, chain 3, DTr, 2Tr, 4HTr) x 3, 2Tr, DTr, chain 3, DTr, 2Tr, slip stitch to join to the start point.
6th round – Ch2, Htr round, 2HTr, 1Ch, 2HTr, in each corner, slip stitch to join to the start point.
Change colour
7th round – Ch2, Htr round, 2HTr, 1Ch, 2HTr, in each corner, slip stitch to join to the start point.
8th round – Ch2, Tr round 2Tr, 1Ch, 2Tr in each corner, slip stitch to join to the start point.
9th round – Ch2, Htr round, 2HTr, 1Ch, 2HTr, in each corner, slip stitch to join to the start point.

Small Square – UK terms

1st round – Make a magic loop, 3Ch, 15Tr, slip stitch to join to the start point.
Change colour
2nd round – Ch3, 2xTr cluster, Ch1, (3Tr cluster Ch1)x 15, slip stitch to join to the start point.
3rd round – Ch2, HTr, (2Tr, DTr, Ch3, DTr, 2Tr, 2HTr,) x 3,  2Tr, DTr, Ch3, DTr, 2Tr, slip stitch to join to the start point.
Change colour
4th round – Ch2 work Dc along each side, 2Dc, 2Ch, 2Dc in each corner, slip stitch to join to the start point.

Instructions in US terms – please SCROLL UP for UK terms

Large Square – US terms

1st round – make a magic loop, 2Ch, 9Sc slip stitch to join to the start point
2nd round – Ch3, 2Dc in each stitch, Dc, slip stitch to join to the start point
Change Colour
3rd round – Ch2, Sc in each stitch (19), slip stitch to join to the start point
4th round – Ch3, 2xDc cluster, ch1, (3Dc cluster ch1)x 19. Slip stitch to join to the start point
5th round – Ch2, 3Hdc, (2Dc, Tr, chain 3, Tr, 2Dc, 4Hdc) x 3, 2Dc, Tr, chain 3, Tr, 2Dc, slip stitch to join to the start point.
Change colour
6th round – Ch2, HDc round, 2HDc 1ch 2HDc, in each corner, slip stitch to join to the start point.
7th round – Ch2, Dc round 2Dc, 1ch, 2Dc in each corner, slip stitch to join to the start point.
Change colour
8th round – Ch2, HDc round, 2HDc 1ch 2HDc, in each corner, slip stitch to join to the start point.
9th round – Ch2, Dc round 2Dc, 1ch, 2Dc in each corner, slip stitch to join to the start point.
Change colour
10th round – Ch2, HDc round, 2HDc 1Ch 2HDc, in each corner, slip stitch to join to the start point.
11th round – Ch2, Dc round 2Dc, 1ch, 2Dc in each corner, slip stitch to join to the start point.
Change colour
12th round – Ch2, HDc round, 2HDc 1Ch 2HDc, in each corner, slip stitch to join to the start point.
13th round – Ch2, Dc round 2Dc, 1ch, 2Dc in each corner, slip stitch to join to the start point.
Change colour
14th round – Ch2, HDc round, 2HDc 1Ch 2HDc, in each corner, slip stitch to join to the start point.
15th round – Ch2, Dc round 2Dc, 1ch, 2Dc in each corner, slip stitch to join to the start point.
16th round – Ch2, HDc round, 2HDc 1Ch 2HDc, in each corner, slip stitch to join to the start point.
Change colour
17th round – Ch2, HDc round, 2HDc 1Ch 2HDc, in each corner, slip stitch to join to the start point.

Medium sized square – US terms

1st round – Make a magic loop, 2Ch, 9Sc slip stitch to join to the start point
2nd round – Ch3, 2Dc in each stitch, Dc, slip stitch to join to the start point
Change colour
3rd round – Ch2, Sc in each stitch (19), slip stitch to join to the start point
4th round – Ch3, 2xDc cluster, ch1, (3Dc cluster Ch1)x 19. Slip stitch to join to the start point.
5th round – Ch2, 3HDc, (2Dc, Tr, chain 3, Tr, 2Dc, 4HDc) x 3, 2Dc, Tr, chain 3, Tr, 2Dc, slip stitch to join to the start point.
6th round – Ch2, HDc round, 2HDc, 1Ch, 2HDc, in each corner, slip stitch to join to the start point.
Change colour
7th round – Ch2, HDc round, 2HDc, 1Ch, 2HDc, in each corner, slip stitch to join to the start point.
8th round – Ch2, Dc round 2Dc, 1Ch, 2Dc in each corner, slip stitch to join to the start point.
9th round – Ch2, HDc round, 2HDc, 1Ch, 2HDc, in each corner, slip stitch to join to the start point.


Small Square – US terms


1st round – Make a magic loop, 3Ch, 15Dc, slip stitch to join to the start point.
Change colour
2nd round – Ch3, 2xDc cluster, Ch1, (3Dc cluster Ch1)x 15, slip stitch to join to the start point.
3rd round – Ch2, HDc, (2Dc, Tr, Ch3, Tr, 2Dc, 2HDc,) x 3,  2Dc, Tr, ch3, Tr, 2Dc, slip stitch to join to the start point.
Change colour
4th round – Ch2 work Sc along each side, 2Sc, 2Ch, 2Sc in each corner, slip stitch to join to the start point.

And that is it from me.   I hope you enjoy rooting around for knit wear to recycle and yarn salvage!   Please share your stories.    Happy crocheting!

Annie 🙂

Filed Under: Craft projects, Upcycling Tagged With: blankets, crochet, crochet blocks, design, Free pattern, frugal, handmade, recycling, salvage, stash buster, stash busting, yarn

Crochet blog – update #8

August 18, 2018 by Annie Leave a Comment

Hello and SORRY – it has been a few weeks since my last post.    I was calling these ‘weekly’ updates but that just hasn’t been happening.    My day job has been REALLY busy for a few weeks but should be calming down now, so hopefully I will get to spend my weekends here again.

I have still been busy with my crochet projects on the train each day.    I have also been able to work on with my Hearts and Spots blanket in the evenings.  Although I don’t want to get my laptop out after a day in the office – I don’t mind a bit of crochet to wind down before bed.

Here are the latest views of the blanket.   I still have to tie in all the ends but it is all stitched together.  The border would be finished if I hadn’t run out of yarn!   The yarn order is in for just two more balls of Drops Paris to complete the project.   The patterns for the squares are on my blog, heart square pattern here and basic square pattern here.   I am not fully happy with the way they fit together so I will be tweaking them over the coming weeks.   I plan to put a smaller version of the blanket together as a kit so watch this space on that.

This project is waaay too big for the train now so I have been working on other things in the mornings and evenings.   I started work designing more blocks and produced a pentagon….  not terribly useful as they don’t tesselate or fit together easily.   I might turn out a pattern for a ball (think football/soccer) at some point using these and a hexagon or two 🙂  I will put the hexagon pattern up on here in case anyone finds it helpful for a five sided project!   I suppose you could just keep going round and make a pentagon shaped blanket.

My other project on the train has been a little bag.   I am quite pleased with this so far.   It looks a bit basic as it still needs handles, decoration.  I think I might include a lining.   Again I am thinking about putting this pattern together as a kit on Etsy but I will share the pattern for free on the blog as soon as I can get it written up.

I have been using a lighter weight yarn for these two projects, Drops Muskat.   Another winner from Drops as far as I am concerned.  This yarn again is incredible value and consistent quality.  I have yet to find a knot!  The yarn is 100% mercerized cotton with a lovely sheen and tight twist which means that it doesn’t split much if at all when being worked.   Easier if you want to be looking up from the work a bit!  I have been using a 4mm hook for this yarn which seems to work well.  The finished work has great stitch definition so would really show off complicated stitches.

Finally, a team project has started in my house.    It started with me worrying about the cost of yarn.   I began wondering whether it would be possible to get hold of some yarn very cheaply by buying old knitwear and dismantling garments to recover the yarn.   This is where my Mum came in and if I am honest has completely taken over!   A trawl of local charity/thrift shops turned up a number of candidate garments.    We got to work (carefully) with scissors, unpicking and balling and the results have been amazing.    I will put up a separate post on the process and results as I could fill pages with what we found and learned.   For this post, in summary, we have recovered a huge quantity of yarn so far for a tiny outlay.   My Mum is now unstoppable in her search for woollies to dismantle and I have started my first project using this recovered yarn!    I am trying to top up what we find with yarn from my stash but as it stands far more is going into my stash than is coming out!!

Here are some of the pics of the project using the recycled yarn.   The inspiration for the project was the first yarn we recovered – a soft brown boucle yarn flecked with yellow and orange.    I came up with a pattern for a block using a cluster stitch (another new one for me).    I will share the patterns in a separate post.

My husband loves drawing and designing and was once an engineer before moving on to other things so he likes a bit of geometry and maths.    I enlisted his help for this project as I was short on time.   He came up with this layout below which I really like – I think I will be asking him for designs more often!   Here is his sketch.

I have had a very exciting time with the blog this month.   One of my posts on pricing of handmade work seemed to catch attention out there and drove far more page views than I have had previously.   My income from ads ‘soared’ to £1.83 in one month 🙂 clearly still a long way to go to being financially secure!

That’s all from me for this post – I have promised a number of follow on posts and patterns so I had better get working!   Please get in touch either by leaving a comment or joining my mailing list.   I love hearing from you all.

Happy crocheting!

Annie 🙂


Filed Under: craft blog, Craft projects Tagged With: bags, blankets, commuter crochet, cotton, crafts, crochet, crochet blog, design, handmade, recycling, recycling yarn, small bags, stash, stash busting, upcycling, yarn, yarn salvage

Crochet blog – update #6

July 1, 2018 by Annie Leave a Comment

Hello and welcome to my sixth update!   This week I made more progress on my blanket project.   I realised I have been calling it different names as is has progressed.   It started life as my Shades of the Rainbow blanket but more recently I have been calling it Hearts and Spots!   Whatever name it ends up with I have to confess, I am ready to move on… I have never been great at finishing things but this blog acts as a conscience so I will get it done!

This photo shows four more completed rows of squares.   Only four more to go and I can start the making up.   I have already made the majority of the blocks for those last four rows but still need to fasten off the ends.

I started to look into pricing of this project, researching on Etsy and google for similar items and found a huge range of pricing.   Some of it was incredibly low and looks to cover the cost of materials at best.   This got me thinking!   I built myself a little spreadsheet to calculate the cost of producing the blanket.   I know what the yarn cost including shipping and I used the UK minimum wage to value my time. The blanket isn’t finished yet but when it is I will know what I should be charging. The spreadsheet has a section to record the number of hours worked.   I think I will use one for every project from now on.   I created it as a PDF and set up a FREE DOWNLOAD HERE.   Pricing basics (748 downloads)   I wrote a longer post on pricing which you can read here – pricing basics.

As a break from my big project this week I designed this new block in the picture above.   I have made it up in a few colours with some of my left over scraps. I am very pleased with the way it turned out.   Here is a link to the FREE PATTERN. There are no complicated stitches so it should be suitable for beginners.   I have listed the instructions in both UK and US notation.   I haven’t decided on my next big project but I would quite like to make a blanket with this block.   I worked it in Drops Paris yarn on a 5mm hook and the finished blocks are about 14cms square.

The problem with these little side projects is that they hold up work on the main project.   I do tend to get a bit distracted by new things.   Confession time, I have three other side projects on the go.   I am working on a cushion design, a summer top and a shoulder bag design.   The good news is that I will be able to share those patterns with you soon I hope.

For now it is back to finishing of little Hearts and Spots squares.   I hope you have a good week. Happy crocheting!

Annie 🙂

Filed Under: craft blog, Craft projects Tagged With: blankets, blocks, commuter crochet, cotton, Craft, crochet, design, Free pattern, handmade, squares, stash, stash busting

Crochet blog – update#4

June 16, 2018 by Annie Leave a Comment

Hello 🙂

Welcome to my fourth weekly update.   This update is slightly different as I have decided to split out the crochet content from the blog progress updates.   If you are interested in the blog progress then you can read about them here.

Soooo – crochet!!   This week I have been working on my Shades of the Rainbow blanket – do you like that name?   I am not sure yet.   I might call it Shades of the Heart because I have worked up my heart pattern into a square for inclusion in this blanket.   Here are a few of them laid out.   I have about five more sets of three colours to complete and about four more where I have completed the crochet but have to tie in all the ends yet *sigh*.   Here is a picture of some of the finished squares.

I put up a blog post giving the free pattern for the Heart Square – just follow the link if you would like to give it a go.


I am working on another type of square to include in the blanket – a spot.   I wanted to include more solid squares as I am worried that the heart squares might not be very stable given how much space there is around the heart.   Here are a few of the ‘spot squares’.   I worked these up from my sample square pattern but changed the colour of the yarn for the first round and last round.

These squares have all been brilliant to work on my commute – I only need to take a couple of small balls of yarn and my hook.   The yarn is Drops Paris which is incredibly good value at c £1 per ball for pure cotton.   The yarn splits a little so needs care to work with but it has been very good quality for the price with very few of the hated knots and breaks!

The other project I have worked on at home this week is my Spring Flowers Blanket.  I started this in Spring, hence the name but I don’t think I will be finishing it until next Spring at this rate of progress.   The problem I have with it is that I am working across the full width of a blanket so I cannot really take it out of the house as it is already getting a bit big to carry around!

This is the latest progress with the flowers joined to the body of the work and the next section started.    I will work up another row of flowers on my commute when I have completed all these hearts and spot blocks (see above!).

That is all from me for this week… happy crocheting!

Annie 🙂

Filed Under: craft blog, Craft projects Tagged With: beginner blog, blankets, commuter crochet, crochet, crochet blog, Free pattern, squares, stash busting

2 June 2018

June 10, 2018 by Annie Leave a Comment

Hello 🙂  Welcome to the third weekly update on my journey to being a full time craft blogger and designer.    Ooooh that sounds exciting when written down….  but to put it into perspective, this journey could take me the remainder of my working life and I might not actually be a full time craft blogger until I retire from paid employment in my 70’s!

This week I have been working on defining my goals and developing a tracker so I can measure progress.   Some of my goals feel like an awfully big stretch from where I am now but all the advice out there says to aim high!   The goals needed to be broken down into smaller targets for the next six months.   Here they are from my bullet journal…..   I will be adding to these targets as I work out what is most important and what works.

One of the top tips for beginner bloggers is to set up and manage your own mailing list.   I learnt quite a lot this week whilst researching  and setting up my mailing list.  If you are reading this you might have been invited to join mine!    I hope you will join 🙂  I will write a separate post on this in a couple of weeks when I can comment on how well it is working for me.

Focussing on the technical side of my blog this week I have also been researching hints and tips for bloggers on Pinterest.   There seem to be so many blogs out there about blogging and many of them are promoting courses that claim to enable bloggers to turn their hobby into full time income.   The courses are expensive!!   I am not against investing in my blog.   I have spent a little already on getting set up with my own website using 1&1  there is a link to 1&1 below (note this is an affiliate link which could give me a little income at no increased cost to you).   1&1 have several low cost entry plans where you can set up and really own your blog from the start giving more flexibility and protection for your work.   Many of the plans come with free domain names and it is good fun checking out which names are available – checking costs nothing 🙂

1&1 Ionos

At the moment, I believe that there is so much more I can learn from reading and researching without spending money on courses.   I have a long list of things to work on and I will share with you anything that makes a big difference.    The top tips I will be working on this week are as follows:

  • Improve board descriptions on Pinterest – include key words
  • Apply to join group boards – although this is getting a mixed press currently
  • Declutter my blog

On the creative side this week I have merged two projects!!   My sample blanket that was stalled because I couldn’t come up with a design I really liked, and the heart patterns from last week.   I have made a pattern for the heart within a square and it is the same size as the sample square pattern I produced earlier this year.   Here is a link to the free pattern for the sample square.   I will be writing up the pattern for the heart square this week so I can share it in next week’s update.

I have worked up a few heart squares in the Drops Paris – 100% cotton yarn and here they are laid out in the start of the design I plan to complete.   This is a great stash busting project.   The other really good thing about this project is that it is perfect for working up on the train!   I have worked out that I am going to need more yarn though…. not a help to my stash busting efforts.    I have a room full of yarn and seem to keep needing to buy more!! 🙂

I picked up a tip from Kat over at KrazyKabbage on the best conditions to photograph large projects outside and I have managed to take this photo of my big Sunshine Flower blanket.   This is the best photo I have taken so far – very happy with it.

In the evenings this week I worked a few more sections of my Spring Flower blanket.   I am really pleased with the way this is coming on and I am documenting the pattern at every stage so I will have another item to list on Etsy when I am done.  I don’t have a photo this week but will share again next week.

I will probably list the blanket on Etsy too but when I cost the blankets in terms of the time they take to make, plus materials, the price I need to charge makes them unaffordable.   I am listing them with little hope of a sale but at least they show the patterns.

Finally a weekly status report.  I am hugely excited by the leap in my advertising income which has almost doubled…… to 31p  🙂

  • Pinterest followers – 556
  • AdSense income to date – 31p
  • Subscribers – 1 (me – it was a test)
  • Etsy listings – 10
  • Etsy sales – 0
  • Page views last seven days – 34

I am starting to track page views – apparently this is key to success.    Stickytapeandstring.co.uk is currently running at around 140 page views per month.   Some bloggers quote 1000 per day as being the level you need to be taken seriously…. As I say – this is not going to be a short journey!    More next week….

happy crocheting and happy blogging,

Annie 🙂

Filed Under: Blog diary, Blogging Tagged With: beginner blog, blankets, blocks, commuter crochet, crochet, design, handmade, ideas, projects, stash busting

20 May 2018

May 27, 2018 by Annie 4 Comments

Hello 🙂

I have decided to keep a log of my progress as I build my blog and Esty shop.  I will  share my experience here, in case anything I learn can help anyone else. This is my first weekly update post.   I might need to split the content between the nuts and bolts of blogging and the crochet/knitting design work as I am not sure anyone would want to read all of it!   I am not sure anyone will want to read any of it if I am honest but I am putting it out there in hope 🙂

So far I have only written a post when I had a project ready to share.  That makes weekly posts tricky as there are some weeks when I do not feel I have anything at the right stage.   You will see from these updates that I have a bit of a problem with focus 🙂 I tend to work on several projects at once and I am not much of a completer finisher.    Does anyone else have a problem with that?

I work full time and jam my crafting into the corners and spare moments of my life. I generally get a good amount of time to spend on my crafting and blogging at the weekend.  During the week I spend two hours a day on the train travelling to work.   I am normally surrounded by sleeping commuters!  I took the decision when I first started in this job, that I would not waste those two hours a day.

One of my tasks each weekend is to get myself set up with projects for the train.   I need the projects to be small and easy to carry.    I generally get a seat on the train but I don’t get much elbow room so the work needs to be compact and not need laying out.   This week I have been working on little crochet bags.    I started with a basic pattern which I will share in a separate post.    I worked up a number of variations.    I thought that these could be used for wedding favours.   We just had a bit of royal wedding fever here in the UK so that was what set me off!

I am still working on designs for my sample squares blanket.   I haven’t managed to get to a design I really love yet so I put the project on hold.    I started with the layout below then edged a number of squares in black and wasn’t sure I liked that look.

I think I am going to ditch the black edges and join with white instead.   Maybe it is because we are coming into summer and the black just looks too heavy.

I am progressing my Spring Flowers Blanket I completed all the flowers for one row last week.    I have joined them now and I am working on the next part of the design.   These colours really make me happy.    I was going to pick up a row of chain after the flowers but I think it will be neater if I start in the other direction and mirror the panel I just made.    My project for the train this week will be another set of flowers to make a new row across the work.    I am going to put in some zig zag rows this weekend.   It has to be a weekend job as the work is too big now to take on the train!

Every week I like to do a bit of research on blog or Etsy tips.  I read an article this week on Etsy success which said that you need c200 items listed to start to get a higher chance of sales.    I was shocked.   That is a huge number of listings.   I am currently at 10!   I think it will take about two years of work to get me to the 200 listings point

I do have a lot of patterns in draft that I plan to list and a number of those could be projects that people could give as Christmas presents.   It sounds dreadful to be thinking of Christmas in May but given the time it takes to produce items I think it is a good time to be planning and starting to make gifts.    This is a link to my shop in case you want a look.   Stickytapeandstring

One of the problems I used to have with my blog and Pinterest posts is with photography.    I have now invested in a light system and have a small ‘studio’ set up in a corner of my bedroom that allows me to take great photos of small and medium sized work.   I bought the kit on Amazon – it was a lot cheaper than I expected.   Problem solved!!

I have included an affiliate link here to the type of kit I bought, which if you find the link helpful, allows me to get a bit of income whilst not costing you a penny more than you would pay anyway.

The problem I haven’t been able to crack so far is how to photograph really  big items.   My sunshine flower blanket looks lovely in real life but I cannot get a decent picture of it to list on Etsy.   I might take it into the garden on a sunny day and see whether sunlight does the trick!

When I am travelling to work I listen to audio books.   After a phase of murder mystery type books I have moved on to self improvement.   Everything I have read/heard tells me that I have more chance of success if I write my goals down so I am working on a bullet journal page to do just that.     I will post an update on this next week.   I love my bullet journal and have a board on Pinterest to keep all the inspiring ideas that I see.   Many of them seem to need more artistic ability than I possess but a lot of the pages can be copied.   Working on the bullet journal is an exercise in mindfulness all on its own and I find it very relaxing but it is a bit of a drain on time if I allow it to be!  Pinterest board link here – Bullet Journal.

I will share my progress against my goals each week once I have set those goals.   For now I can give a status report.    I have 522 Pinterest followers and 10 Esty listings with no sales.    I do not have any blog subscribers yet but plan to start a mailing list next week.   I rarely get comments on my blog and haven’t really looked into how to improve that yet.    I signed up with AdSense a couple of months ago and so far my cumulative earnings are 16p 🙂   The only way is up!!

I think I had better stop writing now and go and make something.

More next week,

Annie 🙂


Filed Under: craft blog, Craft projects Tagged With: beginner blog, blankets, commuter crochet, commuting, Craft, crochet blog, productivity

  • Go to page 1
  • Go to page 2
  • Go to page 3
  • Go to Next Page »

Footer

Newsletter

Copyright © 2022 · Genesis Sample on Genesis Framework · WordPress · Log in