• Skip to primary navigation
  • Skip to main content
  • Skip to footer

Stickytapeandstring

Created with WordPress managed by 1&1

  • Craft projects
    • craft business tips
    • craft blog
    • Crochet patterns
    • Upcycling
    • craft with kids
  • Blogging
    • New to blogging
    • Blog diary
  • Bullet Journal
  • About me
  • Welcome!!

Free pattern

Crochet Rope Edging

August 24, 2020 by A_Sticky_tape_and_string_girl Leave a Comment

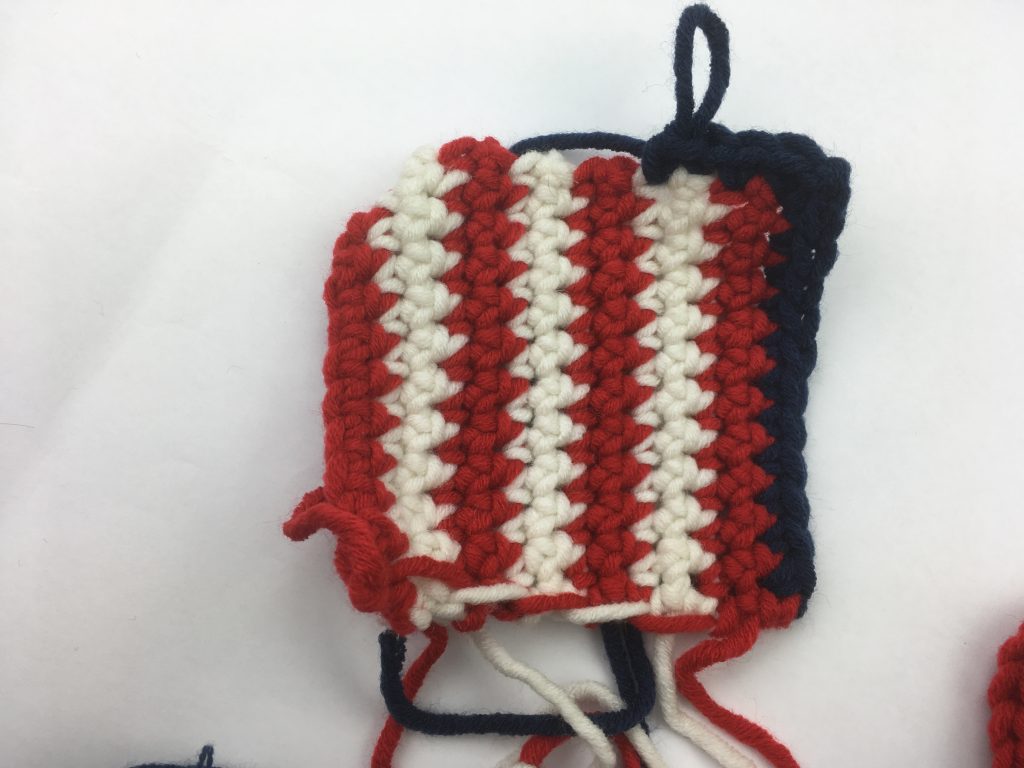
This three coloured rope crochet edging makes a beautiful finish to any project. I was looking for an neat edge that used all three of the colours from my project. This edging forms a pretty rope effect and although it feels a bit fiddly to start with you will soon find you get into a rhythm.

crochet rope edging
three colour crochet rope edging

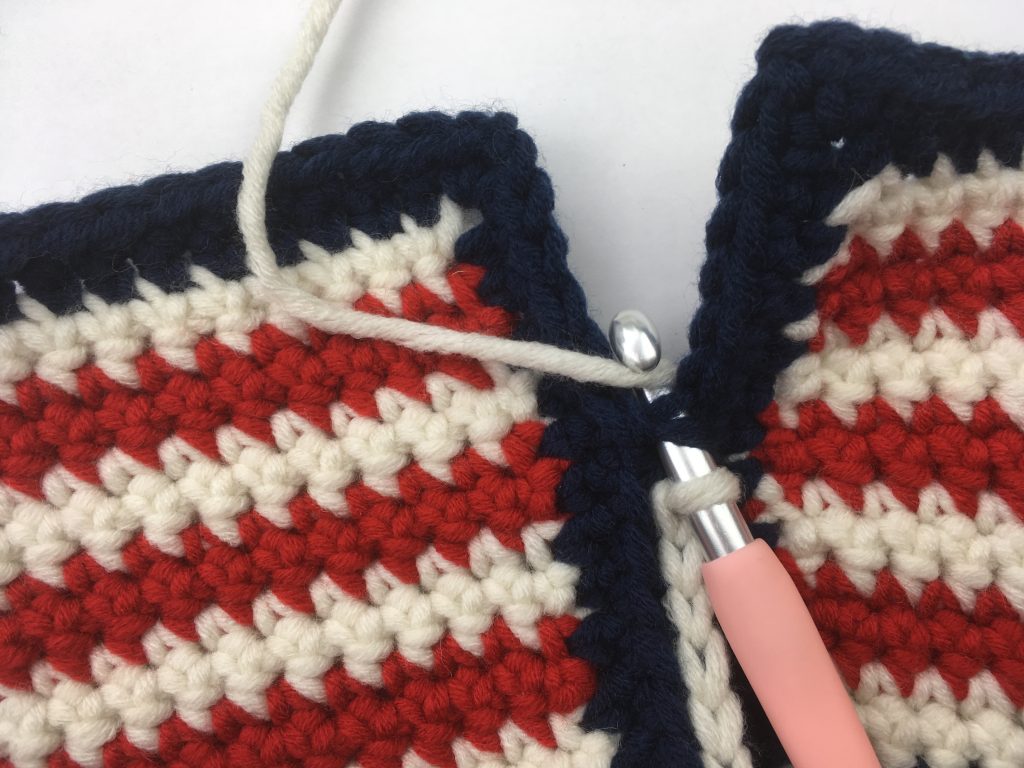
The materials I am using in this example are Sirdar Cotton DK and a 4mm hook. These photographs use the following colours, Red (shade 510), Honeysuckle (shade 508) and Citrus (shade 531). The base colour is Vanilla (shade 502).

Three coloured rope crochet edging pattern

Choose your start point and join in the first colour. Make a chain of five stitches and take the hook out of the stitch to leave a loop. Tip – as you work it is easy to pull out stitches so I recommend pulling a bit of thread through to leave a larger loop.

Join in the second colour to the stich alongside your first chain and again make a chain of five stitches then remove the hook.

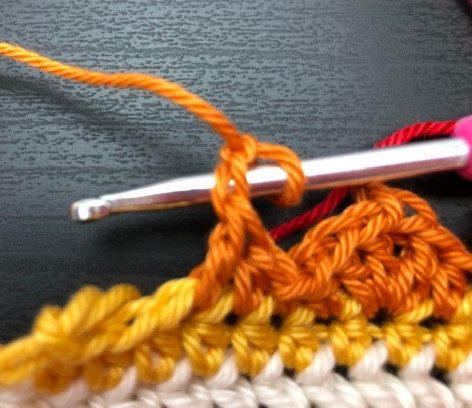
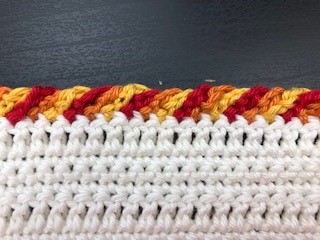
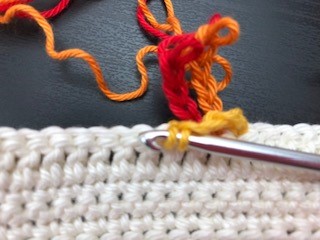
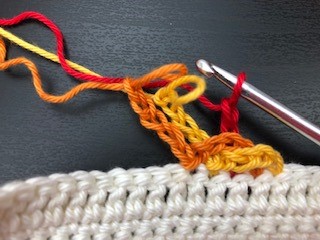
Finally join in the third colour into the next stitch of your project, making your final chain of five stitches. When you have joined your third colour the work should look like this picture below.

crochet rope edging
three colours joined

Start making the three coloured crochet rope

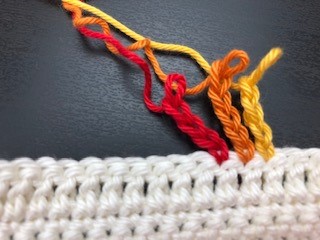
Next we are going to start to make the rope. Put your hook back into the loop at the end of the first chain you made. In my work above this is the yellow chain. This is where it gets a bit fiddly! I found if I worked slowly at first and kept the colours from tangling, I got into an easy rhythm after a few colour changes ๐Ÿ™‚

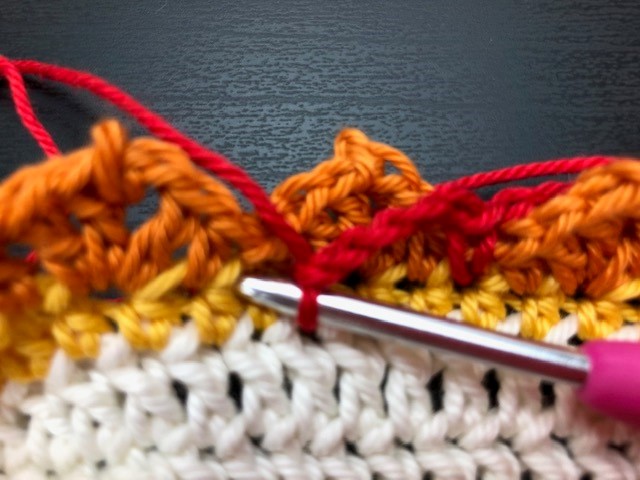
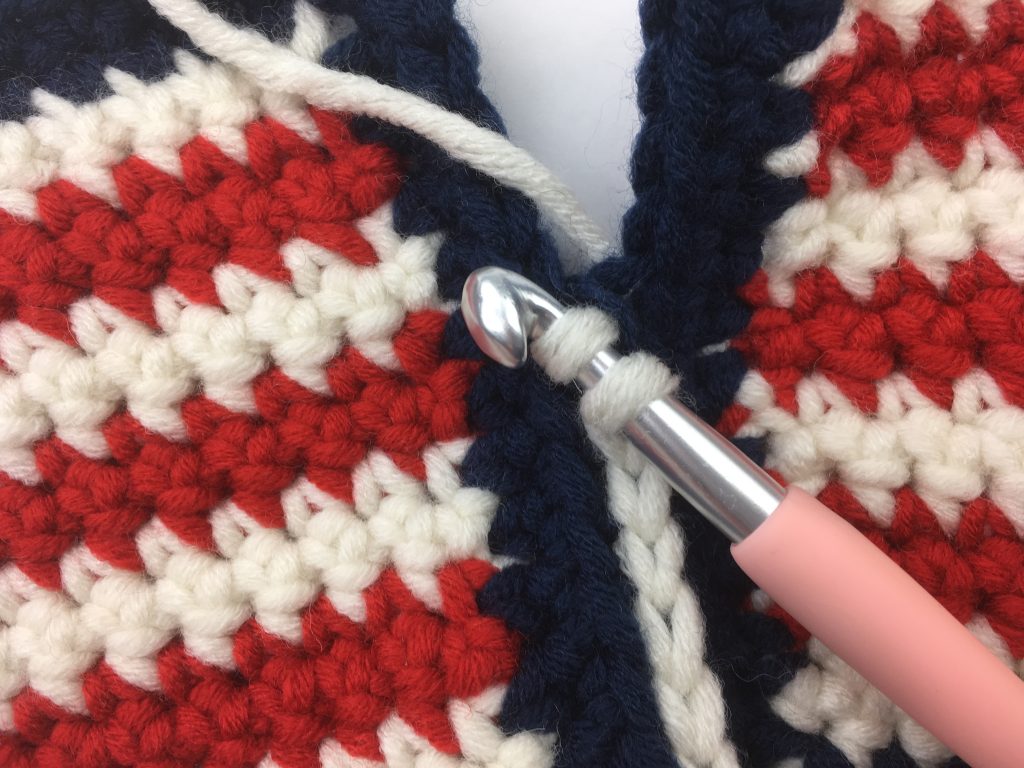
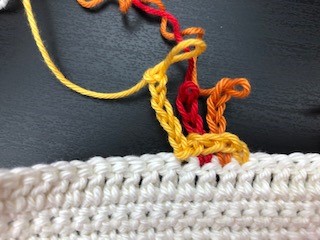
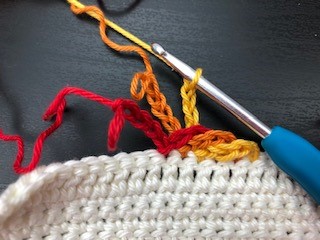
With your hook in the loop at the end of the first chain, bring this chain down in front of all the others and put your hook into the stitch next to the third colour. This is the next available stitch on the edge of your project as shown below.

crochet rope edging
hook placement for first twist of the rope

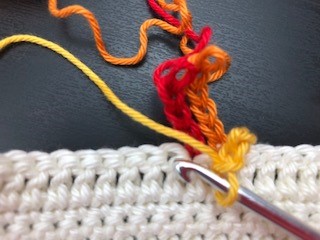
Make a slip stitch by putting your hook into this stitch, wrapping the yarn around and pull back through the work as shown below. Next pull this through the loop on the hook to form a slip stitch.

slip stitch to make the first twist
slip stitch to secure the first twist

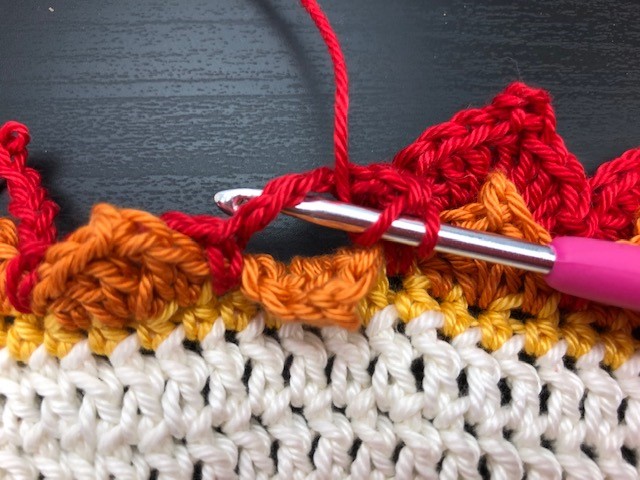
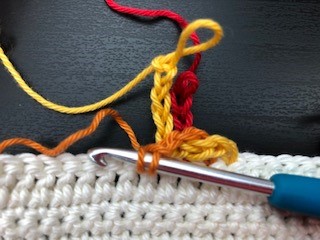
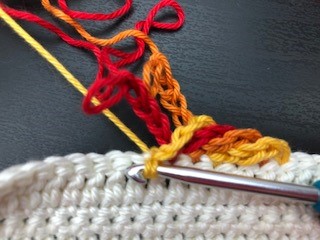
Work another five chains with this colour and remove the hook from the work. Your edging should look like this picture below.

crochet rope edging 4
crochet rope edging after the first twist

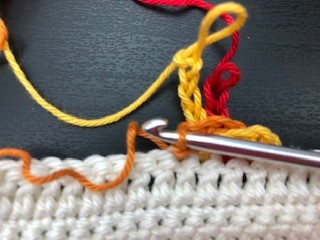
You have made the first twist and the rest of the crochet rope follows the same method. Put your hook into the end of the chain nearest to the right of the work. Bring the chain to the front of the work and put your hook into the next available stitch to the left of the work. For my example here this means putting the hook into the end of the orange chain. Bring this chain forward and secure the twist with a slip stitch into the stitch next to the yellow chain, as shown in the photos below.

crochet rope edging 5
bring the next chain to the front of the work
crochet rope edging 6
work into the next available stitch
crochet rope edging 7
slip stitch leaving one loop on the hook
crochet rope edging 9
work another five stitch chain and move the hook to the next colour

Finishing your work – Tips

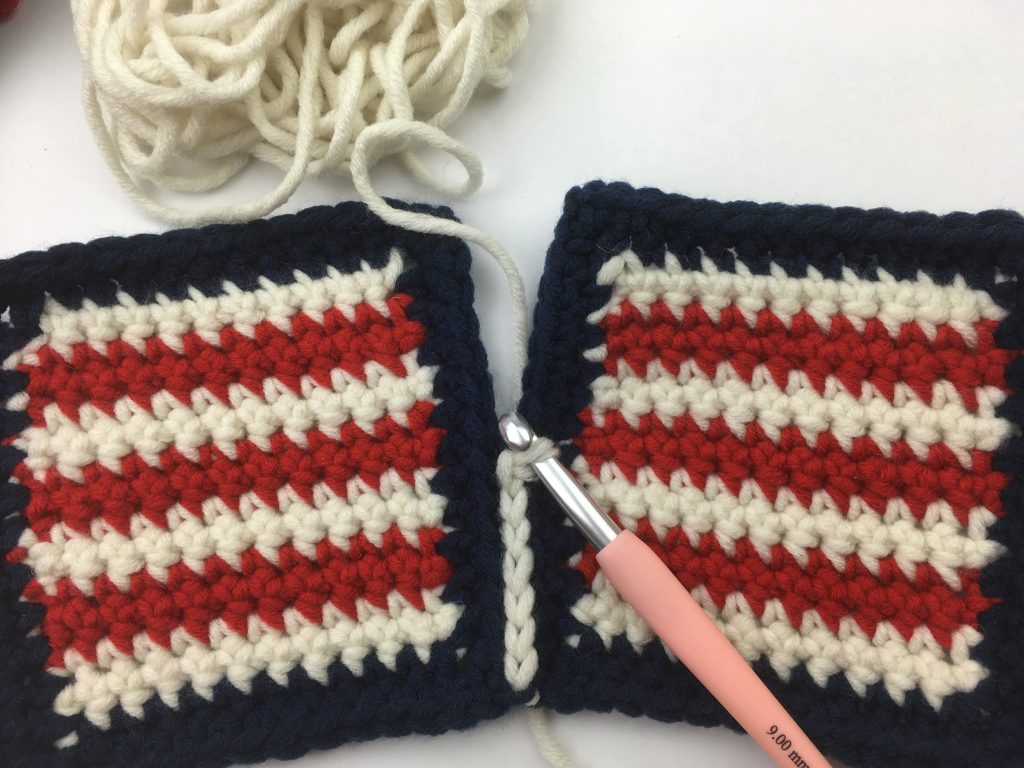
That really is all there is to it. Continue picking up each colour, bringing it to the front of the work and secure with a slip stitch before making a new five stitch chain. You will see your rope start to grow. More pictures below along with a few final tips.

crochet rope edging 10
third twist secured
crochet rope edging 11
keep going in the same way to form the rope

Using the rope edging on the ends of rows side

If you are working along an edge that has the ends of rows rather than a neat set of stitches this can be difficult to space. Measure the gap between two slip stitches of the same colour on your first edge and use that as a guide to place your slip stitches on this edge.

Changing the pattern to suit different weights of yarn or tension

If you find that the tension of the rope doesn’t sit well or look right then adjust the number of stitches you have in your chain. I found five chain stitches was perfect for this Cotton DK. You might need more/fewer if you are working with a different weight of yarn. Just find the right tension by trial and error working a small section then see how the edging sits.

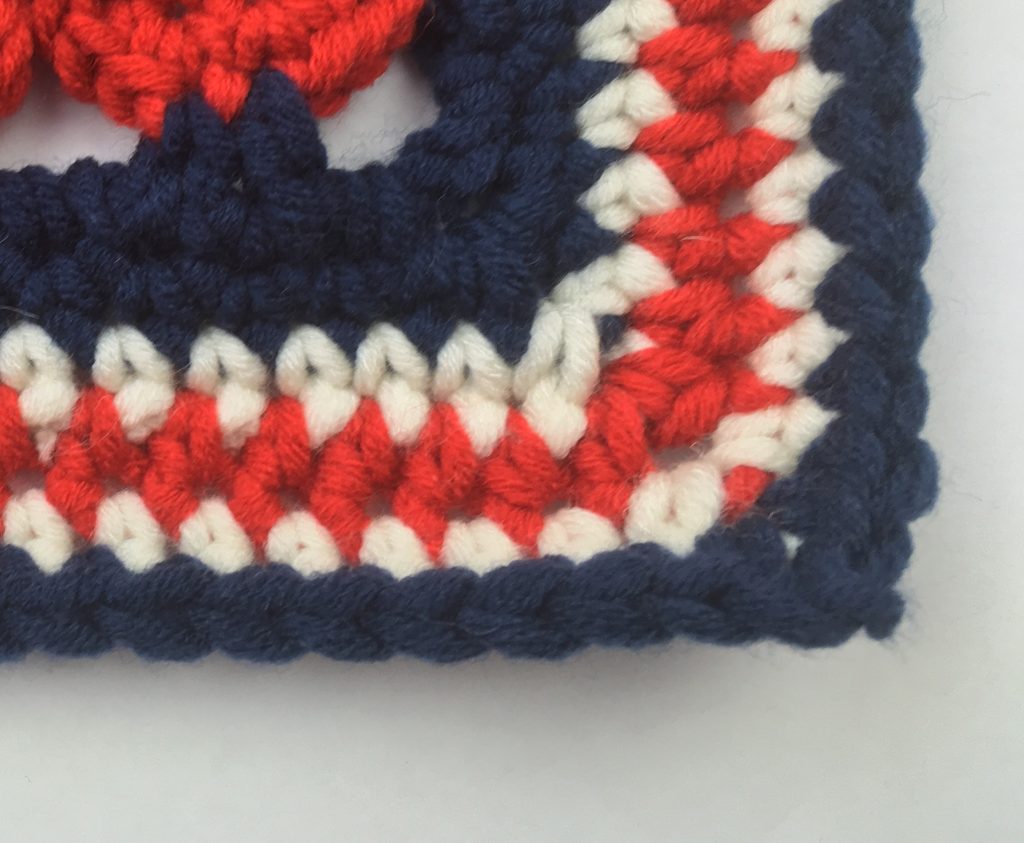
Dealing with corners

If you are working on a square or rectangular project you will have to deal with a 90 degree corner or rather four corners! You should find that if you work three colours into one stitch either side of the corner the rope will continue round the corner. This means that you work all three colours into the last stich of the row before the corner. Turn and again work all three colours into the first stitch on the next side. Please let me know if you would like to see photos of this and I will add them or put up a separate post.

Adding in more colours

I only used three colours in my design here but you could work a rope with more colours or fewer. Simply adjust the length of chain you use to give the desired effect.

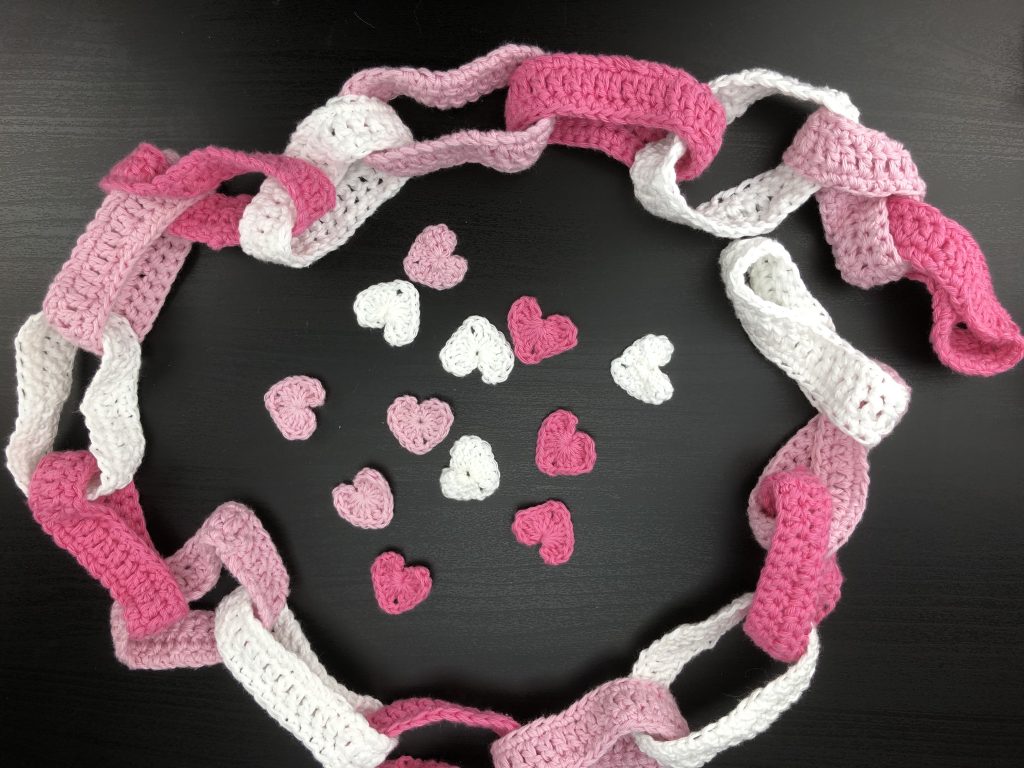
I think that is it for now. I put up a pattern for flower petal edging if you would like to try something different. You can see that pattern here – flower petal edging. Please let me know if you like this edging pattern and if there is anything else I can help with. Happy crocheting!

Annie ๐Ÿ™‚

Filed Under: Crochet patterns Tagged With: crochet blog, crochet design, crochet edging, free crochet pattern, Free pattern

Flower Petal Edging Pattern

July 28, 2020 by A_Sticky_tape_and_string_girl Leave a Comment

I was absolutely thrilled to receive a comment on one of my early posts requesting this Flower Petal Edging Pattern. This edging completed my Sunshine Flower Blanket which you can see as it grows in these posts. These goes back to the early days of my blog ๐Ÿ™‚

Sunshine Flower Blanket

Sunshine Flower Blanket – Progress!!

The Edging takes the theme of the flower squares I used to make the blanket. You can find the flower square pattern in a book by Tracey Lord called A Square a Day. I love this book and have used it as a source of inspiration many times.

Here is the pattern. For your ease I will list it twice using UK then US terms. The pattern uses three colours but you could keep to one or two if you prefer. My blanket was worked in Sirdar Cotton DK which is a glorious yarn with beautiful stitch definition and a lovely soft texture. I used their cream shade called Vanilla 502 for the background for the blanket.

The colours I used for the edging are:

  • Yellow – Yarn A – Citrus 531
  • Orange – Yarn B – Honeysuckle 508
  • Red – Yarn C – Red 510

Before we start there is a stitch here that you might not have come across. Picot 2 or Picot 3. These little stitches create the peak of each petal. I used Picot 2 on the orange round of petals and Picot 3 on the final round of larger red petals. To perform this stitch simply chain 2 for picot 2 and then slip stitch into the first chain stitch. For Picot 3, you guessed it – chain 3 then slip stitch into the first chain stitch. The stitch creates a little knot which adds texture and definition.

working the slip stitch to form the Picot 2.

Flower Petal Edging pattern – UK crochet terms

First round

Using Yarn A join the yarn to the edge of your work with a slip stitch and work two chain. Work a row of Htr into each stitch of the edge of your project.

Second round

TIP – there is no need to start each round in the same place. Moving the start point around the project will spread the positioning of the ends you will need to weave in and also improves the overall uniform appearance.

Using Yarn B join in the yarn to the edge of your work with a slip stitch chain two, (1Tr, picot 2*, 2Tr) all into the same stitch, 1Htr, slip stitch. This should give you your first petal. The first petal is slightly different as it has the starting chain so I will write out the repeating petal pattern next. Each petal is worked over four stitches of the row below. (*see instructions above)

[1Htr, (1Tr, picot 2, 2Tr) all into the same stitch, 1Htr, Slip stitch]

Repeat this petal all the way around your project.

Third round

Using Yarn C – join in the yarn between any two petals with a slip stitch working into the stitch from the first round. The pictures show where you should put your hook.

Work 5 chain and then 1DC between the next two petals. Again you are working into the stitch you created on the first round. This round should be super quick and it forms the foundation for the final round of petals.

The chain loops might be at the front or the back of your work once you finish this round. It doesn’t really matter where they end up – mine are normally at the front. Push them to the back as you work the final round, pulling the petals from the previous round to the front.

Fourth and final round

Keeping with yarn C working into the chain loop you created on the last round in each chain loop work as follows: 1DC, 3Tr, picot 3, 1Dtr, 3Tr, 1DC. A total of 8 stitches into the chain loop then move onto the next chain loop and repeat all the way around your project.

picture shows the front of the work – working the petals into the chain loops

Finish off the ends and you are done!!

Flower Petal Edging pattern – US crochet terms

First round

Using Yarn A join the yarn to the edge of your work with a slip stitch and work two chain. Work a row of HDc into each stitch of the edge of your project.

Second round

TIP – there is no need to start each round in the same place. Moving the start point around the project will spread the positioning of the ends you will need to weave in and also improves the overall uniform appearance.

Using Yarn B join in the yarn to the edge of your work with a slip stitch chain two, (1Dc, picot 2*, 2Dc) all into the same stitch, 1HDc, slip stitch. This should give you your first petal. The first petal is slightly different as it has the starting chain so I will write out the repeating petal pattern next. Each petal is worked over four stitches of the row below. (*see instructions above)

[1HDc, (1Dc, picot 2, 2Dc) all into the same stitch, 1HDc, Slip stitch]

Repeat this petal all the way around your project.

Third round

Using Yarn C – join in the yarn between any two petals with a slip stitch working into the stitch from the first round. The pictures above in the UK terms section show where you should put your hook.

Work 5 chain and then 1SC between the next two petals. Again you are working into the stitch you created on the first round. This round should be super quick and it forms the foundation for the final round of petals.

The chain loops might be at the front or the back of your work once you finish this round. It doesn’t really matter where they end up – mine are normally at the front. Push them to the back as you work the final round, pulling the petals from the previous round to the front.

Fourth and final round

Keeping with yarn C working into the chain loop you created on the last round in each chain loop work as follows: 1SC, 3Dc, picot 3, 1Tr, 3Dc, 1Sc. A total of 8 stitches into the chain loop then move onto the next chain loop and repeat all the way around your project. See picture above in the UK terms section.

Finish off the ends and you are done!!

I hope you love this edging as much as I do. Happy crocheting!

Annie ๐Ÿ™‚

Filed Under: Crochet patterns Tagged With: crochet, crochet design, crochet petal, edging, flower petal, flower petal edging, Free pattern, petal edging

Crochet Chain Garland

May 31, 2020 by A_Sticky_tape_and_string_girl Leave a Comment

In an attempt to help reduce plastic pollution, I have been making sustainable decorations including this crochet chain garland. This is another fun, quick, easy make. I made the example here in sustainable cotton as part of a set of decorations I designed with weddings or girls bedrooms in mind.

Crochet Chain Garland with ‘table confetti’ hearts

If you like the little ‘table confetti’ hearts, the pattern for those is here.

This idea would also work with bright colours and different weights of yarn. The pattern is a fab stash buster as you can mix and match any colours you have. Each link in the chain requires only a small amount of yarn. I plan to make a super chunky version with the left over yarn from all my rainbow projects which you can see here

Crochet Chain Garland Pattern

Note – this pattern uses DK weight yarn and a four mm hook. However it can be adjusted to any yarn weight – instructions at the bottom.

For the first link.

Chain 35 and join to the first chain with a slip stitch.

First round – chain two. Work DC into the each chain (SC in US terms). Finish the round with a slip stitch to join to the top of the first stitch.

Second round – chain three. Work TR (DC in US terms) into each of the DC on the previous row. (SC in US terms). Again finish the round with a slip stitch.

Third and final round – work a round of DC (SC in US terms) as round 1. Finish with a slip stitch and tie off the yarn. You have made your first link.

Second and all subsequent links

Start with a chain the same length as your first link. If you are using the same weight yarn as I used that means a chain of 35. The only difference between this and the first link is that we need to join to the rest of the garland. To do this, thread the chain through the first link before you make the slip stitch into the first chain to form the loop.

Continue to form this link in the same way as you made the first. Each link in the chain is free to move through its neighbours. They are not attached – just threaded together.

And that is it! Continue for as many links as you like. Make patterns with the colours or make them happily random with any remnants from your stash!

Changing the pattern to suit different weights of yarn.

Consider what size of link will work best for the yarn weight. I find that links work well when the length of the link is eight to ten times the height. You can work out how many stitches it takes to make the size you require based on the tension square instructions on the ball band.

Example – Super Chunky – Lion Brand Yarns – Hometown USA. The ball band has a 10cm tension square of 12 rows x 9 stitches. The pattern gives the equivalent of four rows so the links would be c 3.3 cm high.

I want each link to be 8 to 10 times as long as they are tall so I need them to be 27cms which means 30 stitches. This is super chunky yarn so these chains will be HUGE – but I hope that gives you the method to use to adjust the pattern.

Hope you enjoy making these happy garlands!

Annie. ๐Ÿ™‚

Filed Under: Crochet patterns, Uncategorized Tagged With: bunting, crochet, crochet design, crochet garland, free crochet pattern, Free pattern, handmade, sustainable decorations, sustainable wedding, wedding

Crochet Hearts – three sizes

February 12, 2020 by A_Sticky_tape_and_string_girl 6 Comments

Here is an update to my crochet hearts pattern which gives you three sizes of heart to make. These lovely little motifs are super quick to make.

Crochet heart in three sizes - free pattern on my blog

You can use the hearts as card toppers or to decorate any craft project. If you add a safety pin to the back you could use these as a simple pin or broach. You could even turn them into earings! I recently used them to make charms as you can see below and read here. I also plan to sell them on my Etsy store if you would like some ready made!

Crochet Heart charm - quick make

The pattern will work in any yarn thickness or type. The ones shown here are in cotton DK and 4 ply but I have also made these in super chunky and used them in a block to make a blanket which you can see here.

Just before I share the pattern I want to share something else! I have decided 2023 will be the year I stop drinking alcohol. If you are interested in my journey and/or considering something similar you can read about it here.

Crochet Heart – UK terms

Size 1 – smallest heart (UK terms)

Make a magic loop, chain 3 and working into the magic loop, 3 dtr, 3tr, chain 1, 1dtr, chain 1, 3tr, 3dtr, chain 2, slip stitch into magic loop and pull the thread to close the centre of the heart. And you are done!

Size 2 – medium heart (UK terms)

Make a small heart as above then…..

Second round – 2 sl stitch into the gap behind the three chain from the first round.  3dc into the next stitch (top of the left side of the heart), 3 dc into the next stitch and 2 dc into the following stitch.   Work 4 dc to take you to the bottom loop of the heart.  3dc into the bottom stitch of the heart, 4 dc, work 2dc, 3dc, 3dc into the next three stitches, 2 sl stitches and one final slip stitch into the centre of the heart. You should have a medium heart!

Size 3 – largest heart (UK terms)

Make a medium heart as above then…..

Third round – 2 slip stitches then 2dc into the next five stitches (around the top of the left side of the heart) 7 dc, 3dc into the bottom stitch of the heart, 7dc, 2dc into the next five stitches, 2 slip stitches and finish off to complete the largest heart.

Crochet Heart – US terms

Size 1 – smallest heart (US terms)

Make a magic loop, chain 3 and working into the magic loop, 3TRC, 3DC, chain 1, 1TRC, chain 1, 3DC, 3TRC, chain 2, slip stitch into magic loop and pull the thread to close the centre of the heart. Your small heart is complete!

Size 2 – medium heart (US terms)

Make a small heart as above then…..

Second round – 2 sl stitch into the gap behind the three chain from the first round.  3SC into the next stitch (top of the left side of the heart), 3 SC into the next stitch and 2SC into the following stitch.   Work 4SC to take you to the bottom loop of the heart.  3SC into the bottom stitch of the heart, 4SC, work 2SC, 3SC, 3SC into the next three stitches, 2 sl stitches and one final slip stitch into the centre of the heart. Stop here if you wanted to make a medium heart – you are done!

Size 3 – largest heart (US terms)

Make a medium heart as above then…..

Third round – 2 slip stitches then 2SC into the next five stitches (around the top of the left side of the heart) 7 SC, 3SC into the bottom stitch of the heart, 7SC, 2SC into the next five stitches, 2 slip stitches and finish off to complete the large heart.

I hope you enjoy this quick make. Let me know what you use yours for. I am always on the look out for ideas!!

HOT off the press – Just added a new heart to the family. This one is a bigger version which works up to 10cm across in a chunky yarn. You can find the pattern here. Hope you like it ๐Ÿ™‚

happy crocheting!

Annie ๐Ÿ™‚

Filed Under: Quick makes Tagged With: card topper, crochet, crochet hearts, crochet motif, Free pattern, heart, heart card topper, hearts, quick crochet, quick makes

Hearts and Stripes blanket

April 27, 2019 by A_Sticky_tape_and_string_girl Leave a Comment

Hello ?here is my latest project – Hearts and Stripes Blanket. This pattern is based on the heart motif I created last year. For this project I wanted to produce a solid version of the heart square. To make a heavy duty lap blanket quickly! I used super chunky yarn and a 9mm hook. With this yarn I can easily make one of these blankets in a week or two.

Here is the finished blanket worked up in red white and blue yarn. You can use the blocks to make a blanket of any size. If you use a lighter weight yarn you will probably want to put in more blocks. I went for a seven by five block layout as that worked best for the quantity of yarn I had. The finished blanket measures about 34 inches by 48 inches or 85cm by 125cm in metric.

Hearts and Stripes Blanket

This pattern would also work very well as a stash-buster project. The yarn required for each area of colour is quite small. I salvage quite a lot of yarn and often end up with a large number of smaller balls of yarn. You can read my top tips for yarn salvage here.

The pattern took four 100g balls of the navy and 3 of each of the red and white.

The blanket pattern is made up of striped squares and full heart blocks. The pattern for the heart block in both UK and US terms are available here

The instructions for the striped block are here again in both UK and US terms.

Joining the Blocks to make the blanket

The blanket is made up of these two blocks worked in a seven by five alternating pattern. The join I used for this blanket is one that has minimal finishing off. The technique makes a feature of the joining thread.

Line up two squares edge to edge with the right side of the work facing up.

Place the yarn you are using for the join behind the work. Always keep the joining yarn behind the squares. Pick up stitches from the back of each of the two edges, as shown below.

Joining instructions 1 - Hearts and Stripes Blanket

Wrap the yarn round the hook working from behind. You need to keep the yarn behind the work at all times.

Joining instructions 2 - Hearts and Stripes Blanket

Pull the yarn through the two stitches you picked up to give you two loops on the hook.

Joining instructions 3 - Hearts and Stripes Blanket

Finally pull the yarn through the loop on the hook to form a slip stitch. From the picture above this means pulling the first loop nearest the end of the hook through the second loop on the hook. The result should look like the picture below.

Design choice – pick a highlight colour for the join and make it a feature. Or use the same colour as the borders of the squares. Using the same colour would make the join less visible.

Hearts and Stripes Blanket – Border

The border for this blanket is very simple and echos the stripes in the squares.

Hearts and Stripes Blanket - border

UK terms

First round – Join in yarn in the colour you used to join the blocks and work one round of DC working 1DC, 2CH, 1DC into each corner. For the design shown here yarn colour white.

Second round – Join in yarn A (red for the design shown here) and work a round of HTR working 1HTR, 2CH, 1HTR into each corner.

Third round – Join in the first yarn again (white) and repeat the first round.

Fourth round – for the final round use the border colour (Navy) and again repeat the first round above.

US terms

First round – Join in yarn in the colour you used to join the blocks and work one round of SC working 1SC, 2CH, 1SC into each corner. For the design shown here yarn colour white.

Second round – Join in yarn A (red for the design shown here) and work a round of HDC working 1HDC, 2CH, 1HDC into each corner.

Third round – Join in the first yarn again (white) and repeat the first round.

Fourth round – for the final round use the border colour (Navy) and again repeat the first round above.

Finish off your ends and there you have it – one Hearts and Stripes Blanket. Hope you like it!

Annie ๐Ÿ™‚

Filed Under: Crochet patterns Tagged With: afghan, crochet afghan, crochet blanket, crochet throw, free crochet pattern, Free pattern, heart blanket, hearts and stripes blanket, super chunky yarn, thick crochet throw, uk and us terms

Free pattern for Striped Block

April 19, 2019 by A_Sticky_tape_and_string_girl Leave a Comment

This post includes a free pattern for a striped block which can be used in a variety of blanket designs. The pattern below makes a crochet block of five inches square when worked up in a super chunky yarn on size 9mm needles. To make a larger square simply increase the number of stitches and rows. You can see how I used this block in one of my blanket designs here.

Striped Block - crochet

The basic pattern below produces seven stripes of two rows each. If you want your block to have broader stripes work more rows before changing colour. When using just two colours and changing colour every two rows you do not need to cut the yarn. Keeping the twists to a minimum you can work the border over the carried yarn and save yourself from a lot of finishing off! The pictures below show the border being worked in this way.

Edging the Striped Block - crochet

UK terms

With yarn A

First row – Chain 12 then turn.

Second row – working into second chain from the hook, 11DC then turn.

Join in yarn B

Third row – chain 2, DC1, turn.

Fourth row – chain 1, DC11, turn.

Change yarn back to A for the two colour stripe block or change to yarn C if you are using multiple colours.

repeat Third and Fourth row until you have seven stripes.

Border round 1 – Join in the border colour Chain 2, DC11, the last of these 11DCs is in the corner of the square. Chain 2, turn the block so that you are working along the side of the square and work a second DC into the corner. Work another 9DC evenly spaced along the side of the block then one DC into the bottom corner as shown below. Chain 2 then work second DC into the corner. Work a further 9DC across the bottom of the square then into the final corner work 1DC, 2CH, 1DC. Work a further 9DC evenly spaced along the final side of the square and finally work one DC into the corner, 2CH and slip stitch to join to the 2CH at the start point of the round.

Border round 2 – CH2 then DC into each of the stitches working 1DC, 2CH, 1DC into each corner. Complete the round then join with a slip stitch to the 2CH at the start point and finish off.

US terms

With yarn A

First row – Chain 12 then turn.

Second row – working into second chain from the hook, 11SC then turn.

Join in yarn B

Third row – chain 2, SC1, turn.

Fourth row – chain 1, SC11, turn.

Change yarn back to A for the two colour stripe block or change to yarn C if you are using multiple colours.

repeat Third and Fourth row until you have seven stripes.

Border round 1 – Join in the border colour Chain 2, SC11, the last of these 11SCs is in the corner of the square. Chain 2, turn the block so that you are working along the side of the square and work a second SC into the corner. Work another 9SC evenly spaced along the side of the block then one SC into the bottom corner as shown below. Chain 2 then work second SC into the corner. Work a further 9SC across the bottom of the square then into the final corner work 1SC, 2CH, 1SC. Work a further 9SC evenly spaced along the final side of the square and finally work one SC into the corner, 2CH and slip stitch to join to the 2CH at the start point of the round.

Border round 2 – CH2 then SC into each of the stitches working 1SC, 2CH, 1SC into each corner. Complete the round then join with a slip stitch to the 2CH at the start point and finish off.

Hope you enjoy making lots of striped squares and striped blankets. This is a great stash buster square and is a great way to use up odds and ends or salvaged yarn which tends to be in small balls! You can read about my yarn salvage tips here.

Please share pictures of your projects and link back to this page if you reuse my pattern. Happy crocheting!

Annie ๐Ÿ™‚

Filed Under: Crochet patterns Tagged With: crochet, crochet block, free crochet pattern, Free pattern, striped block, uk and us terms, uk crochet terms, us crochet terms

  • « Go to Previous Page
  • Page 1
  • Page 2
  • Page 3
  • Page 4
  • Page 5
  • Page 6
  • Go to Next Page »

Footer

Newsletter

Copyright © 2026 ยท Genesis Sample on Genesis Framework ยท WordPress ยท Log in