I was absolutely thrilled to receive a comment on one of my early posts requesting this Flower Petal Edging Pattern. This edging completed my Sunshine Flower Blanket which you can see as it grows in these posts. These goes back to the early days of my blog 🙂
Sunshine Flower Blanket – Progress!!
The Edging takes the theme of the flower squares I used to make the blanket. You can find the flower square pattern in a book by Tracey Lord called A Square a Day. I love this book and have used it as a source of inspiration many times.
Here is the pattern. For your ease I will list it twice using UK then US terms. The pattern uses three colours but you could keep to one or two if you prefer. My blanket was worked in Sirdar Cotton DK which is a glorious yarn with beautiful stitch definition and a lovely soft texture. I used their cream shade called Vanilla 502 for the background for the blanket.
The colours I used for the edging are:
- Yellow – Yarn A – Citrus 531
- Orange – Yarn B – Honeysuckle 508
- Red – Yarn C – Red 510
Before we start there is a stitch here that you might not have come across. Picot 2 or Picot 3. These little stitches create the peak of each petal. I used Picot 2 on the orange round of petals and Picot 3 on the final round of larger red petals. To perform this stitch simply chain 2 for picot 2 and then slip stitch into the first chain stitch. For Picot 3, you guessed it – chain 3 then slip stitch into the first chain stitch. The stitch creates a little knot which adds texture and definition.
Flower Petal Edging pattern – UK crochet terms
First round
Using Yarn A join the yarn to the edge of your work with a slip stitch and work two chain. Work a row of Htr into each stitch of the edge of your project.
Second round
TIP – there is no need to start each round in the same place. Moving the start point around the project will spread the positioning of the ends you will need to weave in and also improves the overall uniform appearance.
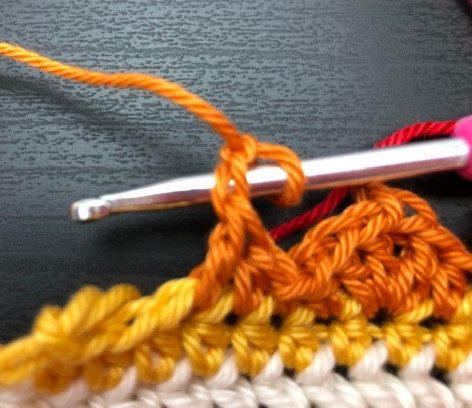
Using Yarn B join in the yarn to the edge of your work with a slip stitch chain two, (1Tr, picot 2*, 2Tr) all into the same stitch, 1Htr, slip stitch. This should give you your first petal. The first petal is slightly different as it has the starting chain so I will write out the repeating petal pattern next. Each petal is worked over four stitches of the row below. (*see instructions above)
[1Htr, (1Tr, picot 2, 2Tr) all into the same stitch, 1Htr, Slip stitch]
Repeat this petal all the way around your project.
Third round
Using Yarn C – join in the yarn between any two petals with a slip stitch working into the stitch from the first round. The pictures show where you should put your hook.
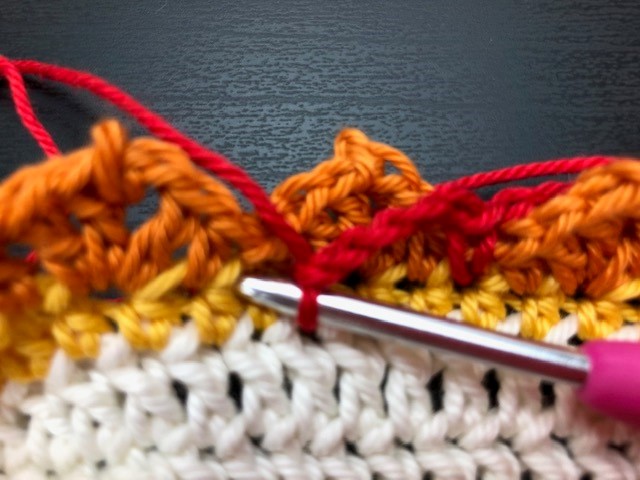
Work 5 chain and then 1DC between the next two petals. Again you are working into the stitch you created on the first round. This round should be super quick and it forms the foundation for the final round of petals.
The chain loops might be at the front or the back of your work once you finish this round. It doesn’t really matter where they end up – mine are normally at the front. Push them to the back as you work the final round, pulling the petals from the previous round to the front.
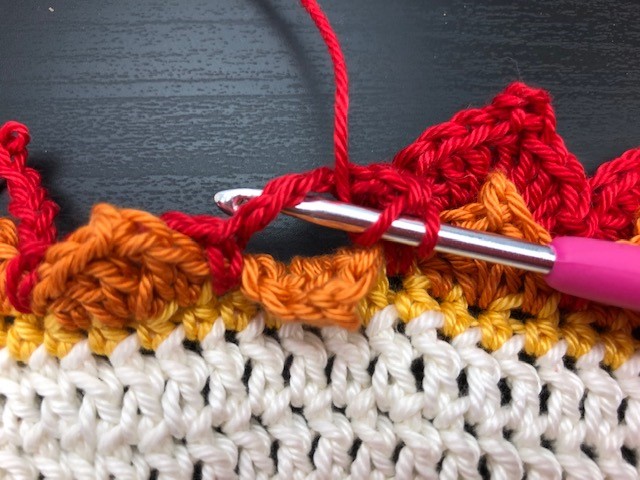
Fourth and final round
Keeping with yarn C working into the chain loop you created on the last round in each chain loop work as follows: 1DC, 3Tr, picot 3, 1Dtr, 3Tr, 1DC. A total of 8 stitches into the chain loop then move onto the next chain loop and repeat all the way around your project.
Finish off the ends and you are done!!
Flower Petal Edging pattern – US crochet terms
First round
Using Yarn A join the yarn to the edge of your work with a slip stitch and work two chain. Work a row of HDc into each stitch of the edge of your project.
Second round
TIP – there is no need to start each round in the same place. Moving the start point around the project will spread the positioning of the ends you will need to weave in and also improves the overall uniform appearance.
Using Yarn B join in the yarn to the edge of your work with a slip stitch chain two, (1Dc, picot 2*, 2Dc) all into the same stitch, 1HDc, slip stitch. This should give you your first petal. The first petal is slightly different as it has the starting chain so I will write out the repeating petal pattern next. Each petal is worked over four stitches of the row below. (*see instructions above)
[1HDc, (1Dc, picot 2, 2Dc) all into the same stitch, 1HDc, Slip stitch]
Repeat this petal all the way around your project.
Third round
Using Yarn C – join in the yarn between any two petals with a slip stitch working into the stitch from the first round. The pictures above in the UK terms section show where you should put your hook.
Work 5 chain and then 1SC between the next two petals. Again you are working into the stitch you created on the first round. This round should be super quick and it forms the foundation for the final round of petals.
The chain loops might be at the front or the back of your work once you finish this round. It doesn’t really matter where they end up – mine are normally at the front. Push them to the back as you work the final round, pulling the petals from the previous round to the front.
Fourth and final round
Keeping with yarn C working into the chain loop you created on the last round in each chain loop work as follows: 1SC, 3Dc, picot 3, 1Tr, 3Dc, 1Sc. A total of 8 stitches into the chain loop then move onto the next chain loop and repeat all the way around your project. See picture above in the UK terms section.
Finish off the ends and you are done!!
I hope you love this edging as much as I do. Happy crocheting!
Annie 🙂
Recent Comments