This three coloured rope crochet edging makes a beautiful finish to any project. I was looking for an neat edge that used all three of the colours from my project. This edging forms a pretty rope effect and although it feels a bit fiddly to start with you will soon find you get into a rhythm.
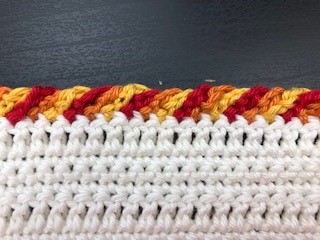
The materials I am using in this example are Sirdar Cotton DK and a 4mm hook. These photographs use the following colours, Red (shade 510), Honeysuckle (shade 508) and Citrus (shade 531). The base colour is Vanilla (shade 502).
Three coloured rope crochet edging pattern
Choose your start point and join in the first colour. Make a chain of five stitches and take the hook out of the stitch to leave a loop. Tip – as you work it is easy to pull out stitches so I recommend pulling a bit of thread through to leave a larger loop.
Join in the second colour to the stich alongside your first chain and again make a chain of five stitches then remove the hook.
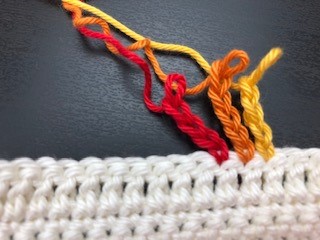
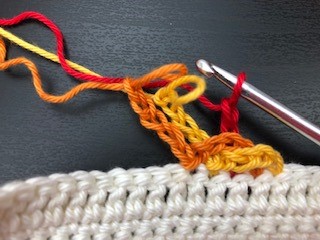
Finally join in the third colour into the next stitch of your project, making your final chain of five stitches. When you have joined your third colour the work should look like this picture below.
Start making the three coloured crochet rope
Next we are going to start to make the rope. Put your hook back into the loop at the end of the first chain you made. In my work above this is the yellow chain. This is where it gets a bit fiddly! I found if I worked slowly at first and kept the colours from tangling, I got into an easy rhythm after a few colour changes 🙂
With your hook in the loop at the end of the first chain, bring this chain down in front of all the others and put your hook into the stitch next to the third colour. This is the next available stitch on the edge of your project as shown below.
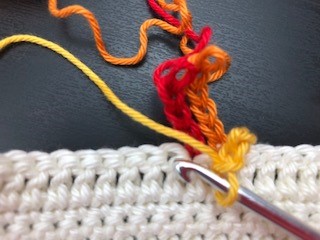
Make a slip stitch by putting your hook into this stitch, wrapping the yarn around and pull back through the work as shown below. Next pull this through the loop on the hook to form a slip stitch.
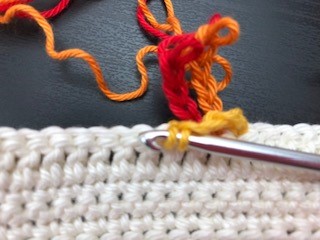
Work another five chains with this colour and remove the hook from the work. Your edging should look like this picture below.
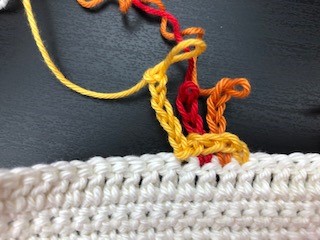
You have made the first twist and the rest of the crochet rope follows the same method. Put your hook into the end of the chain nearest to the right of the work. Bring the chain to the front of the work and put your hook into the next available stitch to the left of the work. For my example here this means putting the hook into the end of the orange chain. Bring this chain forward and secure the twist with a slip stitch into the stitch next to the yellow chain, as shown in the photos below.
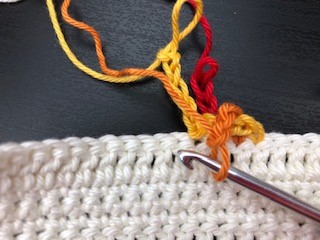
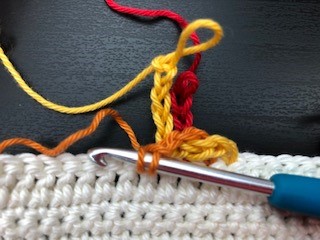
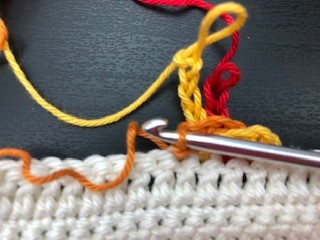
Finishing your work – Tips
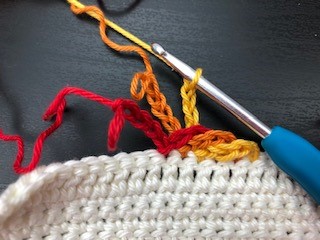
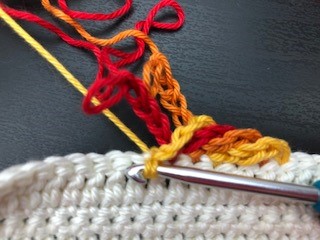
That really is all there is to it. Continue picking up each colour, bringing it to the front of the work and secure with a slip stitch before making a new five stitch chain. You will see your rope start to grow. More pictures below along with a few final tips.
Using the rope edging on the ends of rows side
If you are working along an edge that has the ends of rows rather than a neat set of stitches this can be difficult to space. Measure the gap between two slip stitches of the same colour on your first edge and use that as a guide to place your slip stitches on this edge.
Changing the pattern to suit different weights of yarn or tension
If you find that the tension of the rope doesn’t sit well or look right then adjust the number of stitches you have in your chain. I found five chain stitches was perfect for this Cotton DK. You might need more/fewer if you are working with a different weight of yarn. Just find the right tension by trial and error working a small section then see how the edging sits.
Dealing with corners
If you are working on a square or rectangular project you will have to deal with a 90 degree corner or rather four corners! You should find that if you work three colours into one stitch either side of the corner the rope will continue round the corner. This means that you work all three colours into the last stich of the row before the corner. Turn and again work all three colours into the first stitch on the next side. Please let me know if you would like to see photos of this and I will add them or put up a separate post.
Adding in more colours
I only used three colours in my design here but you could work a rope with more colours or fewer. Simply adjust the length of chain you use to give the desired effect.
I think that is it for now. I put up a pattern for flower petal edging if you would like to try something different. You can see that pattern here – flower petal edging. Please let me know if you like this edging pattern and if there is anything else I can help with. Happy crocheting!
Annie 🙂