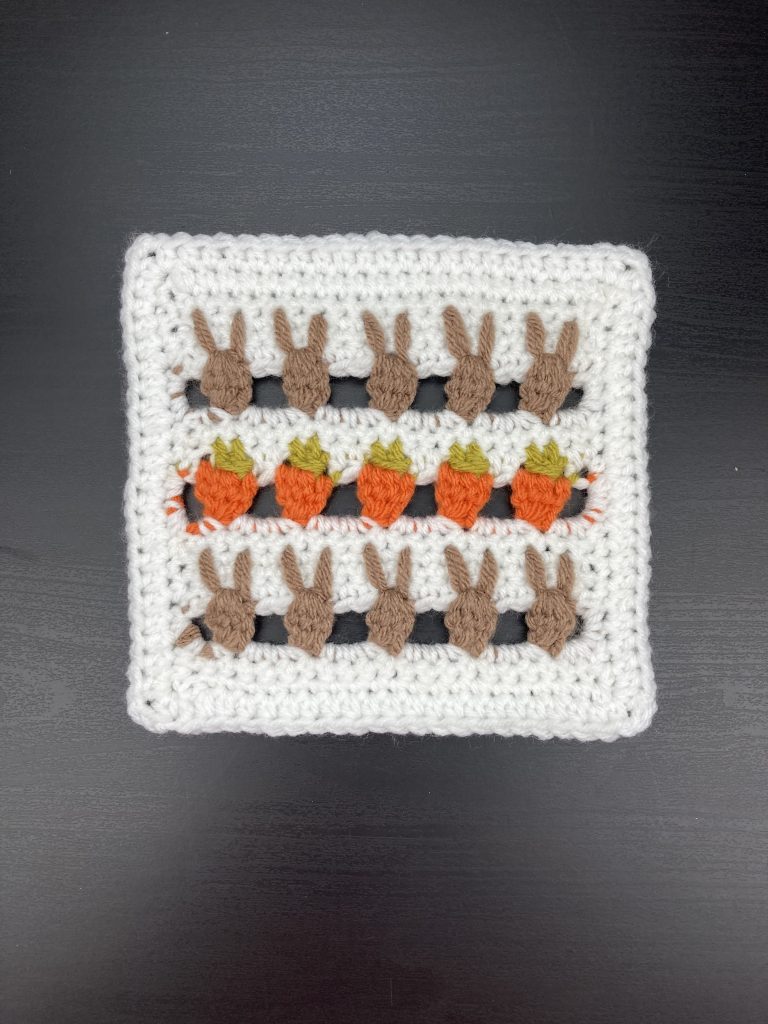
Hello and thank you for visiting my little crochet blog. This is the latest of my bunny themed patterns which were written with Easter in mind but actually work at any time of year. This bunny and carrot crochet block measures 6 inches/15 centimetres square when worked in chunky yarn. The pattern works in any weight of yarn but you need to check that the tension has the same proportions (ratio of rows to stitches) if you want it to come up square shaped. Worst case you will create oblong shaped blocks which might be fine too ?
Bunny and Carrot Crochet Block – Materials
The block pictured here was worked in Stylecraft Special Chunky. If you have read any of my recent posts you will know this is my current go to yarn. There is a fab range of colours which you can see here at woolwarehouse which is where I normally buy all my yarn. The block uses four colours a base colour which I will call Yarn A then a colour for the bunnies Yarn B (for bunny). Finally, two colours for the carrots which I will call Yarn T for the carrot tops and Yarn C (for carrot) for the carrots themselves.
The colours I have used in the blocks in these photos are:
- White – Yarn A
- Mocha – Yarn B
- Spice – Yarn C
- Lime – Yarn T
This yarn uses a 6mm hook which means it grows nice and quickly! In the worked examples I carry the yarn up the side of the work and you might notice that this is visible through the white. To avoid this, if you don’t mind a few more ends, you can break the yarn and re-join. You will need to work chain in Yarn A on the bunny and carrot rows though to provide the framework for the block.
Bunny and Carrot Crochet Block – Instructions with UK crochet terms (for US terms please scroll down)
Foundation Chain
Each row of this block will have a starting chain and 21 stitches. The bunny and carrot patterns use a repeat of three stitches with a one stitch gap and we will have an additional stitch at the edge to make the spacing work. Chain 24 stitches for the foundation row.
First Row
Starting into the fourth stitch from the hook, work a row of DC. This should mean a row of 21DC will take you to the end of the chain. Chain 2 and turn the work.
Second Row
Our starting chain of 2 forms the first stitch of the row so miss one and starting into the second stitch of the row of DCs again work a row of 21 DC then Chain 2 and turn the work. If you find it is taking you more than 21DC to complete the row, you might be starting into the first rather than second stitch.
Third and Fourth Rows
Repeat rows 1 and 2 so that you have four rows of DC with lovely straight edges! At the end of the fourth row do not work the 2 Chain stitches. Turn the work and we will put those two chain stitches at the start of the fifth row.
Fifth Row
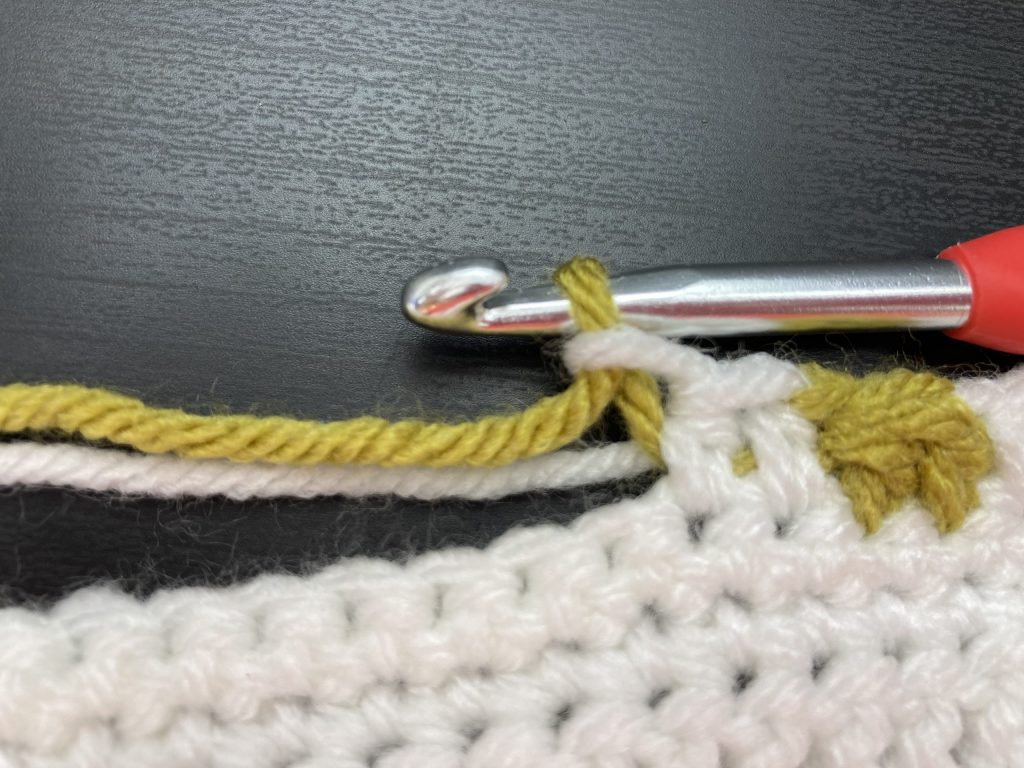
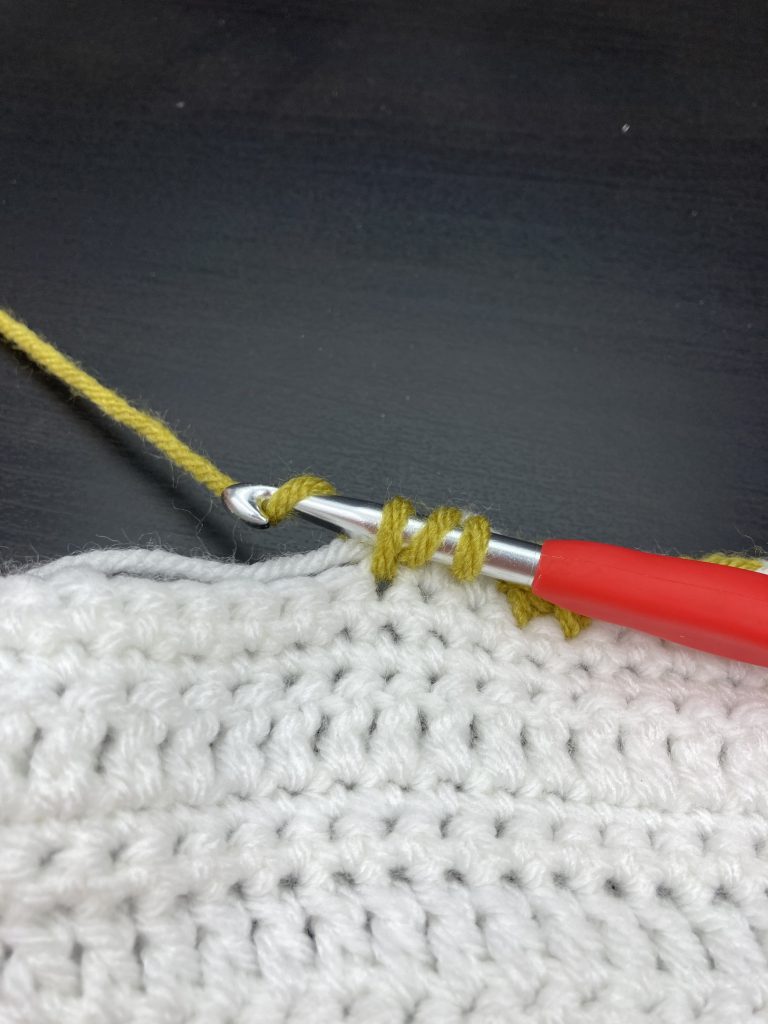
As you work the first of your two chain to start the row, take up yarn B and lay it across yarn A behind the hook so that when you work the chain, Yarn B is caught up and joined into the work. Work 2CH then one DC in Yarn A carrying Yarn B along the top of the work as shown. Pick up Yarn B and work the bunny ear stitch which you will find in the posts via the links below.
Crochet Bunny Stitch – UK crochet terms
Crochet Bunny Stitch – US crochet terms
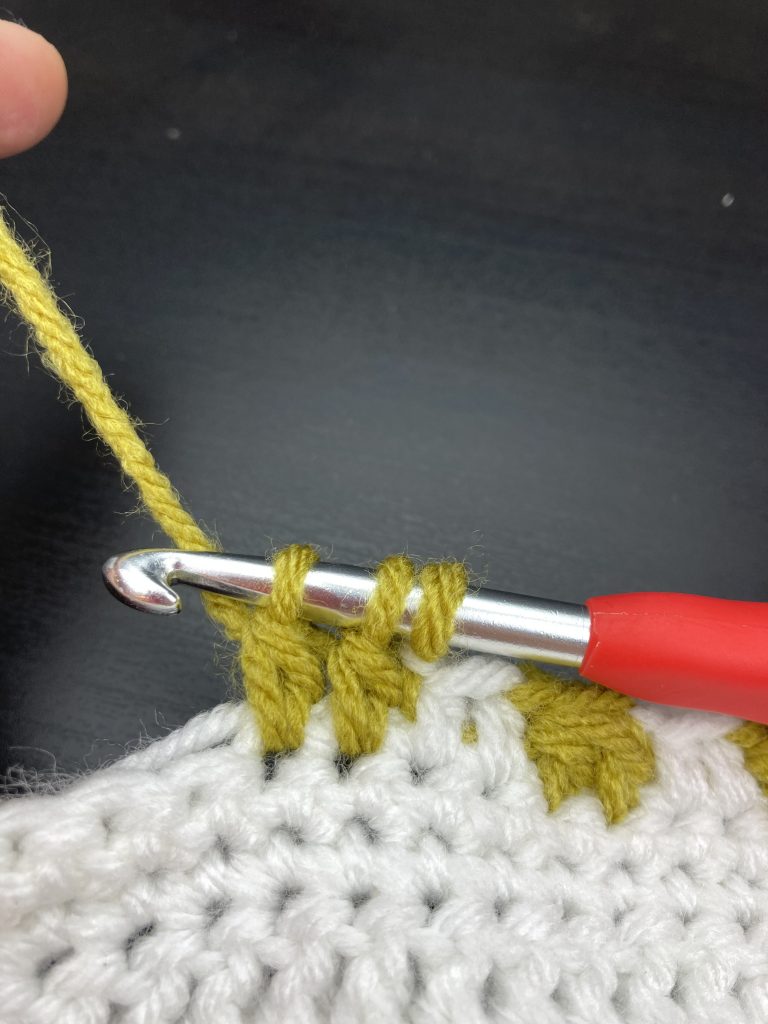
The bunny ear stitch has a four stitch repeat which should give you five sets of ears then a final 2DC in Yarn A to complete the row.
If you are working these blocks as shown with the minimum of ends and do not mind the appearance of the carried yarn then break off yarn A at the end of this row and work 4 chain in Yarn B.
If however, you are not carrying yarn then break off Yarn B and work 3 chain in Yarn A and one in yarn B ready to start the row of bunny bodies.
Sixth Row
Work a row of bunny bodies as shown in the Bunny Stitch post. This row is worked entirely in Yarn B if you are carrying the yarn. At the end of the row CH5 and slip stitch to join to the end of the row below and break off Yarn B
If you are not carrying the yarn then join in Yarn B for each bunny and break off Yarn B after each bunny body, working the three chain between in Yarn A. At the end of the row you will need to make 5CH in Yarn A and join to the row below then break off Yarn A.
Seventh Row
Remember to turn the work so that you are on the right side. The tail of the starting chain should be on your left as you look at the block. Join in Yarn A to the gap beside the last bunny and working around the chain stitches make 2CH then 2DC. Into each of the gaps between bunny bodies work 4DC until the end of the row when you need to work 3DC into the final gap. Chain 2 and turn the work.
Eighth Row
As with Row 4 work a row of DC starting into the second stitch and it should take you 21DC to complete the row. Turn the work ready to add in Yarn T for the carrot tops.
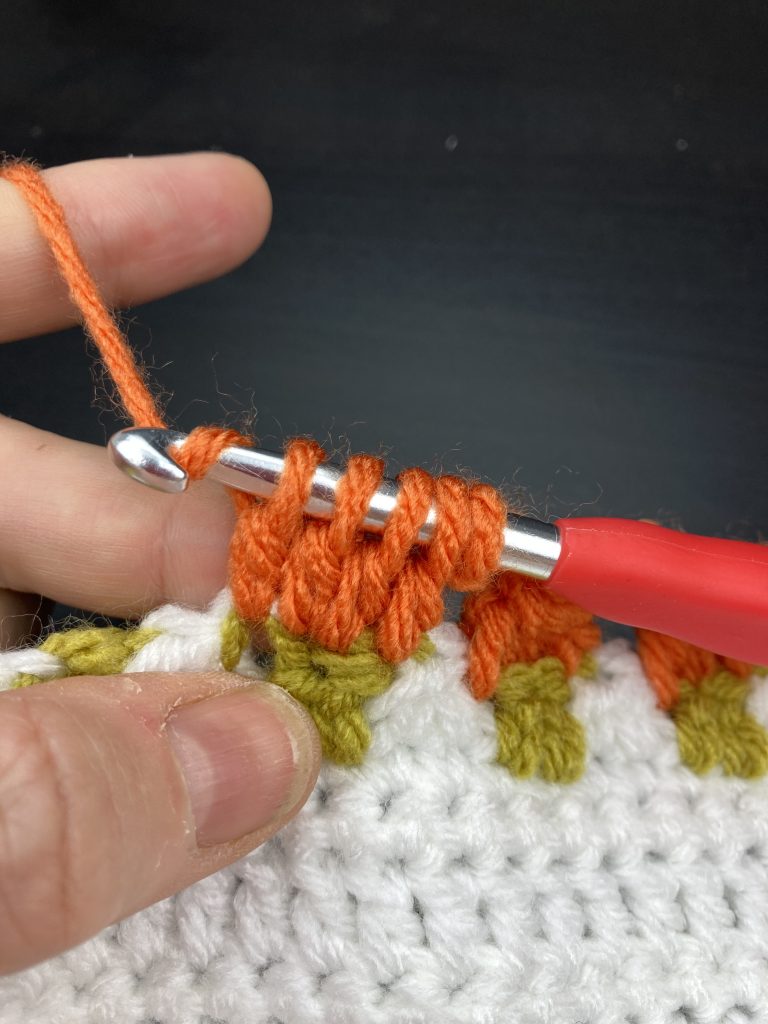
Ninth Row
Laying Yarn T over Yarn A work one Chain to join in the yarn then work another two chain in Yarn A. Work 1Htr into the second stitch on the row below, then * work one chain in Yarn T. The carrot top is a two stitch treble cluster.
Wrap Yarn T around the hook and put the hook into the third stitch on the row then wrap the yarn round again and pull back through. Next, wrap Yarn T around again and pull through the first two loops on the hook as though you were working a Tr.
Wrap Yarn T around the hook and put the hook into the fourth stitch on the row and again wrap Yarn T around pull back through, wrap Yarn T round again and pull through the first two loops on the hook. Finally wrap Yarn T round the hook again and pull back through all the loops on the hook.
Gently pull Yarn A and Yarn T to ensure the tension is good then pick up Yarn A and work 2 HTR. Repeat from * to the end of the row.
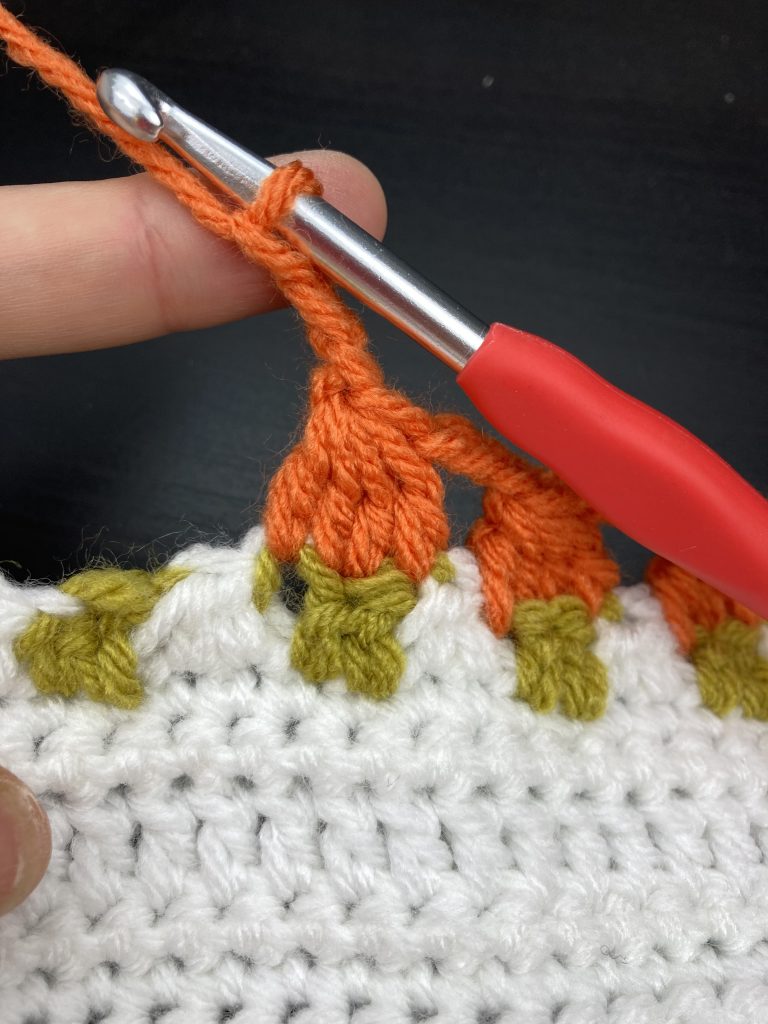
This row sounds complicated but once you get into the swing of it it is actually quite a quick row to work. I will aim to put up a video once I can work out the technology but in the meantime I hope the photographs help!
At the end of this row break off Yarn T
Tenth Row – wrong side of the work
This row presents the same choice as with the bunny bodies row. It is similar in that we will be working a row of TR clusters this time in Yarn C.
If you are carrying the yarn and ok with the way that that looks then you need to break off Yarn A, join in Yarn C and work 4CH. Make the carrots by working a four treble cluster in the same way you worked the cluster for the bunny bodies. This time the first stitch goes into the first stitch on the previous row in Yarn T as shown below.
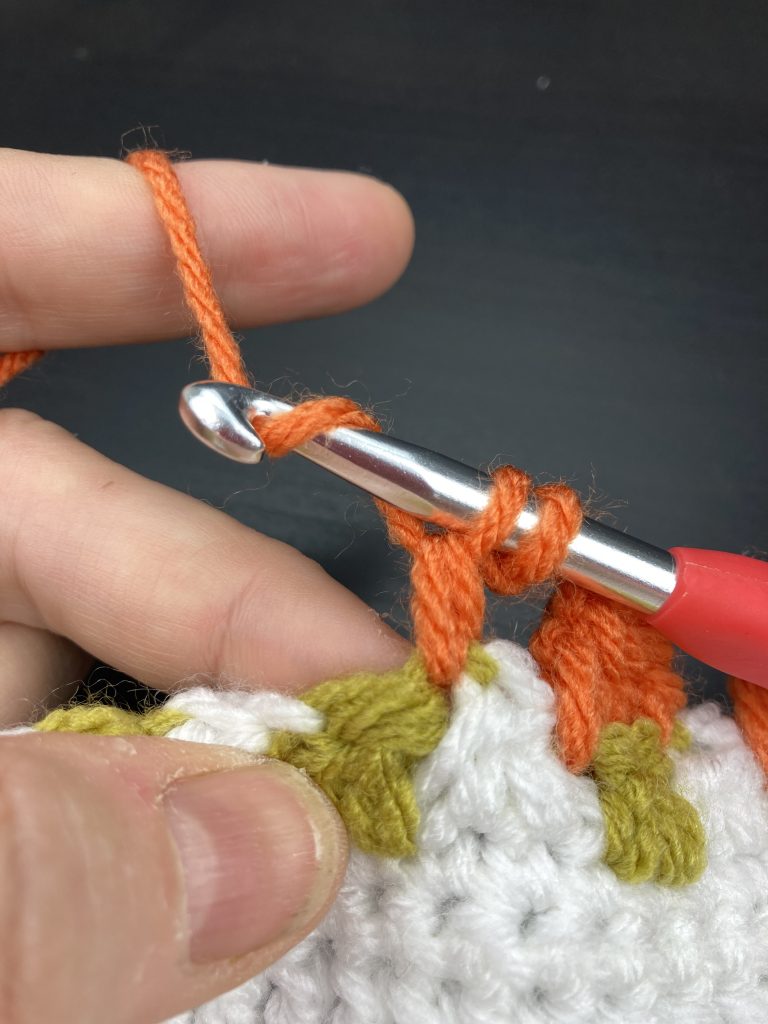
The second and third stitches go into the next and larger stitch in Yarn T on the row below. Finally work the last Tr of the cluster into the gap beneath the chain stitch in Yarn T just on the other side of the carrot top. Wrap the yarn around the hook and pull back through all the stitches till you have one loop on the hook.
Work three chain and start the next carrot! At the end of the row CH4 and join to the end of the previous row.
If you are not carrying the yarn then work 4CH in Yarn A and join in Yarn C separately for each carrot, working the 3CH between carrots in Yarn A. As I said, this method will result in A LOT of ends to finish off!
Eleventh Row
Work this row as Row 7 again making sure you are on the right side of the work.
Row 12 – 14
Work these in Yarn A starting with 2CH then work 21DC which should complete the row.
Row 15 – 16
Repeat rows five and six to add another row of bunnies.
Row 17 and 18
Repeat rows seven and eight.
Row 19
Work a final row of DC with 2CH to start the row. Leave Yarn A attached and you are ready to work the border.
Bunny and Carrot Crochet Block – Border worked on the right side.
First round
CH2 then turn the block so that the bunnies are running vertically and you are working along the side of the block. Along the side of the block work 21 DC evenly spaced along the piece. As a guide you should have worked 10 DC by the time you are alongside the middle of the carrot row.
At the end of the row chain 2 turn the block through 90 degrees and work 22 DC into the starting row, ending the row with 2CH.
Turn the block again and work 22 DC spaced evenly along the other second side of the block. At the end of the row CH2 and work 22 DC along the top of the block then CH2 and slip stitch to join to the starting chain.
Second Round
Work a round of DC with 2CH at each corner. Start the round with 2CH and end with a slip stitch to join.
Bunny and Carrot Crochet Block – Instructions with US crochet terms (for UK terms please scroll up)
Foundation Chain
Each row of this block will have a starting chain and 21 stitches. The bunny and carrot patterns use a repeat of three stitches with a one stitch gap and we will have an additional stitch at the edge to make the spacing work. Chain 24 stitches for the foundation row.
First Row
Starting into the fourth stitch from the hook, work a row of SC. This should mean a row of 21SC will take you to the end of the chain. Chain 2 and turn the work.
Second Row
Our starting chain of 2 forms the first stitch of the row so miss one and starting into the second stitch of the row of SCs again work a row of 21 SC then Chain 2 and turn the work. If you find it is taking you more than 21SC to complete the row, you might be starting into the first rather than second stitch.
Third and Fourth Rows
Repeat rows 1 and 2 so that you have four rows of SC with lovely straight edges! At the end of the fourth row do not work the 2 Chain stitches. Turn the work and we will put those two chain stitches at the start of the fifth row.
Fifth Row
As you work the first of your two chain to start the row, take up yarn B and lay it across yarn A behind the hook so that when you work the chain, Yarn B is caught up and joined into the work. Work 2CH then one SC in Yarn A carrying Yarn B along the top of the work as shown. Pick up Yarn B and work the bunny ear stitch which you will find in the posts via the links below.
Crochet Bunny Stitch – US crochet terms
The bunny ear stitch has a four stitch repeat which should give you five sets of ears then a final 2SC in Yarn A to complete the row.
If you are working these blocks as shown with the minimum of ends and do not mind the appearance of the carried yarn then break off yarn A at the end of this row and work 4 chain in Yarn B.
If however, you are not carrying yarn then break off Yarn B and work 3 chain in Yarn A and one in yarn B ready to start the row of bunny bodies.
Sixth Row
Work a row of bunny bodies as shown in the Bunny Stitch post. This row is worked entirely in Yarn B if you are carrying the yarn. At the end of the row CH5 and slip stitch to join to the end of the row below and break off Yarn B
If you are not carrying the yarn then join in Yarn B for each bunny and break off Yarn B after each bunny body, working the three chain between in Yarn A. At the end of the row you will need to make 5CH in Yarn A and join to the row below then break off Yarn A.
Seventh Row
Remember to turn the work so that you are on the right side. The tail of the starting chain should be on your left as you look at the block. Join in Yarn A to the gap beside the last bunny and working around the chain stitches make 2CH then 2SC. Into each of the gaps between bunny bodies work 4SC until the end of the row when you need to work 3SC into the final gap. Chain 2 and turn the work.
Eighth Row
As with Row 4 work a row of SC starting into the second stitch and it should take you 21SC to complete the row. Turn the work ready to add in Yarn T for the carrot tops.
Ninth Row
Laying Yarn T over Yarn A work one Chain to join in the yarn then work another two chain in Yarn A. Work 1HDC into the second stitch on the row below, then * work one chain in Yarn T. The carrot top is a two stitch DC cluster.
Wrap Yarn T around the hook and put the hook into the third stitch on the row then wrap the yarn round again and pull back through. Next, wrap Yarn T around again and pull through the first two loops on the hook as though you were working a DC.
Wrap Yarn T around the hook and put the hook into the fourth stitch on the row and again wrap Yarn T around pull back through, wrap Yarn T round again and pull through the first two loops on the hook. Finally wrap Yarn T round the hook again and pull back through all the loops on the hook.
Gently pull Yarn A and Yarn T to ensure the tension is good then pick up Yarn A and work 2 HDC. Repeat from * to the end of the row.
This row sounds complicated but once you get into the swing of it it is actually quite a quick row to work. I will aim to put up a video once I can work out the technology but in the meantime I hope the photographs help!
At the end of this row break off Yarn T
Tenth Row – wrong side of the work
This row presents the same choice as with the bunny bodies row. It is similar in that we will be working a row of 4DC clusters this time in Yarn C.
If you are carrying the yarn and ok with the way that that looks then you need to break off Yarn A, join in Yarn C and work 4CH. Make the carrots by working a four treble cluster in the same way you worked the cluster for the bunny bodies. This time the first stitch goes into the first stitch on the previous row in Yarn T as shown below.
The second and third stitches go into the next and larger stitch in Yarn T on the row below. Finally work the last DC of the cluster into the gap beneath the chain stitch in Yarn T just on the other side of the carrot top. Wrap the yarn around the hook and pull back through all the stitches till you have one loop on the hook.
Work three chain and start the next carrot! At the end of the row CH4 and join to the end of the previous row.
If you are not carrying the yarn then work 4CH in Yarn A and join in Yarn C separately for each carrot, working the 3CH between carrots in Yarn A. As I said, this method will result in A LOT of ends to finish off!
Eleventh Row
Work this row as Row 7 again making sure you are on the right side of the work.
Row 12 – 14
Work these in Yarn A starting with 2CH then work 21SC which should complete the row.
Row 15 – 16
Repeat rows five and six to add another row of bunnies.
Row 17 and 18
Repeat rows seven and eight.
Row 19
Work a final row of SC with 2CH to start the row. Leave Yarn A attached and you are ready to work the border.
Bunny and Carrot Crochet Block – Border worked on the right side.
First round
CH2 then turn the block so that the bunnies are running vertically and you are working along the side of the block. Along the side of the block work 21 SC evenly spaced along the piece. As a guide you should have worked 10 SC by the time you are alongside the middle of the carrot row.
At the end of the row chain 2 turn the block through 90 degrees and work 22 DC into the starting row, ending the row with 2CH.
Turn the block again and work 22 SC spaced evenly along the other second side of the block. At the end of the row CH2 and work 22 SC along the top of the block then CH2 and slip stitch to join to the starting chain.
Second Round
Work a round of SC with 2CH at each corner. Start the round with 2CH and end with a slip stitch to join.
There you have it – a completed Bunny and Carrot Crochet Block. I hope you like it. I plan to use it in a baby blanket so will be trialling it in DK and also in an Easter throw.
If you like the bunny stitch there are a few other patterns I have already put out that use this stitch. These include headbands and hats with a scarf and beanie hat to follow. Please join my mailing list or check back in here another day to find my latest free patterns. Happy crocheting!
Annie ?