• Skip to primary navigation
  • Skip to main content
  • Skip to footer

Stickytapeandstring

Created with WordPress managed by 1&1

  • Craft projects
    • craft business tips
    • craft blog
    • Crochet patterns
    • Upcycling
    • craft with kids
  • Blogging
    • New to blogging
    • Blog diary
  • Bullet Journal
  • About me
  • Welcome!!

crochet blocks

Log Cabin Love Blankets

January 31, 2021 by Annie Leave a Comment

In this post I am sharing the love and making my Log Cabin Love crochet blocks into Log Cabin Love Blankets! I have two suggested designs to share with you and some pics of my blanket as it progresses.

Firstly – if you are starting with this post, you need the link to the block pattern which is here

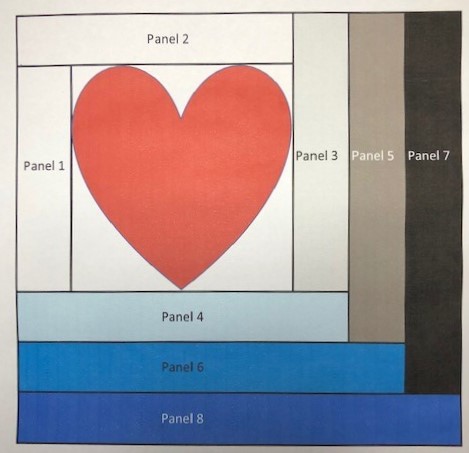
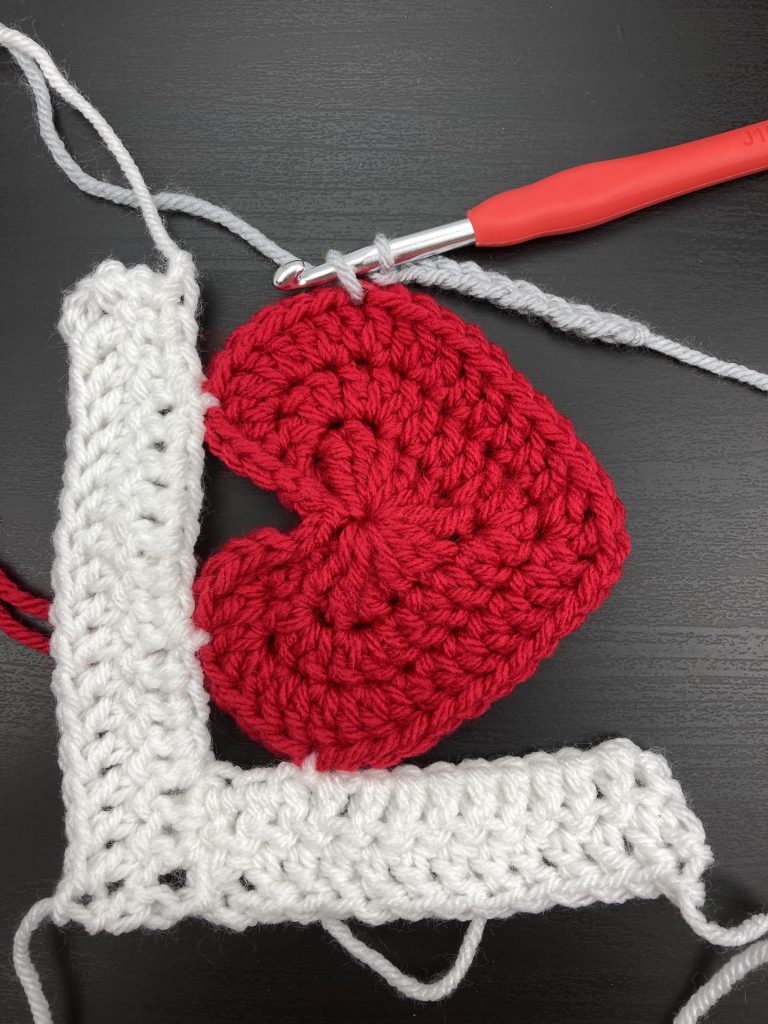
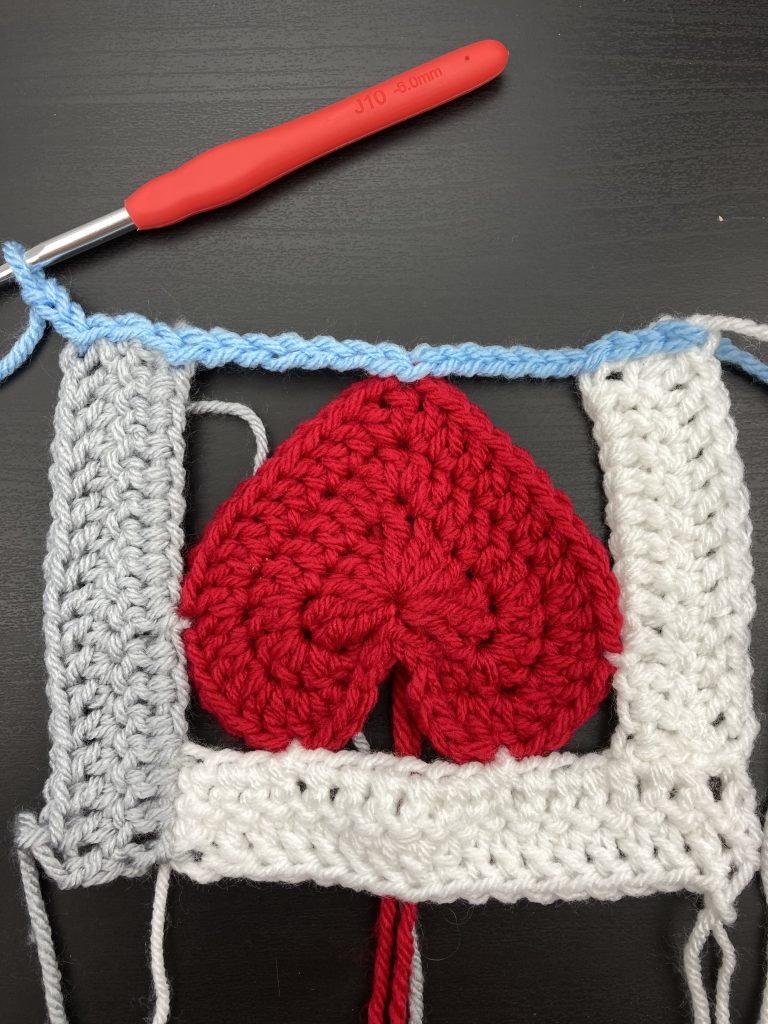
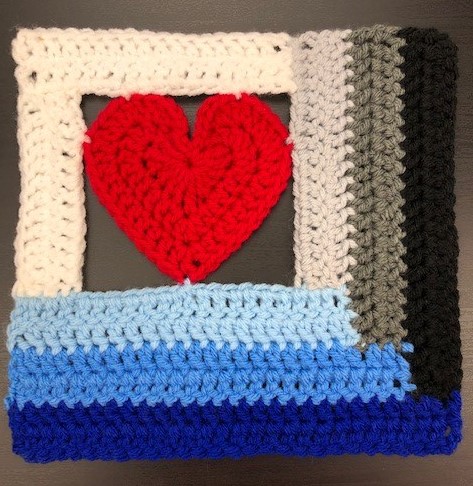
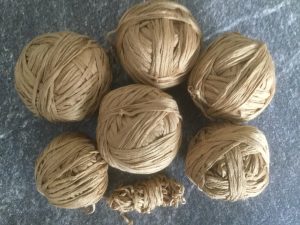
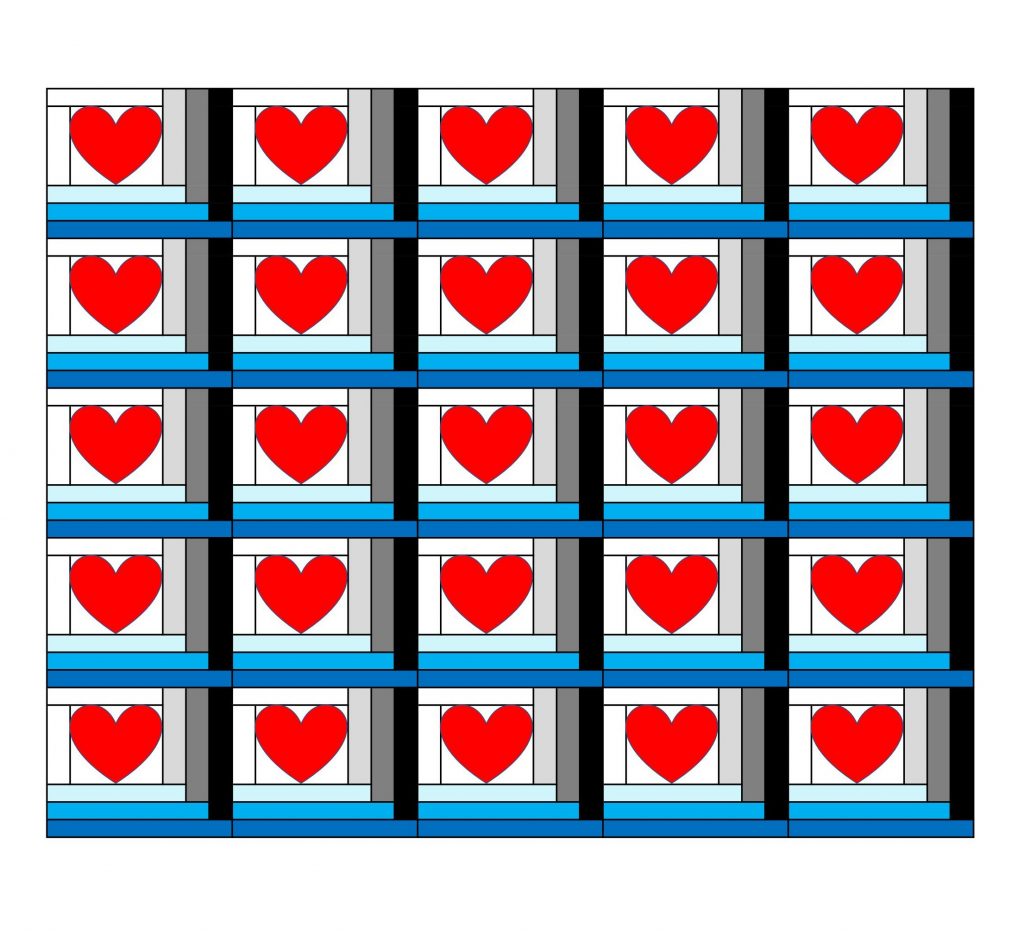
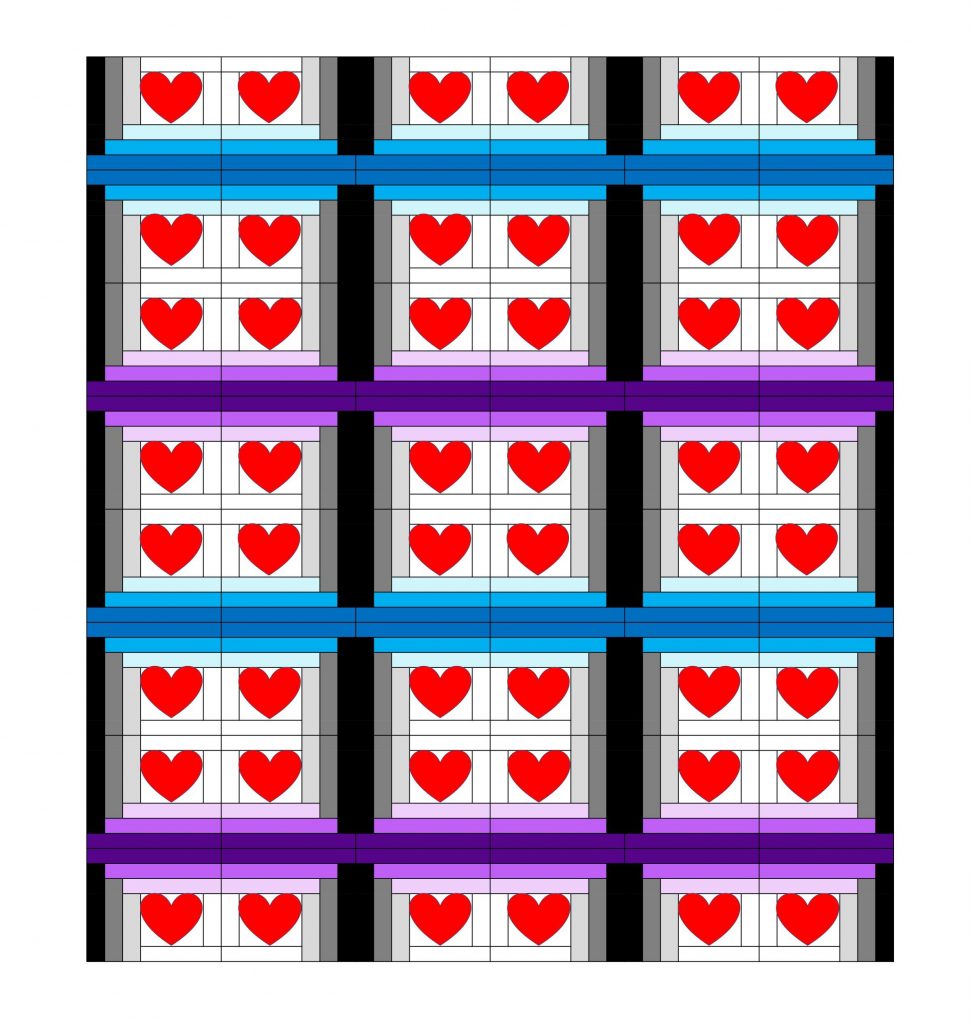
The first blanket design I am sharing is based on the colours in my original block. In this version I have worked the blocks identically. The yarn is my favourite Stylecraft Special Chunky which you can see here at my favourite UK yarn store – Woolwarehouse.

The colours I have used are as follows: Panels 1 and 2 – White 1001, Panel 3 – Silver 1203, Panel 4 – Cloud Blue 1019, Panel 5 – Graphite 1063, Panel 6 – Aster 1003, Panel 7 – Black 1002 and Panel 8 – Royal 1117.

The hearts themselves are worked in Lipstick 1246.

log cabin love blanket
Log Cabin Love blanket

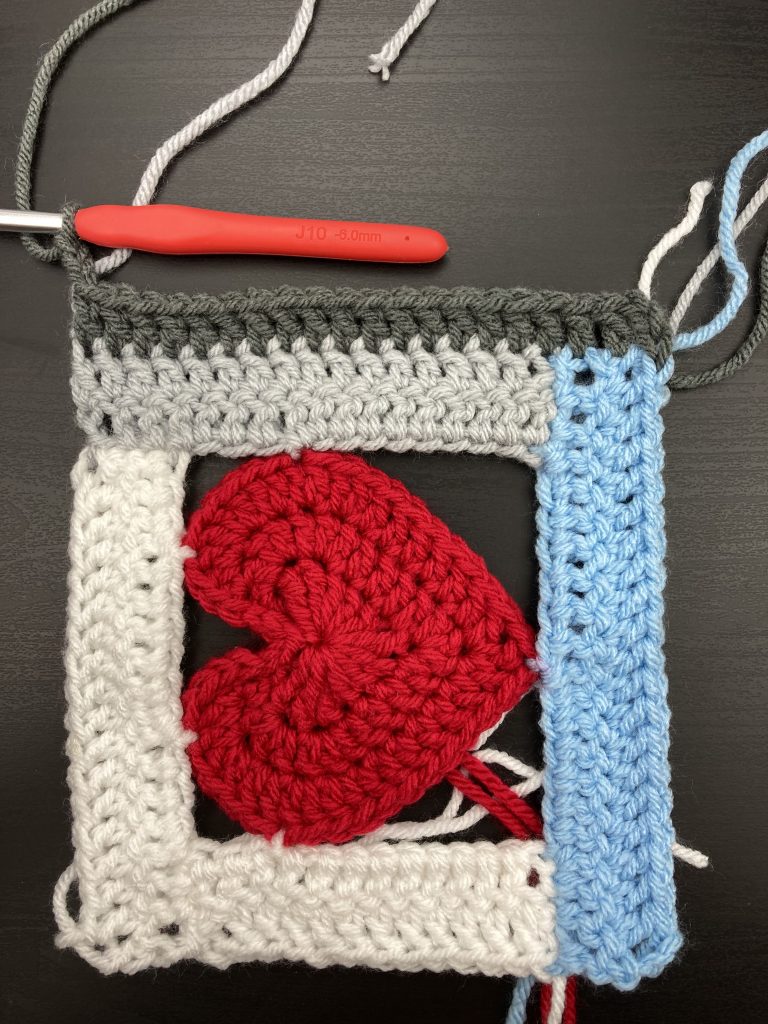
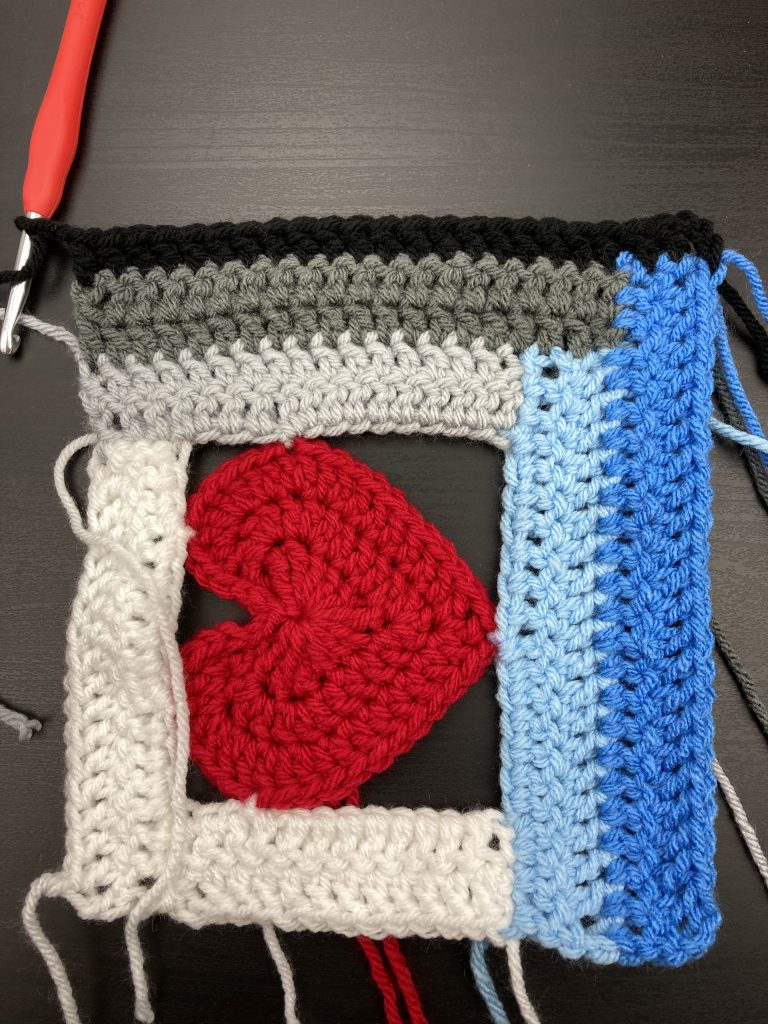
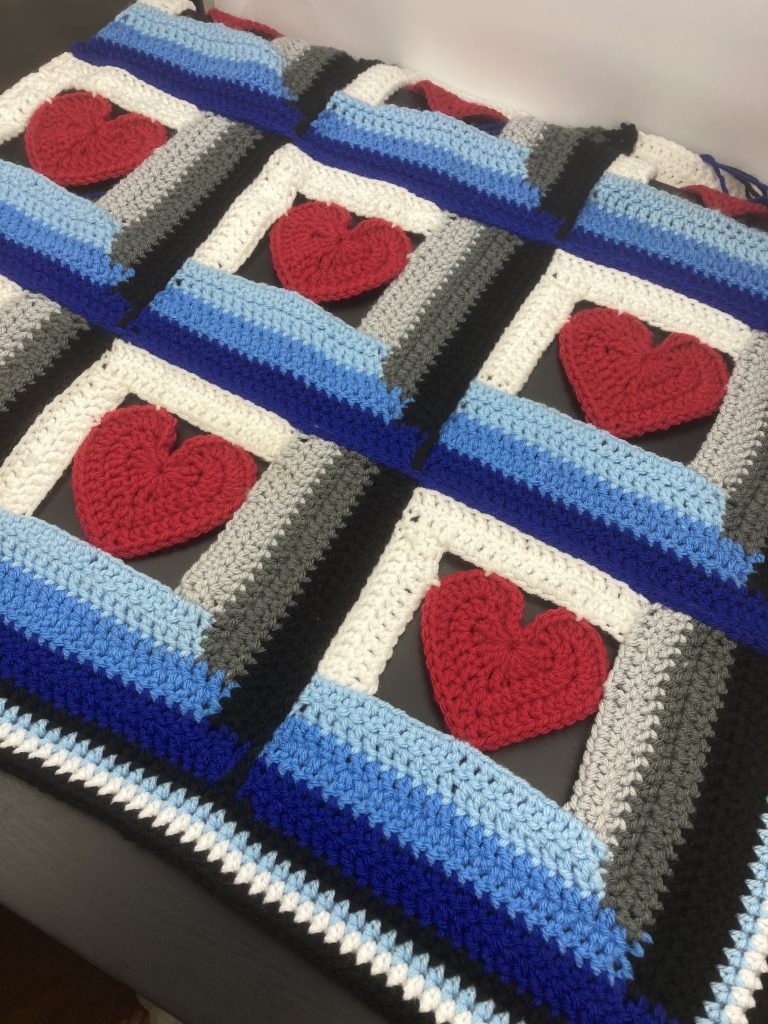
The second layout I have tried requires a flipped version of the block. You can see the effect that that produces in this picture.

log cabin love blanket v2
log cabin love blanket with flipped squares

If you would like me to share the pattern for the flipped block then please leave a comment and I will put that version up on this blog.

Edging the log cabin love blanket

For the edging I worked four rows of half Trebles (HDc in US terms) in black then pale blue, white and finally black again. As an additional option you could add a row of small hearts. I am planning to try this and will post additional pictures when I have completed the border.

log cabin love blanket
log cabin love blanket – basic edging

I hope you enjoy making these log cabin love blankets. Please share pictures of your work if you do use this pattern. I am happy for anyone to use or share my patterns but please include a link back to this blog if you do. Happy crocheting!

Annie 🙂

Filed Under: Crochet patterns Tagged With: crochet, crochet afghan, crochet blanket, crochet blocks, crochet lapghan, crochet project, free crochet pattern, Free pattern, log cabin, log cabin love heart, love heart, stashbuster

Log Cabin Love crochet block

January 24, 2021 by Annie Leave a Comment

Here is my latest heart themed block. This one is a great stash buster! You can use any scraps of yarn you have to make the log cabin love crochet block. However, the yarn does need to be roughly the same weight.

To make the examples shown here I have used Stylecraft Special Chunky and a 6mm hook. You can see the range here where I buy all my yarn at Woolwarehouse.

It is possible to mix different yarn types and I can cover this in a separate post if you would find it helpful. Please leave a comment to let me know.

NOTE – This pattern will be a lot easier to follow when I add photos which will follow in the coming week – before end Jan 21. If you find it hard to follow please come back when the photos are up. 🙂

Log Cabin Love crochet block pattern – UK crochet terms

NOTE – for US terms simply work DC where the pattern states Tr.

The heart of the pattern (see what I did there?) is the crochet heart. To make the heart you need to follow this link to my new large crochet heart pattern. The link takes you to another page on my blog where you will find the free pattern in both UK and US crochet terms. I made a few of these hearts then started to build the log cabin panels around them.

This diagram shows you the order in which the panels are worked.

log cabin love block diagram
log cabin love block panels

First panel

With your crochet heart face up this panel sits down the left hand side of the heart. We will be working from top to bottom of the block. The first four blocks have foundation rows made of chain stitch or slip stitches. This is because they frame the heart and are not joined to anything else in places.

First row
log cabin love panel 1
start by adding foundation for panel 1

Make a loop to start and chain 3. Count the stitches up the left side from the bottom of the heart with the bottom stitch being #1, slip stitch into #13 to attach your chain to the heart. Continue with 12 more chain. Turn the work ready for the second row.

log cabin love panel 1 - second row
starting the second row of panel 1
Second row

(wrong side facing) work 1Tr into the fourth chain from the hook. Continue working Tr along this row, 7 more Tr will take you to the slip stitch on the edge of the heart. Work 1 Tr into this stitch then 1Tr into each of the three chain stitches to reach the end of the row. CH3 and turn the work ready for the final row of this first panel.

log cabin love block - end of second row of panel 1
3CH at end of second row of panel 1
Third row

(right side facing) miss the first stitch and work 12 Trs to take you to the end of the row. Fasten off the yarn.

Second panel

With your crochet heart face up this panel sits across the top of the heart. We will be working from right to left of the block.

First row

Make a loop to start and chain 3. Slip stitch into the top of the right side of the heart to attach your chain to the heart. Continue with 6 more chain stitches then slip stitch to attach the chain to the top of the left side of the heart. Chain 3 then slip stitch into the edge of the top of panel 1 and work 3 more slip stitches across the top of block 1 to take you to the top left hand corner of the log cabin love block. Chain 3 and turn the work ready for the second row.

adding the second panel of the log cabin love block
foundation row for the second panel
Second row

(wrong side facing) miss the first stitch then work 3Tr into the slip stitches across the top of block 1. Work 3Tr into the three chain stitches then one Tr into the slip stitch at the top of the left side of the heart. Work 6Tr into the middle chain section then 1 Tr into the slip stitch at the top of the right side of the heart. Finally work 1Tr into each of the three chain stitches to reach the end of the row. CH3 and turn the work ready for the final row of the second panel.

Third row

(right side facing) miss the first stitch and work 17 Tr to take you to the end of the row. Fasten off the yarn.

Third panel

With your crochet heart face up this panel sits down the right hand side of the heart. We will be working from the bottom to the top of the block.

First row

Make a loop to start and chain 9. Count the stitches up the right side from the bottom of the heart with the bottom stitch being #1, slip stitch into #13 to attach your chain to the heart. Continue with 3 more chain then slip stitch into the bottom corner of panel 2 and work 3 more slip stitches across the end of panel 2. Turn the work ready for the second row.

adding the third panel of the log cabin love block
start the 3rd panel with a chain then slip stitch to the heart
Second row

(wrong side facing) miss the first stitch and work 3 Tr into the slip stitches on the previous row. Work 1Tr into each of the 3CH then one Tr into the slip stitch at the right side of the heart. Finally work into the Chain 9 Tr to reach the bottom of this panel. CH3 and turn the work ready for the final row of this third panel.

Third row

(right side facing) miss the first stitch and work 16 Tr to take you to the end of the row. Fasten off the yarn.

Fourth panel

With your crochet heart face up this panel sits across the bottom of the heart. We will be working from left to right across the bottom of the block.

First row

Attach your yarn to the outside corner of the bottom of panel 1. Slip stich 4 across the bottom of panel 1 then chain six and work one slip stitch into the bottom of the heart. Chain 6 and work four slip stitches across the bottom of panel 3. Chain 3 and turn the work ready for the second row.

foundation row for the fourth panel of the log cabin love block
foundation row for the fourth panel of the block
Second row

(wrong side facing) Miss the first stitch then work 3Tr into slip stitches across the bottom of panel 3. Continue working 6 Tr into the chain and 1 Tr into the slip stitch at the bottom of the heart. Work 6 Tr into the chain and four Tr into the slip stitches across the bottom of panel 1 to reach the end of the row. CH3 and turn the work ready for the final row of this fourth block.

Third row

(right side facing) miss the first stitch and work 20 Tr to take you to the end of the row. Fasten off the yarn.

Fifth panel

With your crochet heart face up this panel sits along the right side of the block next to panel 3. We will be working from the bottom to the top of the block. Things get easier now with no need for a foundation row.

First row

(right side facing) Attach your yarn to the bottom right corner of the work – at the corner of panel 4 and chain 3. Work 2 Tr into the end of panel 4 then work 17 Tr along panel 3. Chain 3 and turn the work ready for the second row.

fifth panel of the log cabin love block
adding the fifth panel
Second row

(wrong side facing) miss the first stitch and work 19 Tr to take you to the end of the row. Fasten off the yarn.

Sixth panel

With your crochet heart face up this panel sits across the bottom of the block below panel 4. We will be working from the right to left side of the block.

First row

(wrong side facing) Attach your yarn to the bottom right corner of the work – at the corner of panel 5 and chain 3. Work 2 Tr into the end of panel 5 then work 21 Tr along panel 4. Chain 3 and turn the work ready for the second row.

sixth panel of the log cabin love block
adding panel six to the block
Second row

(right side facing) miss the first stitch and work 23 Tr to take you to the end of the row. Fasten off the yarn.

Seventh panel

With your crochet heart face up this panel sits along the right side of the block next to panel 5. We will be working from the bottom to the top of the block.

First row

(right side facing) Attach your yarn to the bottom right corner of the work – at the corner of panel 5 and chain 3. Work 2 Tr into the end of panel 5 then work 20 Tr along panel 3. Chain 3 and turn the work ready for the second row.

adding panel seven to the log cabin love block
adding panel seven to the block
Second row

(wrong side facing) miss the first stitch and work 22 Tr to take you to the end of the row. Fasten off the yarn.

Eighth panel

With your crochet heart face up this panel sits across the bottom of the block below panel 6. We will be working from the right to left side of the block.

First row

(wrong side facing) Attach your yarn to the bottom right corner of the work – at the corner of panel 7 and chain 3. Work 2 Tr into the end of panel 7 then work 24 Tr along panel 6. Chain 3 and turn the work ready for the second row.

adding the final panel to the log cabin love block
adding the final panel!
Second row

(right side facing) miss the first stitch and work 26 Tr to take you to the end of the row. Fasten off the yarn.

Log Cabin Love crochet block

I hope you love this Log Cabin Love crochet block and have fun making log cabin blankets to share the love. I have some suggested blanket layouts which I will post separately but I wanted to get his pattern out there! Happy crocheting!

Annie 🙂

Filed Under: Crochet patterns Tagged With: crochet, crochet block, crochet blocks, crochet design, crochet heart, crochet heart block, crochet log cabin block, crochet project, free crochet pattern, Free pattern, log cabin block

Yarn salvage

September 2, 2018 by Annie Leave a Comment

Hello, I am here to share my latest obsession!    Getting lots of yarn for very little money through yarn salvage and recycling…….. what’s not to like?!

This project started with me worrying about the cost of the yarn I am using to develop projects and patterns for the blog.   Even using cheaper yarns like my well loved Drops Paris, the cost mounts up when you are making a large blanket.   Crochet seems to ‘eat’ far more yarn than knitting, or is that just me?

I gave some thought to sources of cheap yarn and began to wonder about Charity shops/Thrift stores and yarn salvage.  

Yarn Salvage and recycle!

After a bit of research I can tell you that woollen/knitted garments typically cost between £2 and £5 in these outlets.   If the yarn could be salvaged that would be quite a lot of yarn for a very low cost.   One problem is that it is the wrong season currently with warmer temperatures shops are not selling much knitwear but we still managed to find some candidate garments.

I say we because I decided to rope my Mum into this project.   I remember from my childhood that she really enjoys undoing knots and taffles.   Turns out Mum also quite likes rummaging through Charity/Thrift shops for bargain items of knitwear!   A knitter herself for many years Mum understands the construction of garments.   This is a big help when choosing pieces for yarn salvage.

We are now some way into our project.    Mum has sourced some 15 garments and we have learned which types work best and the types to avoid.    Here are our tips for garment selection.

TOP TIPS for Garment Selection when Recycling yarn

1. Look at the washing label – that gives you the yarn type, % composition wool, acrylic etc.  This info is normally on the reverse of the label

2. Inspect the seams.  The shoulders will normally be overlocked (zigzag stitching over both joined edges on the inside of the seam).   This isn’t a problem but if you see this type of seam elsewhere on the garment this usually means the knitted fabric has been cut and joined which means there will be a break in the yarn on every row.   This gives very short lengths of yarn.   Avoid!

3. Unless you fall in love with a particular yarn, go for jumpers rather than jackets/cardigans.  Jumpers are normally easier to unpick.   Jackets and cardigans can be very difficult to deal with where the front band is attached and again are sometimes cut, resulting in short lengths of yarn.

4. Look at the texture.   Unravelling thicker yarn is generally easier than the finer ones.

5. Large garments often cost the same as smaller ones as pricing tends to be per garment.   The larger the garment the greater the quantity of yarn you can recover!

Read on for more tips on garment selection

6. Charity shops are seasonal.   Many will not display knitted garments in summer but it is always worth a look.   Lighter weight items will probably still be available.

7. One you have a stock, bear in mind the colours and weight of your yarns – look for items you can combine.

8. Shops have sales.    Even though these outlets are incredibly cheap to start with there are times when they discount.   There are also sometimes discount rails where items have been in store for a time and not sold.   Keep an eye out for sales!

9. Make sure you are looking in the right kind of shop.   Shops selling vintage or retro garments will be selecting stock based on the style and age of the garment and will be charging a much higher price than the average Charity Store.

10. Do not be put off by the style of a garment.   You will not be wearing it!  An item that is not attracting buyers in its current form might be made of very attractive yarn!

Recovering the yarn

We also learnt how best to recycle the yarn and to work out what to do with the yarn we recovered.   I will cover these in a later post.

The first few garments we bought are shown in the photos below.    When you start to take the garments apart you have to be very careful not to snip the yarn.   However, if you do snip the yarn in error it just gives shorter lengths or smaller balls which can still be used – depending on the project you select.

first garment for yarn salvage project
second garment for yarn salvage project
third garment for yarn salvage project

Yarn Salvage – Unpicking the garments

The first garment we unpicked was the flecked cardigan.   This one gave me the inspiration for a blanket project.    We picked creams and browns to go with it and unpicked the other two garments shown.    These photos show the quantity of balled yarn we ended up with.   More than 1kg of yarn for £6, not bad eh? On the subject of money a bit of small print I am obliged to share. Adverts and banners in this post are affiliate links. If you click on them I might receive a small payment which supports my blog and allows me to keep posting. Right – on to the interesting stuff. CHEAP YARN and free patterns!!

yarn salvage project - recycled yarn
yarn salvage project more recycled yarn
recycled yarn from yarn salvage project

The yarn is more or less Aran weight.   I will include more on how to identify the weight in the next post.   I used to have an obsession with knitting cabled sweaters so have a lot of oddments of plain aran yarn in my stash.    Some of the oddments were in similar colours to the yellow/orange flecks in the ‘inspiration’ yarn.   I put these oddments from my stash with the salvaged yarn to give me a large enough quantity to produce a blanket.

Yarn Salvage – Using the recycled yarn!

Next in my yarn salvage project, I came up with a block pattern that I can scale up and down to make three different sizes of square.   The pattern(s) are shown at the bottom of the post.    These are some of the blocks I have completed so far.

sample squares from salvaged yarn

Finally, turning this blanket into a whole family project, my husband designed a layout for the blocks.

blanket layout of different sizes of recycled yarn squares

Here are the patterns I am using for the three sizes of block.  I might need to amend these when it comes to stitching up if the weights of the yarn result in size differences.   I will either block them to the correct size or add additional rows to increase the size!   The change of colour instruction in these patterns shows you how I am working – you can change colour whenever you like or make the blocks solid colour.   It really depends on the yarn you have from your own yarn salvage project.

Instructions in UK terms – please SCROLL DOWN for US terms

Large Square – UK terms

1st round – make a magic loop, 2Ch, 9Dc slip stitch to join to the start point
2nd round – Ch3, 2Tr in each stitch, Tr, slip stitch to join to the start point
Change colour
3rd round – Ch2, Dc in each stitch (19), slip stitch to join to the start point
4th round – Ch3, 2xTr cluster, Ch1, (3Tr cluster Ch1)x 19. Slip stitch to join to the start point
5th round – Ch2, 3HTr, (2Tr, DTr, chain 3, DTr, 2Tr, 4HTr) x 3, 2Tr, DTr, chain 3, DTr, 2Tr, slip stitch to join to the start point.
Change colour
6th round – Ch2, Htr round, 2HTr, 1Ch 2HTr, in each corner, slip stitch to join to the start point.
7th round – Ch2, Tr round 2Tr, 1Ch, 2Tr in each corner, slip stitch to join to the start point.
Change colour
8th round – Ch2, Htr round, 2HTr 1Ch 2HTr, in each corner, slip stitch to join to the start point.
9th round – Ch2, Tr round 2Tr, 1Ch, 2Tr in each corner, slip stitch to join to the start point.
Change colour
10th round – Ch2, Htr round, 2HTr, 1Ch, HTr, in each corner, slip stitch to join to the start point.
11th round – Ch2, Tr round 2Tr, 1Ch, 2Tr in each corner, slip stitch to join to the start point.
Change colour
12th round – Ch2, Htr round, 2HTr, 1Ch, 2HTr, in each corner, slip stitch to join to the start point.
13th round – Ch2, Tr round 2Tr, 1Ch, 2Tr in each corner, slip stitch to join to the start point.
Change colour
14th round – Ch2, Htr round, 2HTr, 1Ch, 2HTr, in each corner, slip stitch to join to the start point.
15th round – Ch2, Tr round 2Tr, 1Ch, 2Tr in each corner, slip stitch to join to the start point.
16th round – Ch2, Htr round, 2HTr, 1Ch, 2HTr, in each corner, slip stitch to join to the start point.
Change colour
17th round – Ch2, Htr round, 2HTr, 1Ch, 2HTr, in each corner, slip stitch to join to the start point.

Medium sized square – UK terms

1st round – Make a magic loop, 2Ch, 9Dc slip stitch to join to the start point
2nd round – Ch3, 2Tr in each stitch, Tr, slip stitch to join to the start point
Change colour
3rd round – Ch2, Dc in each stitch (19), slip stitch to join to the start point
4th round – Ch3, 2xTr cluster, Ch1, (3Tr cluster Ch1)x 19. Slip stitch to join to the start point.
5th round – Ch2, 3HTr, (2Tr, DTr, chain 3, DTr, 2Tr, 4HTr) x 3, 2Tr, DTr, chain 3, DTr, 2Tr, slip stitch to join to the start point.
6th round – Ch2, Htr round, 2HTr, 1Ch, 2HTr, in each corner, slip stitch to join to the start point.
Change colour
7th round – Ch2, Htr round, 2HTr, 1Ch, 2HTr, in each corner, slip stitch to join to the start point.
8th round – Ch2, Tr round 2Tr, 1Ch, 2Tr in each corner, slip stitch to join to the start point.
9th round – Ch2, Htr round, 2HTr, 1Ch, 2HTr, in each corner, slip stitch to join to the start point.

Small Square – UK terms

1st round – Make a magic loop, 3Ch, 15Tr, slip stitch to join to the start point.
Change colour
2nd round – Ch3, 2xTr cluster, Ch1, (3Tr cluster Ch1)x 15, slip stitch to join to the start point.
3rd round – Ch2, HTr, (2Tr, DTr, Ch3, DTr, 2Tr, 2HTr,) x 3,  2Tr, DTr, Ch3, DTr, 2Tr, slip stitch to join to the start point.
Change colour
4th round – Ch2 work Dc along each side, 2Dc, 2Ch, 2Dc in each corner, slip stitch to join to the start point.

Instructions in US terms – please SCROLL UP for UK terms

Large Square – US terms

1st round – make a magic loop, 2Ch, 9Sc slip stitch to join to the start point
2nd round – Ch3, 2Dc in each stitch, Dc, slip stitch to join to the start point
Change Colour
3rd round – Ch2, Sc in each stitch (19), slip stitch to join to the start point
4th round – Ch3, 2xDc cluster, ch1, (3Dc cluster ch1)x 19. Slip stitch to join to the start point
5th round – Ch2, 3Hdc, (2Dc, Tr, chain 3, Tr, 2Dc, 4Hdc) x 3, 2Dc, Tr, chain 3, Tr, 2Dc, slip stitch to join to the start point.
Change colour
6th round – Ch2, HDc round, 2HDc 1ch 2HDc, in each corner, slip stitch to join to the start point.
7th round – Ch2, Dc round 2Dc, 1ch, 2Dc in each corner, slip stitch to join to the start point.
Change colour
8th round – Ch2, HDc round, 2HDc 1ch 2HDc, in each corner, slip stitch to join to the start point.
9th round – Ch2, Dc round 2Dc, 1ch, 2Dc in each corner, slip stitch to join to the start point.
Change colour
10th round – Ch2, HDc round, 2HDc 1Ch 2HDc, in each corner, slip stitch to join to the start point.
11th round – Ch2, Dc round 2Dc, 1ch, 2Dc in each corner, slip stitch to join to the start point.
Change colour
12th round – Ch2, HDc round, 2HDc 1Ch 2HDc, in each corner, slip stitch to join to the start point.
13th round – Ch2, Dc round 2Dc, 1ch, 2Dc in each corner, slip stitch to join to the start point.
Change colour
14th round – Ch2, HDc round, 2HDc 1Ch 2HDc, in each corner, slip stitch to join to the start point.
15th round – Ch2, Dc round 2Dc, 1ch, 2Dc in each corner, slip stitch to join to the start point.
16th round – Ch2, HDc round, 2HDc 1Ch 2HDc, in each corner, slip stitch to join to the start point.
Change colour
17th round – Ch2, HDc round, 2HDc 1Ch 2HDc, in each corner, slip stitch to join to the start point.

Medium sized square – US terms

1st round – Make a magic loop, 2Ch, 9Sc slip stitch to join to the start point
2nd round – Ch3, 2Dc in each stitch, Dc, slip stitch to join to the start point
Change colour
3rd round – Ch2, Sc in each stitch (19), slip stitch to join to the start point
4th round – Ch3, 2xDc cluster, ch1, (3Dc cluster Ch1)x 19. Slip stitch to join to the start point.
5th round – Ch2, 3HDc, (2Dc, Tr, chain 3, Tr, 2Dc, 4HDc) x 3, 2Dc, Tr, chain 3, Tr, 2Dc, slip stitch to join to the start point.
6th round – Ch2, HDc round, 2HDc, 1Ch, 2HDc, in each corner, slip stitch to join to the start point.
Change colour
7th round – Ch2, HDc round, 2HDc, 1Ch, 2HDc, in each corner, slip stitch to join to the start point.
8th round – Ch2, Dc round 2Dc, 1Ch, 2Dc in each corner, slip stitch to join to the start point.
9th round – Ch2, HDc round, 2HDc, 1Ch, 2HDc, in each corner, slip stitch to join to the start point.


Small Square – US terms


1st round – Make a magic loop, 3Ch, 15Dc, slip stitch to join to the start point.
Change colour
2nd round – Ch3, 2xDc cluster, Ch1, (3Dc cluster Ch1)x 15, slip stitch to join to the start point.
3rd round – Ch2, HDc, (2Dc, Tr, Ch3, Tr, 2Dc, 2HDc,) x 3,  2Dc, Tr, ch3, Tr, 2Dc, slip stitch to join to the start point.
Change colour
4th round – Ch2 work Sc along each side, 2Sc, 2Ch, 2Sc in each corner, slip stitch to join to the start point.

And that is it from me.   I hope you enjoy rooting around for knit wear to recycle and yarn salvage!   Please share your stories.    Happy crocheting!

Annie 🙂

Filed Under: Craft projects, Upcycling Tagged With: blankets, crochet, crochet blocks, design, Free pattern, frugal, handmade, recycling, salvage, stash buster, stash busting, yarn

Footer

Newsletter

Copyright © 2025 · Genesis Sample on Genesis Framework · WordPress · Log in