• Skip to primary navigation
  • Skip to main content
  • Skip to footer

Stickytapeandstring

Created with WordPress managed by 1&1

  • Craft projects
    • craft business tips
    • craft blog
    • Crochet patterns
    • Upcycling
    • craft with kids
  • Blogging
    • New to blogging
    • Blog diary
  • Bullet Journal
  • About me
  • Welcome!!

stash

Yarn Salvage #2 – more tips

September 8, 2018 by Annie Leave a Comment

Hello, In my last post I promised you another set of tips and ‘how to points’ on yarn salvage. The project is going very well here and I am drowning a bit in yarn!

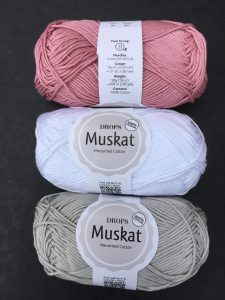
With Autumn coming on, I have also started looking at the list of people I would like to make Christmas and Birthday presents for!   I plan to use some of this new yarn stash to create beautiful things for my friends and family.   I will post a list pattern links when I have it together but as a start point I am making my striped scarf up with some of the greens and greys.

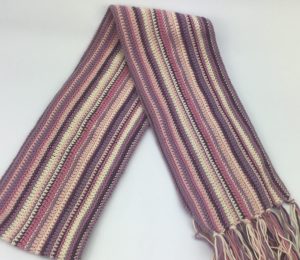
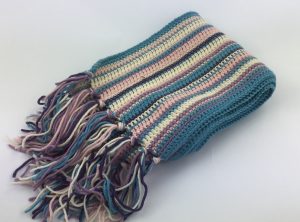
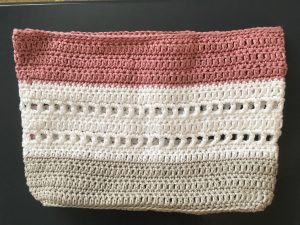
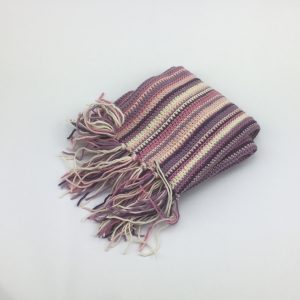
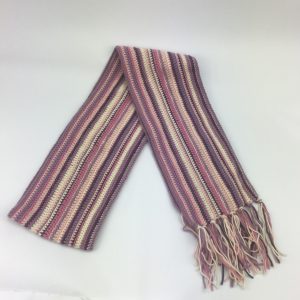
Here is a link to the Striped Scarf pattern and you can see the scarf above in pink and in blue. This type of pattern is ideal for using recycled yarn as you can vary the design according to the yarn you have available and it is easier to mix yarn weights.   Anyway – I promised you tips….. here goes.   The last set of tips focussed on garment selection.  This list is more about what to do when you get your garments home and you need to do the unravelling!   If you missed the first set of tips you can see them here – Yarn Salvage #1

Yarn Salvage Tips#2 – where to start unravelling

1. Firstly spend some time getting to know the garment.   Look at every seam and pull the two joined edges as far apart as possible.   There should be a set of horizontal stitches visible between the two pieces of the garment.   If you are lucky these stitches will be in a slightly different thread but this is not always the case.

2. Side and sleeve seams are the easiest place to start.   Snip through 3 or 4 of those horizontal joining stitches, at one end of the seam but if you’ve chosen the bottom edge, avoid the welt/rib/border.  Instead, start a little higher up.

3. As well as the hole you have created by snipping the horizontal stitches you should be able to see a cut end of yarn.   Pull on this and it might magically unravel the whole seam.   If it doesn’t, go to the other end of the same seam and try again.

4. Most seams will unravel as described above if you persevere long enough.   Beware of fluffy yarns however.   Fluffy yarns need a lot of pulling and sometimes scissor work to prise them apart.

5. If all else fails, it might be necessary to snip all horizontal stitches but this is time taking and risky.    It is very easy to snip part of the knitting which would mean you end up with smaller balls of recovered yarn and more ends to deal with in your project!

6. Sometimes the tops of sleeves and neck areas, particularly on fronts of jumpers, call for the use of scissors.   There is no point in spending ages unpicking these areas just to finish up with very short lengths of yarn.    Just cut across the knitting so that you have a reasonably long raw edge to start from.

7. Welts/ribs/borders and underarm seam intersections on some garments can be huge time wasting areas to deal with.   No matter how long you take or how careful you are, there will be cuts to the knitting in those areas.   Consider just cutting those nasty lumpy seams away with out even trying to unravel them.

8. Beware the double ball knitting demon!!   There are some commercial machines that have two balls of yarn on the go in production.    The balls are used to knit alternate rows.   This means when you are unravelling you will have two balls of yarn to wind – swapping between them every row.    You cannot know this before you unravel, at least we haven’t worked out a way to detect it yet…. but be prepared to deal with it if it occurs.

9. Take a view on whether to unravel ribbing at the neck and elsewhere.   Sometimes it is worth the effort, sometimes not.

10. Finally, it is worth saving every scrap of cut away area or rib/welt/border until you have finished the project you are using the yarn for.    You never know whether you will run out of yarn and just need a tiny bit more.  If this happens, all the bits that were too time consuming to deal with suddenly become worthwhile!!

And that is it for now.    I have a final post in this series for you next week.   In that post I will cover what we do with the yarn we recover in order to prepare it for re-use.

Happy recycling!

Annie 🙂

Filed Under: Craft projects, Upcycling Tagged With: crochet, Free pattern, gift idea, handmade, recycling yarn, scarf, stash, yarn

Crochet blog – update #8

August 18, 2018 by Annie Leave a Comment

Hello and SORRY – it has been a few weeks since my last post.    I was calling these ‘weekly’ updates but that just hasn’t been happening.    My day job has been REALLY busy for a few weeks but should be calming down now, so hopefully I will get to spend my weekends here again.

I have still been busy with my crochet projects on the train each day.    I have also been able to work on with my Hearts and Spots blanket in the evenings.  Although I don’t want to get my laptop out after a day in the office – I don’t mind a bit of crochet to wind down before bed.

Here are the latest views of the blanket.   I still have to tie in all the ends but it is all stitched together.  The border would be finished if I hadn’t run out of yarn!   The yarn order is in for just two more balls of Drops Paris to complete the project.   The patterns for the squares are on my blog, heart square pattern here and basic square pattern here.   I am not fully happy with the way they fit together so I will be tweaking them over the coming weeks.   I plan to put a smaller version of the blanket together as a kit so watch this space on that.

This project is waaay too big for the train now so I have been working on other things in the mornings and evenings.   I started work designing more blocks and produced a pentagon….  not terribly useful as they don’t tesselate or fit together easily.   I might turn out a pattern for a ball (think football/soccer) at some point using these and a hexagon or two 🙂  I will put the hexagon pattern up on here in case anyone finds it helpful for a five sided project!   I suppose you could just keep going round and make a pentagon shaped blanket.

My other project on the train has been a little bag.   I am quite pleased with this so far.   It looks a bit basic as it still needs handles, decoration.  I think I might include a lining.   Again I am thinking about putting this pattern together as a kit on Etsy but I will share the pattern for free on the blog as soon as I can get it written up.

I have been using a lighter weight yarn for these two projects, Drops Muskat.   Another winner from Drops as far as I am concerned.  This yarn again is incredible value and consistent quality.  I have yet to find a knot!  The yarn is 100% mercerized cotton with a lovely sheen and tight twist which means that it doesn’t split much if at all when being worked.   Easier if you want to be looking up from the work a bit!  I have been using a 4mm hook for this yarn which seems to work well.  The finished work has great stitch definition so would really show off complicated stitches.

Finally, a team project has started in my house.    It started with me worrying about the cost of yarn.   I began wondering whether it would be possible to get hold of some yarn very cheaply by buying old knitwear and dismantling garments to recover the yarn.   This is where my Mum came in and if I am honest has completely taken over!   A trawl of local charity/thrift shops turned up a number of candidate garments.    We got to work (carefully) with scissors, unpicking and balling and the results have been amazing.    I will put up a separate post on the process and results as I could fill pages with what we found and learned.   For this post, in summary, we have recovered a huge quantity of yarn so far for a tiny outlay.   My Mum is now unstoppable in her search for woollies to dismantle and I have started my first project using this recovered yarn!    I am trying to top up what we find with yarn from my stash but as it stands far more is going into my stash than is coming out!!

Here are some of the pics of the project using the recycled yarn.   The inspiration for the project was the first yarn we recovered – a soft brown boucle yarn flecked with yellow and orange.    I came up with a pattern for a block using a cluster stitch (another new one for me).    I will share the patterns in a separate post.

My husband loves drawing and designing and was once an engineer before moving on to other things so he likes a bit of geometry and maths.    I enlisted his help for this project as I was short on time.   He came up with this layout below which I really like – I think I will be asking him for designs more often!   Here is his sketch.

I have had a very exciting time with the blog this month.   One of my posts on pricing of handmade work seemed to catch attention out there and drove far more page views than I have had previously.   My income from ads ‘soared’ to £1.83 in one month 🙂 clearly still a long way to go to being financially secure!

That’s all from me for this post – I have promised a number of follow on posts and patterns so I had better get working!   Please get in touch either by leaving a comment or joining my mailing list.   I love hearing from you all.

Happy crocheting!

Annie 🙂


Filed Under: craft blog, Craft projects Tagged With: bags, blankets, commuter crochet, cotton, crafts, crochet, crochet blog, design, handmade, recycling, recycling yarn, small bags, stash, stash busting, upcycling, yarn, yarn salvage

Crochet blog – update #7

July 16, 2018 by Annie Leave a Comment

Hello and welcome to my 7th update.    I am still aiming to do these weekly but my week was crazy busy last week and I didn’t make enough progress to tell you about!

Over the last two weeks I managed to complete the squares for my hearts and spots blanket.  Here are the last four rows.    These are not laid out in the order I plan to put them together here but you get the idea.

The original colour layout looked like this.    I will be joining the blocks in this order more or less.

The heart squares are less stable than the spot and solid squares so rather than make it random I am rotating the three designs which means that a heart square will always be surrounded by solid/spot squares.  Here are the finished blocks in their colour piles!

I have been working on joining methods.    For my sunshine flower blanket I wanted to make the joins as invisible as possible.    This hearts and spots blanket will make a feature of the joins.    I am using the mid colour from each of the sets to join the blocks in each row.    For the joins between rows I haven’t decided what to use yet.    I might carry on with the mid colour of the previous row or might use the bold colours.

Away from this blanket I have been trying to get organised.    I recently published a couple of posts on daily and weekly planning with free printable planner downloads.  I have also been working on a stash catalogue which I will share in a separate post but this is what it looks like.   Here is the file as a free download.   The file is A5 size so you might need to resize it if you would like a different format.    If you have any problems with this please let me know and I will resize the file for you!   stash catalogue (285 downloads)

I have quite a large stash of yarn (!) and much as I try to make use of it before buying more yarn, it doesn’t seem to reduce any!   I hope that having it catalogued and available to browse through will improve my ability to create ideas to use it all.   One thing I have found is that as I go through the backs of cupboards and packing boxes to look at all my yarn, I am falling in love with it all over again.    I have found some yarns I didn’t know I had!    I read an article on yarn stashing and I know I am not the worst for this.   I do not have any yarn deliberately hidden from my family.    I loved one story I read, of a knitter who had removed a bath panel to create a new hiding place for an extreme stash 🙂

That’s all from me this week.   I will go back to joining squares and cataloguing my stash.    I hope to be able to edge the hearts and spots blanket next weekend and to share the final pattern.   Happy crocheting!

Annie 🙂

Filed Under: craft blog, Craft projects Tagged With: blanket, blog, Craft, crochet, design, productivity, stash, stash catalogue, yarn

Crochet blog – update #6

July 1, 2018 by Annie Leave a Comment

Hello and welcome to my sixth update!   This week I made more progress on my blanket project.   I realised I have been calling it different names as is has progressed.   It started life as my Shades of the Rainbow blanket but more recently I have been calling it Hearts and Spots!   Whatever name it ends up with I have to confess, I am ready to move on… I have never been great at finishing things but this blog acts as a conscience so I will get it done!

This photo shows four more completed rows of squares.   Only four more to go and I can start the making up.   I have already made the majority of the blocks for those last four rows but still need to fasten off the ends.

I started to look into pricing of this project, researching on Etsy and google for similar items and found a huge range of pricing.   Some of it was incredibly low and looks to cover the cost of materials at best.   This got me thinking!   I built myself a little spreadsheet to calculate the cost of producing the blanket.   I know what the yarn cost including shipping and I used the UK minimum wage to value my time. The blanket isn’t finished yet but when it is I will know what I should be charging. The spreadsheet has a section to record the number of hours worked.   I think I will use one for every project from now on.   I created it as a PDF and set up a FREE DOWNLOAD HERE.   Pricing basics (750 downloads)   I wrote a longer post on pricing which you can read here – pricing basics.

As a break from my big project this week I designed this new block in the picture above.   I have made it up in a few colours with some of my left over scraps. I am very pleased with the way it turned out.   Here is a link to the FREE PATTERN. There are no complicated stitches so it should be suitable for beginners.   I have listed the instructions in both UK and US notation.   I haven’t decided on my next big project but I would quite like to make a blanket with this block.   I worked it in Drops Paris yarn on a 5mm hook and the finished blocks are about 14cms square.

The problem with these little side projects is that they hold up work on the main project.   I do tend to get a bit distracted by new things.   Confession time, I have three other side projects on the go.   I am working on a cushion design, a summer top and a shoulder bag design.   The good news is that I will be able to share those patterns with you soon I hope.

For now it is back to finishing of little Hearts and Spots squares.   I hope you have a good week. Happy crocheting!

Annie 🙂

Filed Under: craft blog, Craft projects Tagged With: blankets, blocks, commuter crochet, cotton, Craft, crochet, design, Free pattern, handmade, squares, stash, stash busting

Stripes scarf

April 1, 2018 by Annie Leave a Comment

This project is made with the same yarns as my flower hats.    I had quite a bit of each colour left over but not enough to make any more hats in the same design.  I fancied a change anyway so decided to attempt a scarf.

I have collected a lot of images of scarves on my Pinterest boards.   The style I am working here is one of my favourites to wear.    It lends itself to using many colours and as such is perfect for a continuation of my stash busting hats project.  This yarn is a mix of cashmere and merino wool so is beautifully warm to wear.

I began by working a chain to the length of scarf I wanted to produce.    This seemed to go on for ever!    There are 330 stitches in one row of my scarf and the finished scarf measures   160 cm/64 inches long by 15 cm/6 inches.     I made up the stitch pattern and colour banding as I worked the piece but kept careful notes.     I will write up the pattern and put it up on my Etsy store.

This project did not work well on my commute as it grew quite quickly and used several balls of yarn at a time.   I have a separate project worked in parallel so that I could make use of my commuter time!

To finish off the scarf I considered adding more flowers but they didn’t stand out as well as I would like against the stripes so instead I went for fringing.    I have used up all my spare yarn of this type now and listed both the hats and this scarf on Etsy.  I hope you like them 🙂

Happy crocheting!

Annie 🙂

Filed Under: craft blog, Craft projects Tagged With: cashmere, crochet, design, Etsy, handmade, merino wool, scarf, scarves, stash, stash busting, yarn

Footer

Newsletter

Copyright © 2022 · Genesis Sample on Genesis Framework · WordPress · Log in