• Skip to primary navigation
  • Skip to main content
  • Skip to footer

Stickytapeandstring

Created with WordPress managed by 1&1

  • Craft projects
    • craft business tips
    • craft blog
    • Crochet patterns
    • Upcycling
    • craft with kids
  • Blogging
    • New to blogging
    • Blog diary
  • Bullet Journal
  • About me
  • Welcome!!

crochet beginner

Finishing your Lockdown Lapghan

December 28, 2020 by Annie Leave a Comment

This post is the third of my lockdown lapghan instructions. The first post covers the pattern for the basic square so if you are just starting you need to following this link to pick up the free pattern – Lockdown Lapghan free pattern. The second post covers the design of the lockdown lapghan. You can find the second post here – lockdown lapghan design. In this third post I will give you the instructions for finishing your lockdown lapghan.

Finishing off each square

The first job you have to complete is to finish off all the ends. Depending on your choice of colour changes you might have lots of these! Using a wool needle you need to weave each end into the work securely. Try to make them invisible by weaving in and out of a patch of the same colour. It is possible to make them ‘disappear’ from both sides with a little practice. Finishing off ends is not my favourite task but it is made an awful lot easier with the right equipment.

I highly recommend KnitPro Wool Needles. These have a big flexible loop rather than a fixed eye which makes threading eveng the thickest yarn very easy. You can find these easily on an Amazon search. They are less than ยฃ3 for three at the time of writing. Please note – I do try to work as an Amazon Affiliate from time to time. This means that it is possible that if you click on any advert or a link to Amazon in my blog I might receive a small payment. However, I only ever recommend products that I love – whether I am paid to say so or not!

I say above that I TRY to work as an Amazon Affiliate because if you sign up with Amazon and nobody clicks on any adverts for a few months, Amazon end your affiliate membership. So far it hasn’t worked for me – I think I have had my membership cancelled three times now ๐Ÿ™‚ I have written a series of posts on my blog progress if you would like to read more on this. I will keep trying!!

Finishing your lockdown lapghan – sewing up

Although I call this sewing up we will actually be joining the squares together using a very simple technique with a crochet hook. I covered this method in an earlier post which has full instructions and clear pictures. You can find these instructions here.

I like to lay out all my squares in the final positions once the ends are finished off and they are blocked. Blocking really helps with the appearance and is covered in my first post. I then gather up the squares for the two rows I am going to join into two piles. Starting at what will be the edge of the blanket I begin joining two squares along one edge. Once these are joined I pick up the next pair and join these without breaking the yarn. The advantage of not breaking the yarn? Fewer ends to finish off!

When I am joining my squares I work all the way down the blanket in one direction. After four joins, all the squares are attached at the top and bottom but not the sides. Then I start the four joins that run top to bottom and again work each of these in one continuous thread. I will add some pictures of this process when I am finishing my second blanket.

lockdown lapghan - autumn sunset
lockdown lapghan – Autumn Sunset

Finishing your lockdown lapghan – edging.

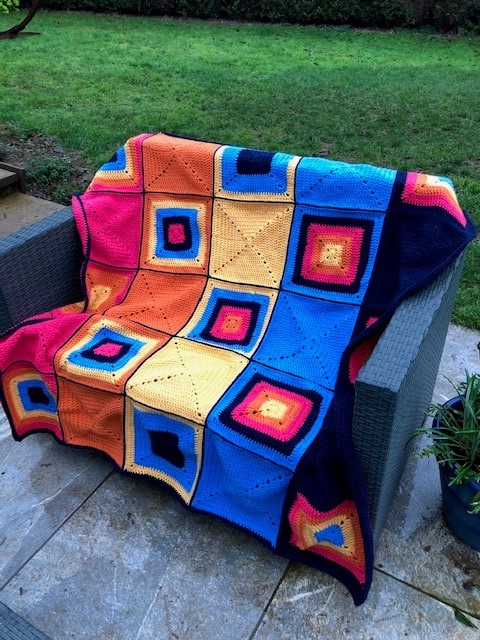
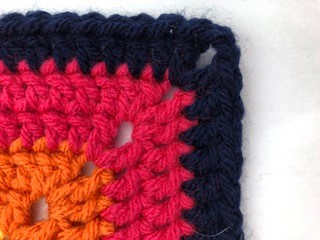
I promised this would be a very easy pattern so your edging can be very simple. Work one round of the same stitch we have used all the way through in a colour of your choice. At each corner follow the corner pattern from the odd rows of the block ie just do one Tr, 2CH, Tr (or DC, 2CH, DC in US terms) The picture of the finished blanket above includes just this simple edge as shown below.

lockdown lapghan treble edge
lockdown lapghan basic edge

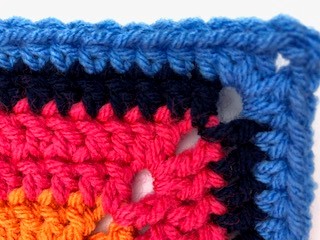
There are other options with the edging though! If you are up for a little bit more complication, I would recommend adding a row of HTr (UK terms) or HDc (US instructions). This is a strong stitch for a border but does mean you need to learn another stitch! If you do go for an additional row of HTr work the corners as follows: UK terms – 2Htr, 2ch, 2Htr. US terms – 2HDc, 2CH, 2HDc. You can play with the colours in your border. Put in more than one row of different colours if you choose. The picture below shows the effect of adding a row of HTr (UK terms) or HDc (US terms).

edge with tr and htr
additional row of half trebles to give a stronger edge

If you are feeling more adventurous you could use one of my other favourite edging stitches. There is a free pattern on my blog for a three colour rope edging which I think I am going to use for my second blanket – pics to follow.

And you are done. Unless you feel like adding tassels to the corners ๐Ÿ™‚ I hope you have enjoyed this free pattern and that if you are new to crochet you manage to produce your first blanket! Happy crocheting!

Annie ๐Ÿ™‚

Filed Under: Crochet patterns Tagged With: beginner crochet, crochet, crochet beginner, crochet blanket, crochet blog, crochet design, easy crochet lapghan, free crochet pattern, Free pattern

Design your Lockdown Lapghan

December 28, 2020 by Annie Leave a Comment

The Lockdown Lapghan is a very easy crochet blanket for beginners. This is the second in a series of three posts. The first post contains the free pattern for each square of the blanket. You can read this post here. In this second post you will find the charts to help you design your Lockdown Lapghan.

The design is based on five colours. I have two suggests sets of colours in my first post but you can make your own choices. This way your Lockdown Lapghan will be your own design. There are two versions of the chart for you to download at the bottom of this post. The colour version follows the Autumn Sunset colours used in the completed blanket below. Sorry about this picture – all it has done here recently is rain!

lockdown lapghan - autumn sunset
lockdown lapghan – Autumn Sunset

The black and white version of the chart will be easier for you to follow if you are choosing your own colours. You could print this black and white version and do a bit of mindful colouring in as part of your process to select colours. I love a bit of colouring in ๐Ÿ™‚

Yarn Selection

The yarn I used for this blanket was Stylecraft Special Chunky. This yarn is very good value and there is a wide range of colours as you can see here at Woolwarehouse. As you design your lockdown lapghan, I recommend you start with a view of the colours available.

You don’t have to stick to the yarn I used. It is possible to use any yarn type as long as you adjust the tension to match. However, this can get a bit tricky and this pattern is designed for beginners so I won’t cover that here. Please let me know if you would like instruction on how to do this and I will put up a separate post.

Design your Lockdown Lapghan – Joining up and edging

The final touches to your lockdown lapghan design will be the joining colours and edging. For both the blankets I designed I used the strongest colour for the joins and edging. I think that this gives the squares more definition which is the look I was going for. However, the joining method I recommend can be ‘invisible’ if you use the colour of one of the squares you are joining. This is a design choice so over to you!

Your choice of joining colours will have a big impact on the appearance of the finished blanket. Similarly, the edging you choose will make a real difference to the look of your work. I like to edge in a darker colour, again this is partly for the definition I think it gives. Practicality also tells me that a white edge would be asking for trouble in terms of my ability to keep it clean. Maybe that is just me, in a house with three muddy dogs!

I think that is all you need from me so here are the two free downloads.

Lockdown Lapghan chart – colour (83 downloads)

Lockdown Lapghan chart – black and white (75 downloads)

I hope you have fun designing your own Lockdown Lapghan and if you are new to crochet I hope you come love it as much as I do. Please do let me know how you get on. I would love to get some comments. Happy crocheting!

Annie ๐Ÿ™‚

Filed Under: Crochet patterns Tagged With: beginner crochet, crochet, crochet beginner, crochet blanket, easy crochet lapghan, free crochet pattern, Free pattern, lapghan

Learn to Crochet – beginners kit

February 15, 2020 by Annie Leave a Comment

Here are my top tips for a beginners kit for anyone who wants to learn to crochet. Lots of people would love to take up a new craft. The health benefits of crafting are real!!

The kit of products I am recommending here would make a lovely starter set. At entry level crochet is very simple and with a few basic stitches you can make a lot of beautiful things.

Disclaimer – the products I am recommending here are ones that I use and love myself. I am a registered affiliate of Amazon and if you click on the links to these products it is possible that I will receive a small payment at no additional cost to you. Any payment I do receive would go towards the running cost of this blog and help me towards my dream of running this as a business one day!

Firstly let’s look at hooks. The hooks I find most comfortable have a cushioned grip. The hooks I have selected here come in a range of 14 sizes. I love working in different yarn weights and do use all the sizes, especially the very large and very small ones!

Next, when you have finished your crochet work you have to finish off the ends. This used to mean trying to thread thick yarn through the eye of a darning needle. Frustrating! Then forcing the needle through the work, splitting the yarn and often piercing your own finger in the process! However, my crochet life was transformed when I discovered the Knit Pro Wool Needles. These are AMAZING wonderful time and patience savers. They produce a better result as well because the rounded ends do not split the yarn.

The appearance of any finished piece of crochet is always improved when it is blocked. This means placing the finished work on a foam board and pinning it out to the shape you would like it to hold. Spray the work with a fine mist of water and leave it to dry. Magic happens and the work takes the desired shape – stops curling at the edges and generally looks much tidier! I used to use kids foam play floor tiles for this and ordinary dressmaking pins. If you are just starting you could use those as a cheaper alternative – they served me well. If you are looking to treat someone or yourself, the ones I recommend are these Knit Pro ones. The grid lines are really helpful. The extra thickness means the pins don’t go all the way through into the table like mine used to!

Finally – when it comes to blocking, I find you can never have too many pins. The blocking boards come with pins but I recommend buying a few more. The set I found has two sizes which is helpful when working in different weights of yarn.

That is really all you need to get started apart from yarn of course! I buy all my yarn from Wool Warehouse here in the UK. I have also posted ideas on how you can recycle yarn which you can read here.

If you are the kind of person who likes to learn from a book, there are several good ones to choose from. I have included a few that I enjoy reading through below. There are ideas here for beginners and more advanced crafters. It really isn’t necessary to buy a book now though with lots of excellent tutorials on YouTube, Pinterest and Instagram.

Hope you find this set of products as useful and helpful as I do. Happy crocheting!

Annie ๐Ÿ™‚

Filed Under: craft blog Tagged With: craft gift, craft present, crochet, crochet beginner, crochet gifts, crochet present, easter gift, equipment for crochet, mothers day gift, present for crocheter

Footer

Newsletter

Copyright © 2022 ยท Genesis Sample on Genesis Framework ยท WordPress ยท Log in