This post is the third of my lockdown lapghan instructions. The first post covers the pattern for the basic square so if you are just starting you need to following this link to pick up the free pattern – Lockdown Lapghan free pattern. The second post covers the design of the lockdown lapghan. You can find the second post here – lockdown lapghan design. In this third post I will give you the instructions for finishing your lockdown lapghan.
Finishing off each square
The first job you have to complete is to finish off all the ends. Depending on your choice of colour changes you might have lots of these! Using a wool needle you need to weave each end into the work securely. Try to make them invisible by weaving in and out of a patch of the same colour. It is possible to make them ‘disappear’ from both sides with a little practice. Finishing off ends is not my favourite task but it is made an awful lot easier with the right equipment.
I highly recommend KnitPro Wool Needles. These have a big flexible loop rather than a fixed eye which makes threading eveng the thickest yarn very easy. You can find these easily on an Amazon search. They are less than £3 for three at the time of writing. Please note – I do try to work as an Amazon Affiliate from time to time. This means that it is possible that if you click on any advert or a link to Amazon in my blog I might receive a small payment. However, I only ever recommend products that I love – whether I am paid to say so or not!
I say above that I TRY to work as an Amazon Affiliate because if you sign up with Amazon and nobody clicks on any adverts for a few months, Amazon end your affiliate membership. So far it hasn’t worked for me – I think I have had my membership cancelled three times now 🙂 I have written a series of posts on my blog progress if you would like to read more on this. I will keep trying!!
Finishing your lockdown lapghan – sewing up
Although I call this sewing up we will actually be joining the squares together using a very simple technique with a crochet hook. I covered this method in an earlier post which has full instructions and clear pictures. You can find these instructions here.
I like to lay out all my squares in the final positions once the ends are finished off and they are blocked. Blocking really helps with the appearance and is covered in my first post. I then gather up the squares for the two rows I am going to join into two piles. Starting at what will be the edge of the blanket I begin joining two squares along one edge. Once these are joined I pick up the next pair and join these without breaking the yarn. The advantage of not breaking the yarn? Fewer ends to finish off!
When I am joining my squares I work all the way down the blanket in one direction. After four joins, all the squares are attached at the top and bottom but not the sides. Then I start the four joins that run top to bottom and again work each of these in one continuous thread. I will add some pictures of this process when I am finishing my second blanket.

Finishing your lockdown lapghan – edging.
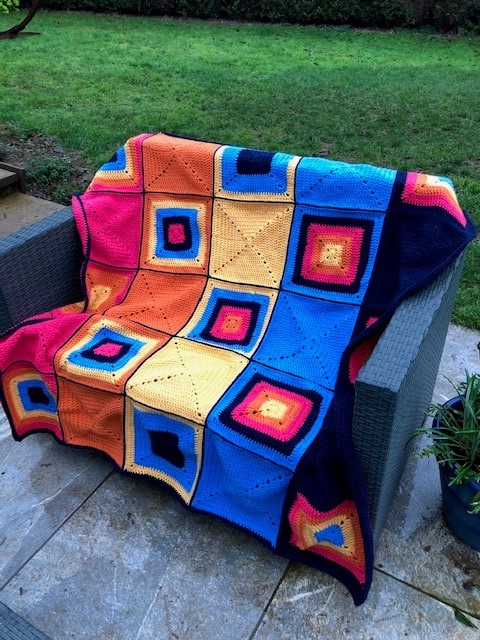
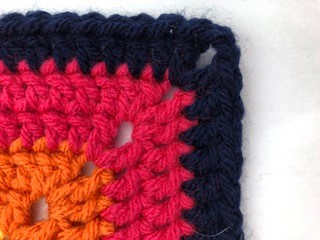
I promised this would be a very easy pattern so your edging can be very simple. Work one round of the same stitch we have used all the way through in a colour of your choice. At each corner follow the corner pattern from the odd rows of the block ie just do one Tr, 2CH, Tr (or DC, 2CH, DC in US terms) The picture of the finished blanket above includes just this simple edge as shown below.

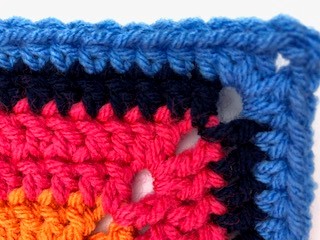
There are other options with the edging though! If you are up for a little bit more complication, I would recommend adding a row of HTr (UK terms) or HDc (US instructions). This is a strong stitch for a border but does mean you need to learn another stitch! If you do go for an additional row of HTr work the corners as follows: UK terms – 2Htr, 2ch, 2Htr. US terms – 2HDc, 2CH, 2HDc. You can play with the colours in your border. Put in more than one row of different colours if you choose. The picture below shows the effect of adding a row of HTr (UK terms) or HDc (US terms).

If you are feeling more adventurous you could use one of my other favourite edging stitches. There is a free pattern on my blog for a three colour rope edging which I think I am going to use for my second blanket – pics to follow.
And you are done. Unless you feel like adding tassels to the corners 🙂 I hope you have enjoyed this free pattern and that if you are new to crochet you manage to produce your first blanket! Happy crocheting!
Annie 🙂
Recent Comments