• Skip to primary navigation
  • Skip to main content
  • Skip to footer

Stickytapeandstring

Created with WordPress managed by 1&1

  • Craft projects
    • craft business tips
    • craft blog
    • Crochet patterns
    • Upcycling
    • craft with kids
  • Blogging
    • New to blogging
    • Blog diary
  • Bullet Journal
  • About me
  • Welcome!!

Craft projects

Quick Make – Heart Charm

February 12, 2020 by A_Sticky_tape_and_string_girl Leave a Comment

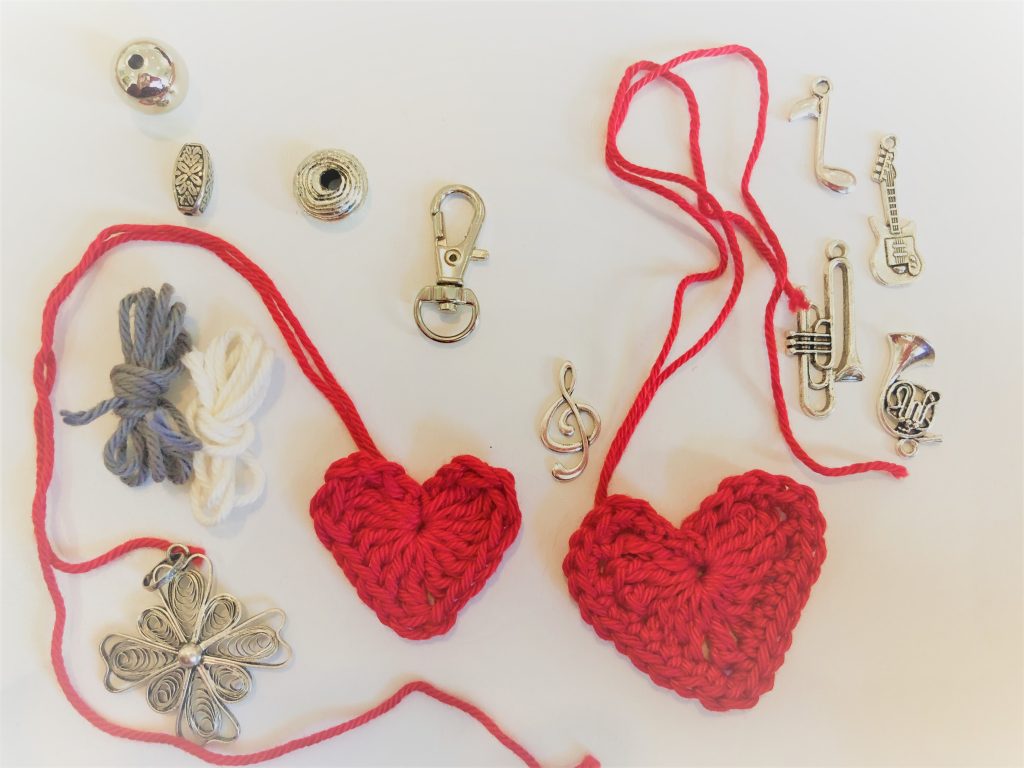
Here is a quick make for you, a heart charm to decorate a bag or belt. You can use any motif or charm to make these. I have chosen hearts and music as those are two of my favourite themes.

The elements I have used are cheap to source and you can include recycled items, buttons or ribbon. I have lots of offcuts and remnants from other projects and these charms are great for using those.

I bought a job lot of key chain hooks on Amazon. These were very cheap (ยฃ7 for 50 at the time of purchase) and offer the flexibility of using either the small loop on the carabiner clip or using a larger ring which comes with the clip. I also bought a pack of musical charms (ยฃ4 for 24 at time of purchase).

Design your Charm

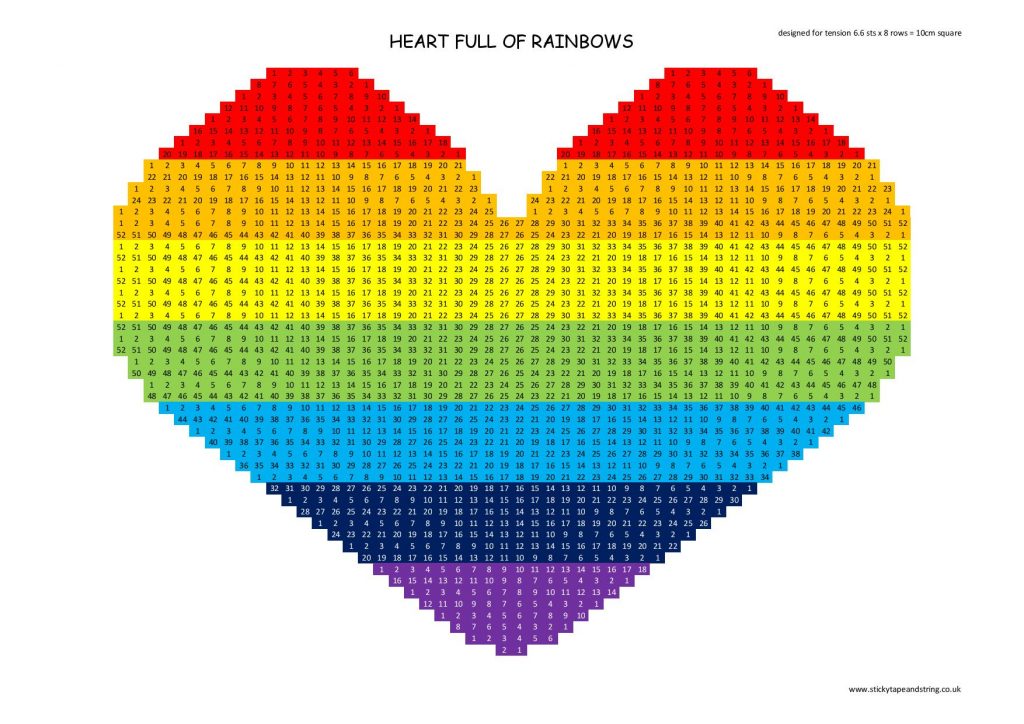
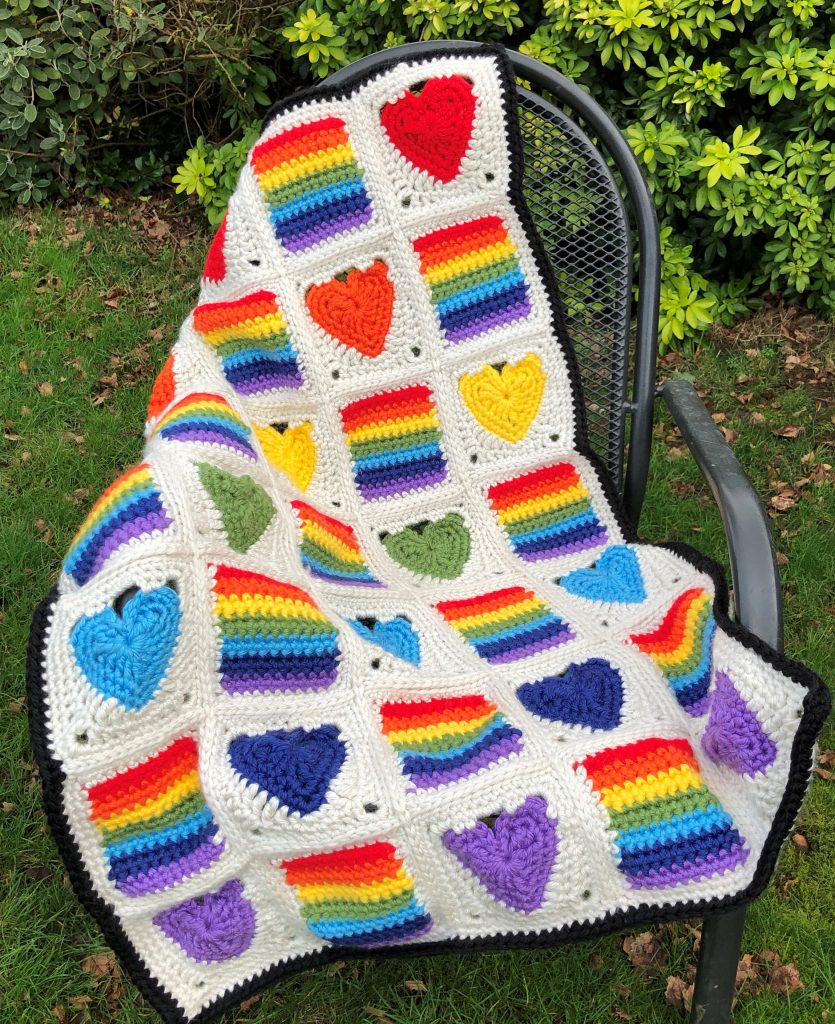
The fun bit is in deciding which crochet motifs and colours to use when putting the charm together. I called this quick make – Heart Charm as it is close to valentines day. My finished charm has pink hearts based on my heart pattern which you can get here. I made one small and one medium sized heart in pink. You don’t have to stick with the heart theme. There are lots of crochet motif patterns available. I have a board for these on Pinterest.

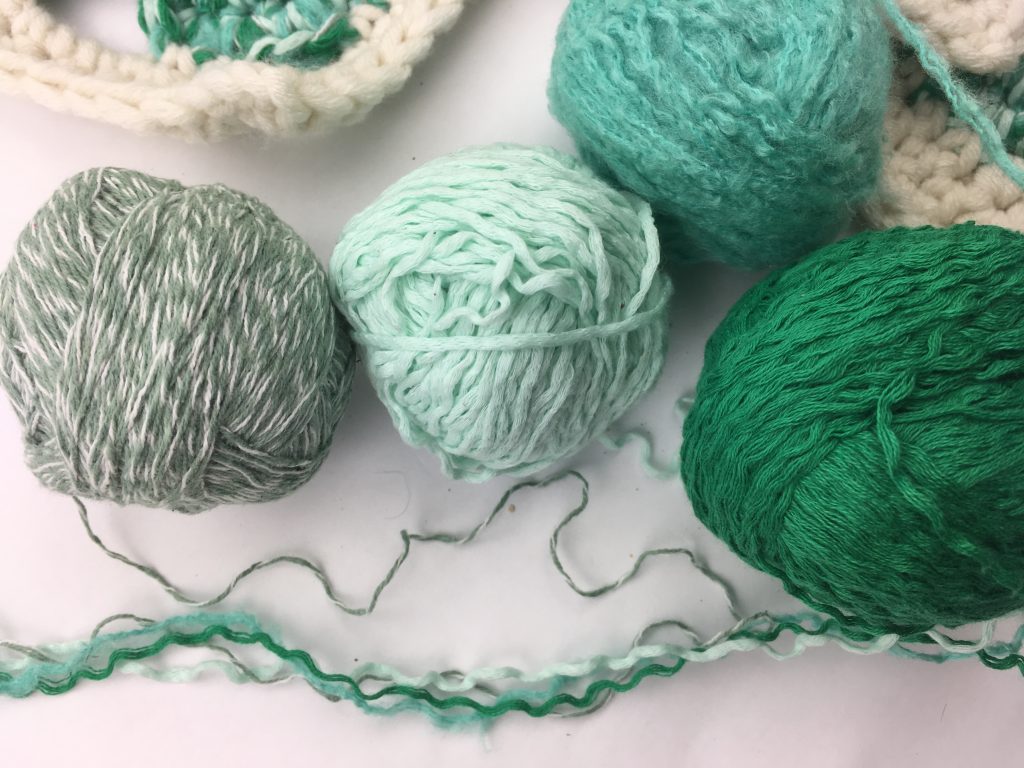
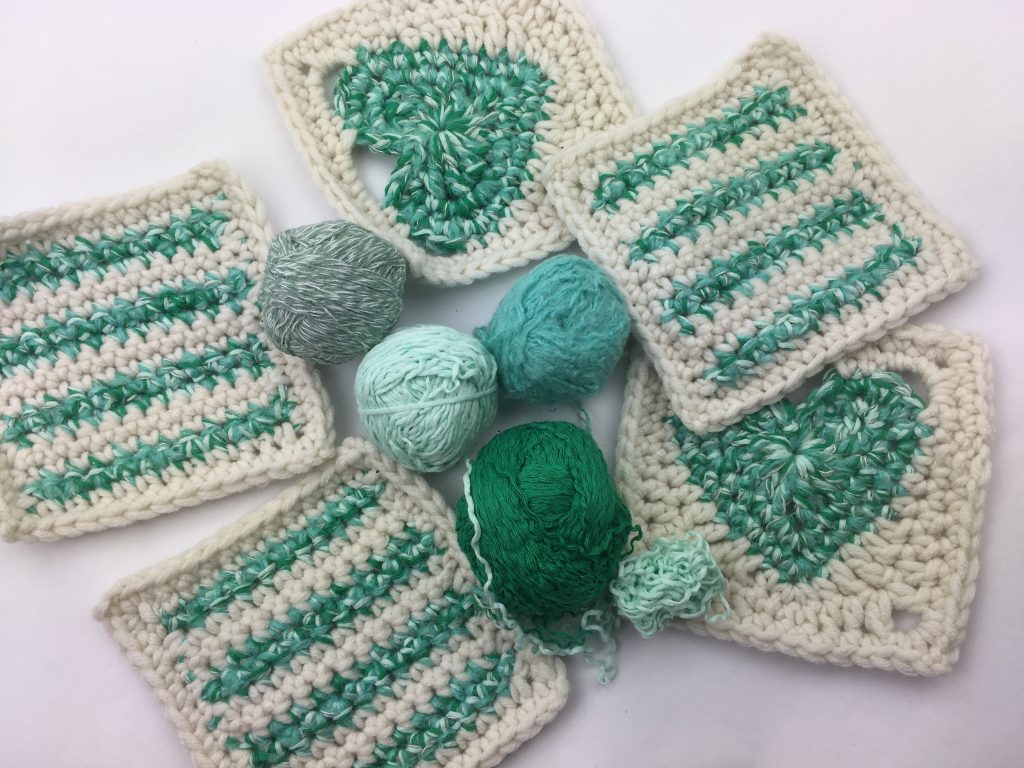
Consider the yarn carefully. These charms might rub against the bag or clothing. If you use a fluffy yarn it might start to look worn very quickly. I chose to use mercerised cotton as it is hardwearing and doesn’t bobble. I also happened to have some oddments in my stash!

If crochet isn’t your thing you could make little hearts out of fabric, stuffing them to make them look full. If sewing isn’t your thing you could cut shapes out of felt. Felt is wonderful for craft as it doesn’t fray so does not require stitching.

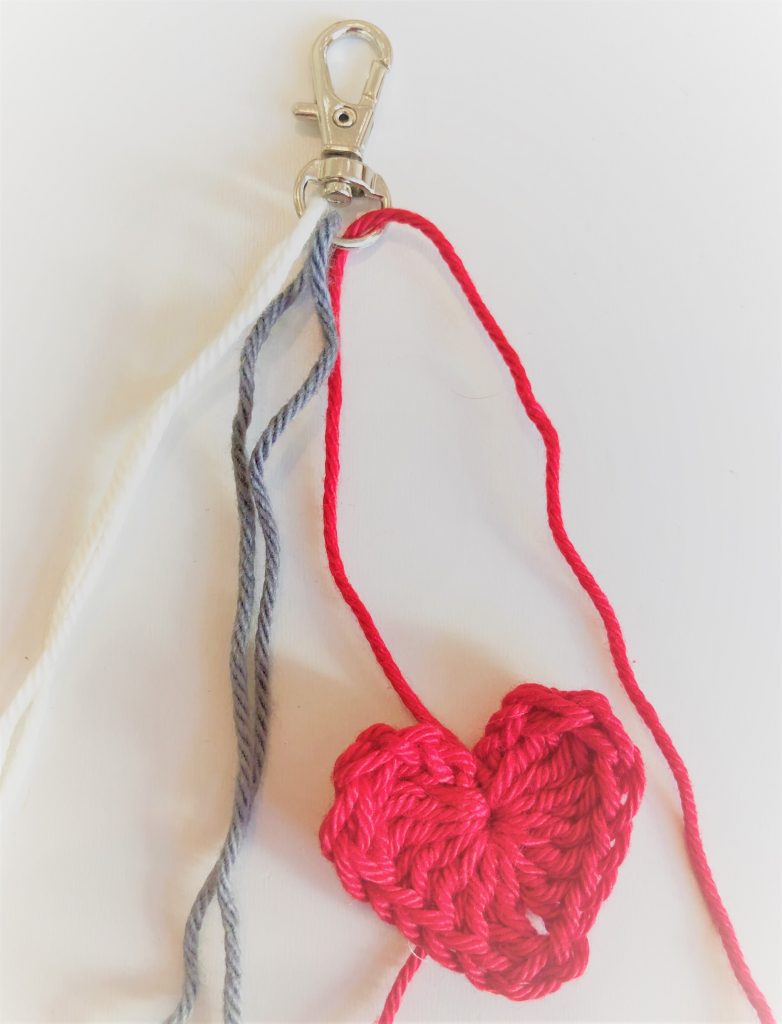
You can attach the elements of your charm to the ring or clip direct. I hung my charms by plaiting the cotton through the ring on the clip – hiding the ends as neatly as I could. Making the ends of the plait into tassels is a good way of finishing off. This makes the ends secure without stitching. You could glue bits together – especially if you are using felt. However, do consider how hardwearing your charm needs to be. If it is going to be on a belt or heavily used bag it will need pretty robust.

Making your Charm

First, make your motif and remember to leave plenty of thread or yarn so that you can use it to join the motif to the clip. To attach with a plait, take one of the ends of the cotton used to make the heart. Thread the end through the ring of the clip and double the thread back. Position the heart so that the length of thread between clip and heart is slightly longer than the finished length you would like. Add two other threads through the ring of the clip. Each thread should be folded over so you have six coming from the clip.

Pair the threads up and plait!

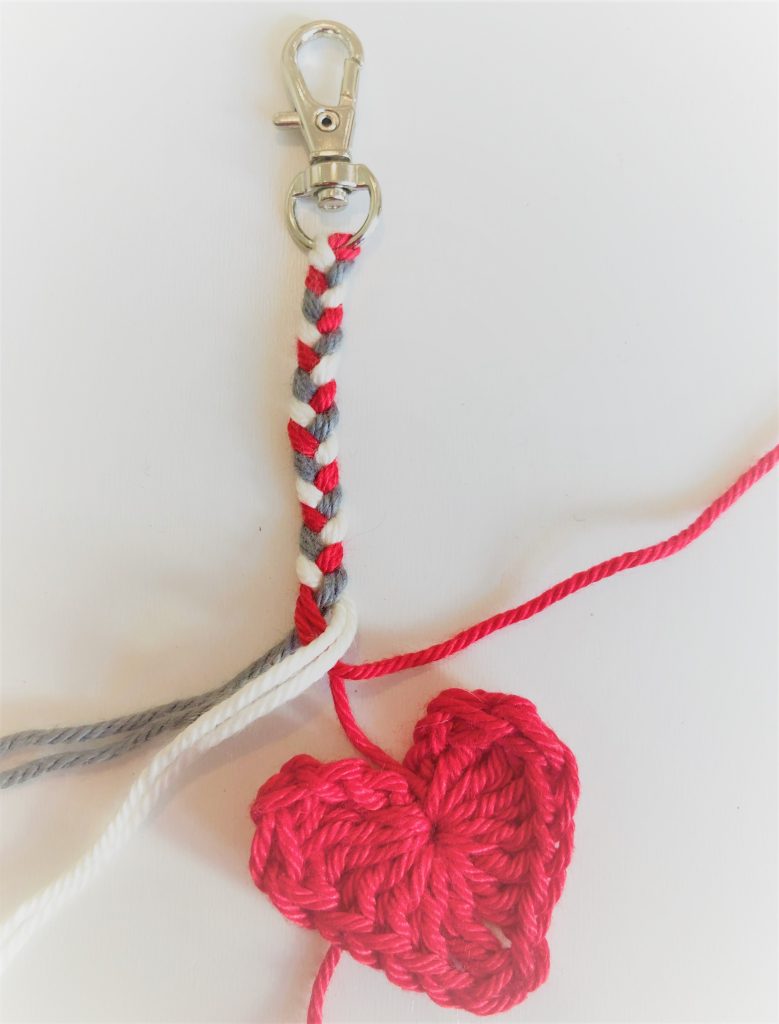
When you get to the heart, tie a knot in the threads to secure. You can also finish off by binding one of the threads around the others if you prefer. Repeat this method with other motifs. I added some beads as they provide weight which helps the charm hang well.

The only limit to these charms is your own imagination. You could add buttons or bows. You could make pompoms or tassels to add. Make them for your friends or as party favours ๐Ÿ™‚

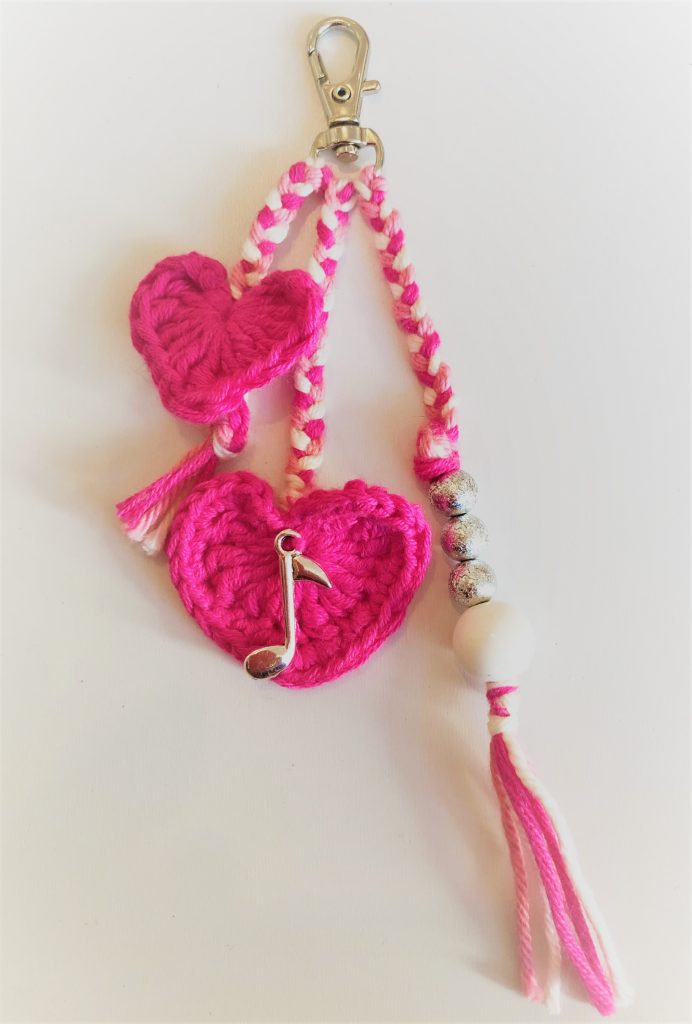
Here is a picture of one of my finished charms. I will put these up for sale on my Etsy store but I expect people would rather make their own than buy mine!

Happy crafting!

Annie ๐Ÿ™‚

Filed Under: Quick makes Tagged With: charm, charms, Craft, craft with children, craft with kids, crafts, creativity, family activities, quick makes, small crafts

Heart Full of Rainbows – Free Crochet Chart

February 2, 2020 by A_Sticky_tape_and_string_girl Leave a Comment

This free crochet chart for a Heart Full of Rainbows Chart is destined to be a cushion pattern. At the moment it is in ‘work in progress’! The chart will work for any project needing a heart graphic where the tension is in similar proportions to the yarn I am using. To make up the heart as shown you need to work in DC (UK terms) or SC (US terms).

The yarn I have for my project is Lion Brand Yarns – Hometown USA. You can see their full range on the US website here. However I buy all my yarns from Woolwarehouse here in the UK. Note at this point in time I am not an affiliate of either business – I just like sharing what I like!

I picked this yarn because it has lovely bright rainbow colours and is very good quality for the price. I wanted to use a super chunky yarn and found only a limited number had all the colours of the rainbow!

The tension on the ball band for crochet on a 9mm hook, is 8 rows and 6.6 stitches to make a 10cm square. The chart would work equally well for knitting but the ratio is different so the shape of the heart would change. The knitting tension square for this yarn has 12 rows to 9 stitches. This means the heart would come out much longer and thinner if used for knitting. I would recommend reducing the rows in each colour by two to get back to a similar shape. I will be turning this into a cushion pattern and will post on that separately with full instructions.

Free Download

Here is the Heart full of Rainbows free crochet chart.

Click on the link below to download the chart.
Heart Full of Rainbows Chart (15988 downloads )

If this tension is not what you need I can adapt the chart quite quickly so let me know what tension you are looking for and I will do my best to work up a chart for you. Leave a message below or email me with your tension requirement.

More free rainbow heart crochet projects

The cushion is a companion project to my Hearts and Rainbows blanket which you can see here. The finished blanket and cushion will be listed on my Etsy Store as will the pattern (once I create the final PDF version). You can get hold of the pattern sooner if you are happy to copy the colours from my photo. The blanket pattern is available for free here.

Filed Under: Crochet patterns Tagged With: crochet, crochet design, free crochet pattern, heart, hearts, rainbow, rainbow heart chart

Rainbows and Hearts crochet blanket

February 2, 2020 by A_Sticky_tape_and_string_girl Leave a Comment

Here is a Rainbows and Hearts version of my hearts and stripes blanket. I didn’t design the original blanket this way deliberately but when I realised the striped squares have seven bars of colour I HAD to make a rainbow version ๐Ÿ™‚

One of the issues with using more colours is having more ends to finish off. I have to confess I actually shelved the project at one point because tying off all these ends in REALLY thick yarn was pretty grim. However, I have found the most AMAZING gadget to help.

This is probably old news to lots of you but I hadn’t found these before. A ‘Wool needle’ made by Knit Pro. This needle has a blunt end like a tapestry needle. It also has a big loop (rather than an eye) to make threading easy. I love it!! When I am more organised I will put a link to Amazon in here. Until then, all you have to do is search on ‘knit pro wool needle’ to find them. Like all great inventions I am wondering why it took this long to be available. It seems such an obvious design and perfect for the job when you use it.

I will make a PDF of this pattern for sale on my Etsy store when I get chance. I didn’t want to hold up posting because it does take me a while to scrape the time together sometimes. The pattern for the blocks and advice on joining etc is available for free here:

This is the link that takes you to the heart block pattern

Here is the link to the striped block pattern

Finally this link takes you to the instructions for making up and border pattern. For the rainbow version I kept the border very simple. For UK instructions work one round of DC in White. One round of HTR in black. For US instructions make that one round of SC in white. One round of HDC in black.

Sorry if that is a bit clunky – I will produce the PDF as soon as I can. When I produce the PDF I will do a colour chart. If you want to make a start here is a full picture of the blanket laid out flat. Hopefully you can take your colour instructions from this!

I am already onto the next project. I have decided to make a cushion with the left-over yarn. Pattern and pics to follow.

Happy crocheting!

Annie ๐Ÿ™‚

Filed Under: Crochet patterns Tagged With: crochet, crochet blanket, crochet blog, free crochet pattern, hearts, hearts and stripes blanket, rainbow

Yarn Salvage #3 – how best to use the yarn

April 27, 2019 by A_Sticky_tape_and_string_girl Leave a Comment

Yarn recycling is fun, rewarding and good for the planet! In my two earlier posts I gave you tips on garment selection and salvage. Yarn Salvage #3 – How best to use the yarn….. will give more advice on how to process the yarn you collect and the best way to use the yarn. You can see the earlier posts here Yarn Salvage Tips #1 and Yarn Salvage Tips #2

There are a number of different aspects to yarn that influence how you treat it and the type of project it is suited to. The three main aspects I will cover here are yarn weight, ply and content.

Yarn Weight – wpi

This is an important aspect of the yarn when it comes to determining the type of project you can use the yarn for. We measure Yarn Weight in ‘wraps per inch’. You can pay a lot of money for a gadget that works out the wpi for any yarn. It really isn’t difficult though and in my view not worth spending hard earned cash on! Wraps per inch is the number strands of yarn that will fit into one inch. The strands should sit next to each other comfortably. There should be no overlap or stretch.

To make your own gadget to measure wpi you need a pen, ruler and piece of wood – ideally something rounded like a broom handle. We use an old clothes peg ๐Ÿ™‚

Take the ruler and place two marks on the wood one inch apart. Draw lines around the wood at the places you have marked. You are already ready to use the tool!

Take the yarn you want to assess and wrap it around the tool. Place the first strand of yarn just inside the first mark you made. Wind the yarn round the tool without stretching the yarn. Each strand of yarn should sit alongside the previous strand with no overlap. When the yarn wrapped around the tool reaches the second mark, stop winding. Count the number of wraps of yarn between the two markers. This is your wraps per inch for the yarn or wpi.

Yarn Ply

Ply is the number of individual strands that make up a yarn. Sometimes the strands are twisted so that the yarn handles as one strand. Sometimes you unravel a garment and find that the yarn is made up of several strands that have not been twisted. You can choose whether to separate out the strands or keep the yarn as multi-strand. What you choose to do will depend on the type of yarn and the type of project you want to use it for. I keep detailed records of recovered yarn. I write down the wpi and where the strands are not twisted, also note the ply. This gives me good information when planning projects.

Yarn content

The easiest way to identify the yarn content is to take the information from the garment label when you recover the yarn. I try to select garments with an element of natural fibre. When combining yarn in a project I try to match fibre types. This is not always possible. Yarn content will impact the way the yarn changes over time. It will also have a big impact on the way the yarn washes. If you have a project made from recycled yarn always wash on a wool/cool setting and dry flat. This is particularly important when combining more than one salvaged yarn.

Unravelled yarn often has a lot of ‘kinks’. When you crochet or knit with the yarn these kinks will disappear. If they bother you you can try to reduce them. I say ‘try’ because this method will produce varied results according to the yarn composition. The lower the percentage of natural fibre the less effective this method will be.

Flattening kinks in yarn containing natural fibres

Firstly, turn the yarn into hanks rather than balls. There are expensive machines that make this job easier but we are trying to save cash! You can wind yarn into hanks using your own arm winding the yarn between the base of your thumb and elbow. You can also use the back of a chair or enlist the help of a small human! I find small humans to be helpful and compliant until they hit teenage years. Teenagers are less than inspired by the idea of helping wind yarn ๐Ÿ™‚

Once the yarn is in hanks soak them in warm water – NOT HOT (unless you want to end up with felt). You can add wool washing liquid or powder. The kinks should begin to relax in the water. You may have to leave the yarn soaking for a few hours. Rinse and dry the yarn either flat on a towel or hanging over a bath. Do not squeeze or ring out the yarn. Finally you will need to reball the yarn for use.

Using the recycled yarn

Now you have added all this recycled yarn to your stash what will you make? It is possible to use the yarn recovered from one garment to make another garment. However, it is likely that during the recovery process some yarn will have been lost. This means that you might need to top up the quantity of yarn from one garment in order to have enough to make another.

You can top up the recovered yarn with yarn from your stash. You could buy some yarn to contrast or compliment the recovered yarn. Or you could combine different yarns that you have recovered into one project.

Most patterns are designed for yarn of a particular weight or wpi as above. One of the latest patterns I wrote was for a super chunky yarn worked up on a 9mm hook. I wanted something that would grow and complete quickly! I decided to use this pattern as an example of how I work with recycled yarn.

Much of the yarn I salvage has a high wpi. This is because most yarn used in the industrial manufacture of garments is lightweight around 14 wpi. I prefer to work with a heavier yarn, aran or chunky weight around 7 or 8 wpi. However, you can combine the yarns you recover to produce a heavier weight yarn. This is what I did in my latest project. The resulting yarn can look startling different to its component parts.

Hearts and Stripes Recycled Blanket

Here is my recycled project. The pattern is one I designed myself and is available for free here. The yarns I used are different ply and composition but worked up very easily as one yarn. Remember to test the wpi of your combined yarn before starting the project. I expected the crochet to be difficult and that the yarn would split but this was not the case. Finishing off the ends was the only part that I found more difficult but with a little extra patience and care even that was not too much of a challenge. Here are the recycled yarns I started with.

Salvaged yarn

I combined the recycled yarn with some super chunky white yarn from my stash. This was left over from a previous project. As you can see the finished result looks quite different to the four yarns that went into the work.

yarn salvage - how best to use the yarn

There are many ways to choose yarn for your projects. For me, there is nothing better than laying out all the balls of recovered yarn on the floor and playing with the colour combinations. This is how I get inspiration for my next project. Group the yarn by colour and see what works! Happy recycling!!

Annie ๐Ÿ™‚

Filed Under: Uncategorized, Upcycling Tagged With: crochet blanket, recycling, recycling yarn, super chunky yarn, yarn, yarn combining, yarn salvage

Hearts and Stripes blanket

April 27, 2019 by A_Sticky_tape_and_string_girl Leave a Comment

Hello ?here is my latest project – Hearts and Stripes Blanket. This pattern is based on the heart motif I created last year. For this project I wanted to produce a solid version of the heart square. To make a heavy duty lap blanket quickly! I used super chunky yarn and a 9mm hook. With this yarn I can easily make one of these blankets in a week or two.

Here is the finished blanket worked up in red white and blue yarn. You can use the blocks to make a blanket of any size. If you use a lighter weight yarn you will probably want to put in more blocks. I went for a seven by five block layout as that worked best for the quantity of yarn I had. The finished blanket measures about 34 inches by 48 inches or 85cm by 125cm in metric.

Hearts and Stripes Blanket

This pattern would also work very well as a stash-buster project. The yarn required for each area of colour is quite small. I salvage quite a lot of yarn and often end up with a large number of smaller balls of yarn. You can read my top tips for yarn salvage here.

The pattern took four 100g balls of the navy and 3 of each of the red and white.

The blanket pattern is made up of striped squares and full heart blocks. The pattern for the heart block in both UK and US terms are available here

The instructions for the striped block are here again in both UK and US terms.

Joining the Blocks to make the blanket

The blanket is made up of these two blocks worked in a seven by five alternating pattern. The join I used for this blanket is one that has minimal finishing off. The technique makes a feature of the joining thread.

Line up two squares edge to edge with the right side of the work facing up.

Place the yarn you are using for the join behind the work. Always keep the joining yarn behind the squares. Pick up stitches from the back of each of the two edges, as shown below.

Joining instructions 1 - Hearts and Stripes Blanket

Wrap the yarn round the hook working from behind. You need to keep the yarn behind the work at all times.

Joining instructions 2 - Hearts and Stripes Blanket

Pull the yarn through the two stitches you picked up to give you two loops on the hook.

Joining instructions 3 - Hearts and Stripes Blanket

Finally pull the yarn through the loop on the hook to form a slip stitch. From the picture above this means pulling the first loop nearest the end of the hook through the second loop on the hook. The result should look like the picture below.

Design choice – pick a highlight colour for the join and make it a feature. Or use the same colour as the borders of the squares. Using the same colour would make the join less visible.

Hearts and Stripes Blanket – Border

The border for this blanket is very simple and echos the stripes in the squares.

Hearts and Stripes Blanket - border

UK terms

First round – Join in yarn in the colour you used to join the blocks and work one round of DC working 1DC, 2CH, 1DC into each corner. For the design shown here yarn colour white.

Second round – Join in yarn A (red for the design shown here) and work a round of HTR working 1HTR, 2CH, 1HTR into each corner.

Third round – Join in the first yarn again (white) and repeat the first round.

Fourth round – for the final round use the border colour (Navy) and again repeat the first round above.

US terms

First round – Join in yarn in the colour you used to join the blocks and work one round of SC working 1SC, 2CH, 1SC into each corner. For the design shown here yarn colour white.

Second round – Join in yarn A (red for the design shown here) and work a round of HDC working 1HDC, 2CH, 1HDC into each corner.

Third round – Join in the first yarn again (white) and repeat the first round.

Fourth round – for the final round use the border colour (Navy) and again repeat the first round above.

Finish off your ends and there you have it – one Hearts and Stripes Blanket. Hope you like it!

Annie ๐Ÿ™‚

Filed Under: Crochet patterns Tagged With: afghan, crochet afghan, crochet blanket, crochet throw, free crochet pattern, Free pattern, heart blanket, hearts and stripes blanket, super chunky yarn, thick crochet throw, uk and us terms

Crochet Blog – update #9

April 19, 2019 by A_Sticky_tape_and_string_girl Leave a Comment

Welcome to my Crochet blog – update #9. It has been such a long time since I posted an update. I have been working on a number of projects but life and the day job took over. It is difficult to find time to get the patterns together and tested. I am trying to ring fence time to work on my crochet projects, for the sake of my mental health if nothing else!

I have been trying to organise this blog better, updating menus and links. Building my Pinterest profile has been a focus and reviewing all the beautiful work that my fellow crochet designers are producing. I have set up a Tailwind tribe to collect and promote inspiring crochet block and crochet blanket patterns.

Join my new Tailwind tribe here!

Project updates

Hearts and Spots blanket

Now onto the projects I have been busy with. Firstly I am close to finishing a couple of long standing projects. My Hearts and Spots blanket which started life as a Christmas present from my husband. The present was one ball of every colour of Drops Paris cotton yarn. The only thing I have left to do is to finish stitching in the ends. There are a lot of ends!! The design is made up of squares that I designed and have already shared as free patterns. I have added the links to these patterns below the picture.

Hears and spots blanket

Open heart square

Sample square

Cosy Knitted blanket

I branched out into knitting for a short time and will be putting the pattern for this lovely cosy blanket up on my blog as soon as I can get it written. Not to make excuses for the delay but I am actually waiting for my husband to draft the chart ๐Ÿ™‚

Cosy knitted blanket

Hearts and Stripes blanket

My latest project is a 4th of July inspired Hearts and Stripes blanket. I designed a solid block based on my heart motif and put it with a simple striped square to produce this blanket. The free patterns for the two squares you need to make this project are already posted. I will post the full pattern for the blanket next – just finishing the pattern test! Here is a picture of the finished project. I hope you like it. Below the picture are the links to the patterns for the two squares.

Hearts and stripes blanket

Full Heart crochet block

Striped square

Finally I have been working on yarn recycling. We (Mum and I) put together quite a stash of salvaged yarn and it has been nagging at me from bags in my stash room….. YES… I am so lucky – I have a whole room for my stash. Admittedly the room is only about four foot square so I suppose it is more of a cupboard than a room โ€ฆ but it is stash dedicated space ๐Ÿ™‚ Anyway these bags of recycled yarn have been on my mind so you can expect to see an update on that project in the coming days. I think that is it for now – Happy crocheting!

Annie ๐Ÿ™‚

Filed Under: craft blog Tagged With: crochet blog, crochet inspiration, free patterns, uk and us crochet terms, uk and us instructions

  • « Go to Previous Page
  • Page 1
  • Interim pages omitted …
  • Page 3
  • Page 4
  • Page 5
  • Page 6
  • Page 7
  • Interim pages omitted …
  • Page 11
  • Go to Next Page »

Footer

Newsletter

Copyright © 2026 ยท Genesis Sample on Genesis Framework ยท WordPress ยท Log in