• Skip to primary navigation
  • Skip to main content
  • Skip to footer

Stickytapeandstring

Created with WordPress managed by 1&1

  • Craft projects
    • craft business tips
    • craft blog
    • Crochet patterns
    • Upcycling
    • craft with kids
  • Blogging
    • New to blogging
    • Blog diary
  • Bullet Journal
  • About me
  • Welcome!!

Annie

Sunshine Flower Blanket – progress!

February 4, 2018 by Annie 2 Comments

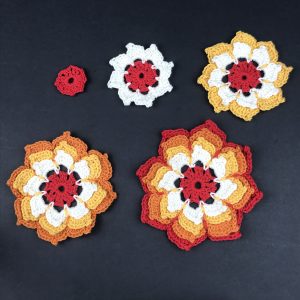
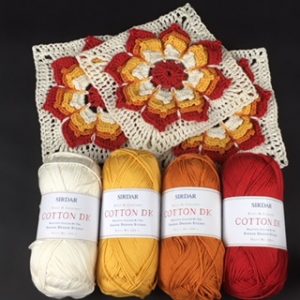
Sunshine Flower Blanket – progress report!  the blanket is starting to take shape this week.    I have taken a break from making blocks.    The blanket is something I started work on in the summer whilst on holiday.   I found a small yarn shop in the seaside town we were staying in and bought the colours to start the project.   The yarn is Sirdar Cotton DK – the colours are shown in the picture below, the background is shade 502 Vanilla.   My flowers are made up of shade 531, Citrus, shade 508, Honeysuckle and shade 510, Red.  You can read my first post on building the blocks here.

Sunshine flower blanket blocks and colours

Blocking and making up….

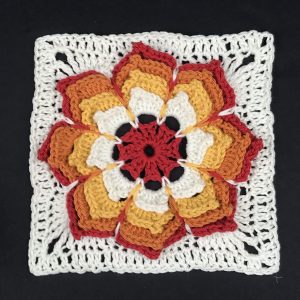
Last week I blocked one of the Tiger Lily squares and left the ball attached.   This allowed me to carry on with the rounds of Vanilla in double and treble crochet that make the larger centre square.   You can find the pattern for the Tiger Lily square in a book called ‘A Block A Day’ by Tracey Lord.   I have included a link below to Amazon where you can get hold of a copy of the book.

Next I put a band of colour using the colours of the flowers.    I increased the stitch size each time I changed colour. The Citrus band uses double crochet then the Honeysuckle band is in half treble.   Finally the red band is worked in trebles.

sunshine flower blanket central block

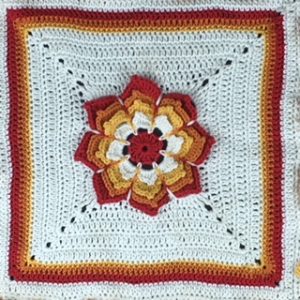
After the red band I worked a couple more rows of Vanilla in trebles and double crochet.

Adding in the little blocks….

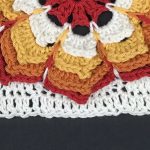
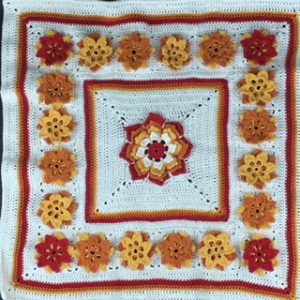
The next step was to put in a ring of the smaller squares I have been making on my train to work every day!    I started by joining together the squares in a strip.  Next I joined each strip of squares to the work working round the four sides of the square.   The process of joining them together is very satisfying.  It is easy to get a good finish if you are careful to line up the two pieces and insert your needle cleanly in each stitch.    There are several methods out there for joining pieces together.   I will share the method I use in a separate post.

I put in a couple of rounds of Vanilla when the smaller blocks were all in place.   Then I added another band of the three colours.   This time I started with the red and made a round of trebles.   I followed this with a round of Honeysuckle using half trebles.  Finally, I added a round of double crochet using the Citrus colour.  Next I re-joined the vanilla which I plan to continue for a few inches before starting to incorporate the larger squares.   There are 27 of those larger squares so far and I think I need just one more before I can complete that round.

Sunshine Flower Blanket centre

I really love the overall effect of this blanket so far and I am looking forward to completing it.   You will hear from me when I get to the next stage!    Please let me know what you think and if you would like to see the pattern, I am writing it as I progress so I will make it available if there is interest.

Happy crocheting 🙂

Annie

Filed Under: craft blog, Craft projects Tagged With: afghan, blanket, crochet, design, handmade, original, sunshine flower blanket

Sunshine flower blanket

January 28, 2018 by Annie Leave a Comment

Sunshine Flower blanket

This is a project I started a little while ago – my Sunshine Flower Blanket.    I found the pattern for the flowers in a book of crochet blocks.  ‘A Square A day’ by Tracey Lord. Working my way through the book making a block a day whilst on holiday last summer was lovely.    I particularly liked this flower block called Tiger Lily.   The book is available on amazon via the link below if you would like to try out the block or any of the others – there are 365, one a day for a year!  Please note – I am an affiliate of Amazon so if you click on the links below or elsewhere in my blog I may receive a small income at no additional cost to you.

The colours in the book reminded me of a time when I was small and colouring in design sheets with my Mum.   I remember my Mum choosing reds, yellows and oranges for her design.   It looked lovely 🙂   My design varies the colours slightly from the book but keeps the red/orange theme.

Sunshine flower blanket - tiger lily block
Tiger Lily block

Building Blocks!

I needed a smaller flower block as part of the blanket pattern so I designed one!   It took a bit of trial and error but I am happy with the final version.     The picture below shows some of these smaller blocks going the blocking process.   The blocks are a bit misshapen when I finish crocheting them.   The blocking process pulls them straight.    You have to pin the block to a foam board, I measure the block as I pin it to make sure that I am turning all my blocks into pieces of the same size!

Once pinned to the foam backboard all you have to do is spray the block with cold water and leave it to dry.   I am leaving mine for a week, after which they are perfect.  It probably doesn’t take that long but I only really get to work on these at weekends so mine get the full seven day treatment!

You will see the foam board I am using is actually a child’s foam play floor tile.   My son, a master of research, found these for me.   These tiles are inexpensive and were recommended on Amazon for the purpose of blocking craft projects.   They have been absolutely ideal.   I am sharing a link below.

That’s all from me for now.    Time to get on with the crochet 🙂   Soon I will be able to start building the blanket from the middle square out.     I will share as I start to join the smaller squares together and show you the blanket as it starts to take shape.    Let me know what you think of my Sunshine Flower Blanket by leaving me comments below.   Bye for now…. happy crocheting 🙂

Filed Under: craft blog, Craft projects Tagged With: blankets, Craft, crochet, design, handmade, yarn

Creative fun with your kids

June 10, 2017 by Annie Leave a Comment

Having creative fun with your kids is a fantastic way to bond and develop together. Would you like to help your kids explore their creativity and lay down great memories!?    Would you like to make the most of long school holidays and weekends?   Age is no barrier to this – teenagers can be inspired to flex their creativity and the results can be amazing! It would be such a shame for them to lose that time to social media and electronic games.    After all it really won’t be many years before they head into a world of work with two weeks summer holiday at most.    Many older children will start with holiday jobs before leaving home and hence have even fewer long breaks. 

With all the distractions and pressures of the modern electronic world spending time away from games and social media is really positive and creativity is great for reducing stress.   I would certainly like to provide space and inspiration to allow my children to make things and learn or at least explore new crafts.

Like most people I don’t have all the money in the world to spend and I don’t have much time either.  I would like to organise holiday activities that encourage and develop creativity but don’t break the bank.

This post contains ideas for three activities you can do today with your kids. They are the basis for all the other activities which will follow. I will include a more detailed post on each in later weeks but there is enough here to get you started!

1.  A list of creative fun activities

This is something we do at the start of our school holidays. We all contribute ideas and then estimate for each idea what the cost would be in time and money.    I love doing this with my family.    It is an exercise in creativity all by itself.    Just getting teenagers to explore what activities they might want to do is refreshing and interesting.  You might find some of the ideas your kids come up with are surprising!

Set categories such as indoor/outdoor, dry/wet weather, free/cheap/splurge, active or restful.   Make sure you have activity ideas in each category.  Doing this helps people consider all sorts of activities not just the ones that involve parents spending lots of money!

This can also be an excellent way to teach younger kids about the costs of activities and explain or set budgets.  I will be sharing my lists here in later posts.   Incidentally Pinterest is a great source of ideas! I have a board devoted to activity ideas which you can see here Pinterest – Activity Ideas

I have produced a free printable template to record the activity ideas which you can read about and download here

2. Family scrapbook

These can be as fancy or simple as you and your family would like.  We used to do one each when my children were younger.   This year I am considering moving to a single one for all of us. Capture the ideas list you create with your family in the scrapbook right at the front! 

I love the bullet journal format but a notebook doesn’t really work when you are looking to collect ticket stubs and add photos.   The additional thickness puts too much strain on the spine of the book.  I find they work best as a loose leaf format so that pages can be added. 

You can keep it cheap and simple with office ring binders.   If you have a bigger budget and want something ready made and prettier there are lots of albums available.    The page limit doesn’t have to be a problem if you are prepared to have more than one!   

Again following a bullet journal type format, I like to use dotted paper which you can buy cheaply as refill pads.   Dotted paper is more flexible than lined paper when it comes to designing pages but the grid provides a guide to keep designs looking neat even if (like me) erm….art is not your first talent!

You can try to be ultra disciplined in terms of what you keep and record or you can keep a draft and refine the content when you make it a permanent record.   I will cover the structure and content of our scrapbooks in a later post.   

Ask your kids to complete a page every time they have something fun to document. Tip – ask them to put the day, date and time at the top of the page!! This helps with filing later and is a good teaching point. You could also get them to include the location (if you are travelling) and the weather is another interesting record to me. (but then I am British!)

You don’t need any special kit to get started on this activity. You can use any scrap paper and pens. I do find it is more special if you have pens and paper set aside specially for the scrapbook. Scrapbooking is a whole industry with some amazing and beautiful layouts, paper and embelishments you can buy. I haven’t gone down that road myself. Our scrapbooks have been much more home-made and low cost. Here are my starter for ten – budget kit and splurge kits if you would like to keep special pens and paper for this activity.    Please note, if you follow links in this post I may receive a small payment which goes towards the cost of running this blog.

Budget Scrapbook Kit

When your budget is tight it is important to spend on the things that will really make a difference.    In this instance I think that is the pens that you will use to brighten your pages and make them stand out.   There are so many options out there but for price and quality I would go with Stabilo point 88 fineliners.   I wouldn’t go for a large number of colours – you can make things look really special with just a few colours.   If you have a young family I would not recommend fineliners as the points can easily be damaged by little hands. When my kids were at that stage we stuck to wax crayons or chubby coloured pencils which I have in my recommendations below.

For the pages themselves to keep the cost down I would go for plain printer paper which you can buy locally to avoid shipping cost. I will also provide free downloads for printable pages when I can.

Finally if your budget is tight then I would either make a folder or do without one at the outset.   I will share a tutorial on making folders in a later post.    To keep your pages tidy you could use treasury tags or simply hold them together with a spare bit of ribbon, yarn or a shoelace!

Splurge Scrapbook Kit

As above, I would put my money into the fineliners.    I would still go for the Stabilo fineliners 88 but would maybe go for a few more colours 🙂   You will find you use a lot of the black pen so it is worth buying a separate set of those.   I also suggest you go for some pens with a thicker point for block colouring.  

Dotted A4 paper is the most flexible and I find it helps me make pages look tidy/pretty. The paper can be bought in pad form which makes it easier to work on and can be filed when pages are completed. 

If you are interested in the elaborate artistic scrapbooking that you can see in craft shops and on Pinterest, there are lots of beautiful supplies you can treat yourself to. Search on scrapbooking on Amazon, Etsy or Pinterest for a taste. I am not familiar with much of that world and it can be very expensive!

For the binder there are lots of options out there but I find the easiest way to source these is to buy lever arch files from my local office supplies shop.   Longer term I really would recommend making your own as part of one of your activity sessions.

3.  Family playlists

The third activity I would recommend is to set up a family playlist. This is something we started in the summer a few years ago now.  They are actually playlists for an entire year.  We each put forward the songs that make us think of that particular year.  Because the list requires everyone’s agreement it is an exercise in selling and diplomacy!  We have rules as follows:

1. Everyone can veto songs they don’t like. 

2. However we all have the right to one song that has been vetoed.  Oh… and

3. The judges decision is final (ie Mum gets to arbitrate if things get nasty!). 

We add to the list all year and record the reasons we are putting each track on the playlist.  It isn’t all current music. One year our playlist included older tracks used for an aqua-aerobics class at a hotel we were at for a week.  We heard the music every day and later those tracks reminded us of the holiday! Capture your list and include it in your family scrapbook!

When I was young, a play list was something you pieced together on a cassette tape. When I was a young Mum playlists were on my ipod. Now, if you subscribe to a music service you can set up an actual play list. We use Spotify here but I believe all services will allow you to set up shared play lists.

So those are my three start points.   I will share more detail from our planning and would love to hear from anyone with different ideas.  What do you do that works well?  What potential
mistakes should I avoid?  Please share!!

Have fun!

Annie 🙂

Filed Under: Craft projects, craft with kids Tagged With: Craft, fabric, family, family activities, kids, memories, pens, school holiday, scrapbooks

Tasks to complete before you set up your blog

June 4, 2017 by Annie Leave a Comment

If you are really keen to get started on your blog but baffled by the number of articles and help out there, it can be very frustrating.    I spent months reading and reading and getting nowhere. This post contains a list of tasks you should complete before you start to set up your blog. It will help you focus on your subject area and speed up the process of getting your blog up and running.

I am a complete beginner and am not claiming any kind of expertise.   The material I am sharing here relates only to my experiences and my limited knowledge.   I recommend reading widely and taking any useful advice you can find out there.  Hopefully you will this helpful.

In my post New to Blogging I lay out the choices I made and the tools I used to get my blog set up and running.

However, once I found my ideal set up and the magic free course that helped me get off the ground I was held up by a few basics that I could have prepared in advance.

Tasks to complete before you start your blog

  1.  Take some photos!    At the very least you need a portrait of yourself or something that you will use as your picture to represent your personality. (see note below)
  2. Write your ‘About Me’.   I made bullet point notes about the elements I wanted to cover.   Next I built the notes into sentences and paragraphs.   Finally I cut out a lot of material and left in only the elements that I hoped would resonate with my target audience.
  3. Start a collection of images that represent the feel and style you want to put across.   A tool like Canva is great fun to play with and can be free depending on the choices you make.   Alternatively as with my first bullet point, take some photos. (see note below)
  4. Draft a list of subject areas your blog will be about.
  5. Sketch ideas for your first three blog posts in each of your areas.   If you cannot easily come up with three posts then consider whether that is the subject area in which you can realistically expect to generate consistent regular posts.

(Note) – Be careful with the file sizes of any photos you take yourself.   Large files will slow down your blog, increasing the time it takes to load.   I am working on this area myself so will share any information I uncover!

The key thing is to make a start.   If you really want to start blogging just make a start.   Pick one small item in the list above and make a start.   I spent months thinking about it rather than taking action….. JUST MAKE A START!!

I would love to hear from anyone at the same stage as me or at any other stage in the process.   It feels so good to be making progress!!   Please share your experiences with me….

Happy Blogging!

Annie 🙂

Filed Under: Blogging, New to blogging Tagged With: advice for new bloggers, blogging, new blogger, set up a blog

New to blogging

May 7, 2017 by Annie Leave a Comment

Get your first blog up and running!!

I wrote this as my first post when I was just starting this blog. The advice contained below is exactly what I needed when I was new to blogging. I have loved my blogging journey and hope this helps you start yours…..

Original post starts here – May 2017. I am a new blogger and learning all the time from the huge number of articles out there.    I have found it to be a complete information overload.

Many articles claim to make the process of setting up a blog simple, then proceed with complicated instructions.

I am a complete beginner and have no qualification or expertise in this area.   I am only sharing my experience and limited knowledge in the hope that it helps you on your journey.

Below I share two links that are enough to make a proper start and get a working blog out there.   These are the best I have found.   I am still learning and I will continue to share as I find helpful information.

Firstly it is important to note that there are many free options out there for hosting your blog.   However, the solution I have chosen uses WordPress on my own domain hosted by 1&1.   This means I have paid for my own website name. My site is not part of another website. I read several horror stories about bloggers who put hours of work into blogs only to lose the content later.   Owning your own domain removes a big risk of this happening.

The links below take you to 1&1 Ionos where you can choose your own domain name and hosting package.   1&1 make this part very easy and quick.   Hosting packages can be very cheap and I would advise you start small.   You can always upgrade later as your requirements change.

get a domain name – 1&1 ionos

get hosting with 1&1 ionos

I found navigating WordPress and getting my blog up and running the hardest part.  I had made a small start using the welcome instructions in the WordPress software but I didn’t make any serious process until I found this free online course.

free wordpress tutorial

It really is free!   Signing up gives you access to a facebook based user group for support.  There are also discounts on offer for more WordPress support services.   I do not know yet whether I will need to use these but it is good to know they are there.

The only investment I made other than in hosting my own domain was to buy a WordPress Theme.  This is not essential and does cost money. However, the free themes are quite restrictive in what they allow you to do.   I bought the Genesis theme.  The course covers this subject.

This is all it took to get my first blog up and running!!   I did have to break off in the middle of setting up to complete a few tasks that I could have done in advance so I will put those into a separate post.   The main tasks were taking photos and preparing text.   I am still working on the photos!!

I hope this helps you and I wish you all the best in getting started on your own blog journey!   Please let me know how you get on 🙂

If you would like to read more of my blogging journey – click on Blogging in the menu above or follow this link to one of my more recent posts.

Filed Under: Blogging, New to blogging Tagged With: begin a blog, beginner blog, blog, blog set up, blogging, new blogger

  • « Go to Previous Page
  • Go to page 1
  • Interim pages omitted …
  • Go to page 12
  • Go to page 13
  • Go to page 14

Footer

Newsletter

Copyright © 2021 · Genesis Sample on Genesis Framework · WordPress · Log in