This bag was designed on my daily commute. I love the fresh look with white cotton and picked the colours my daughter liked but the colour way is entirely up to you!
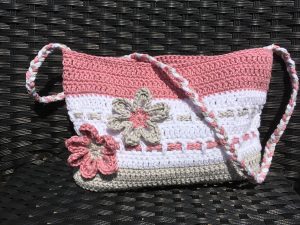
The finished bag measures 10 inches by 7 inches or 25cm by 18cm. I put on one shoulder strap but it would easily convert to two smaller handles if you prefer. I have included instructions for both.
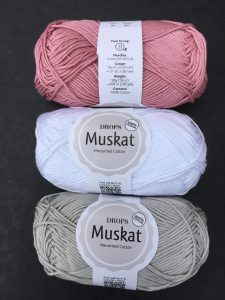
The yarn I have used here is Drops Muskat a mercerized cotton which gives great stitch definition and a firm finish that should not stretch with use. It works up on a 4mm hook and is very good quality/value. I paid £1.45 per 50g ball.
Daisy Bag instructions – UK terms (SCROLL DOWN FOR US TERMS!)
The pattern uses a 4mm hook and three colours of yarn. For the example in the photo I used:
Yarn A – Drops Muskat – colour 19 – Light Grey
Yarn B – Drops Muskat – colour 18 – White
Yarn C – Drops Muskat – colour 06 – Light Pink
Starting with Yarn A – Light Grey
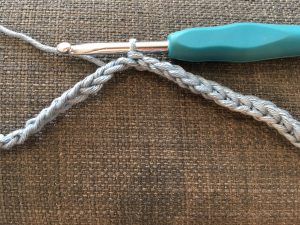
Base – Chain 5 stitches, slip stitch into the first chain to form a loop. Chain 35. slip stitch into the fifth stitch from the hook to form a second loop.
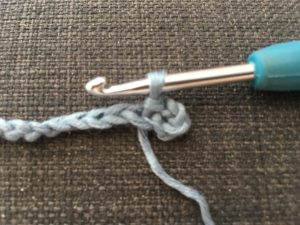
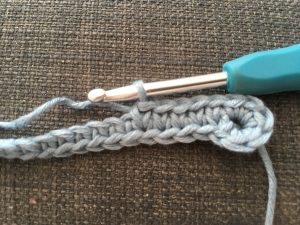
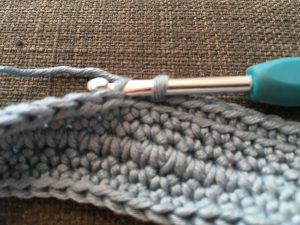
1st round – This is the only real fiddly bit so it is worth taking your time. Chain 2, DC 30 along the straight chain. Take care not to let the chain twist as you work it. Don’t worry if you have to pull it out a couple of times to get it right (I did!). Work 6DC into the end loop, DC 30 along the straight chain working into the DC’s from the first part of the round. This gives a strong bottom to the bag. your work should look like the photo’s below. Finally – work 6 DC into the end loop and join with a slip stitch to your start point for the round.
2nd round – Chain 2, DC 31, work 2DC into each of the middle four of the six DCs you worked into the loop of the base. DC 32, work 2DC into the middle four of the six DCs you worked into the second loop of the base. 1 DC, slip stitch to join to the start point of the round.
3rd round – Chain 2, DC 32, work 2DC into the next 6 stitches, DC 35, work 2 DC into the next 6 stitches, 1DC, slip stitch to join to the start point of the round.
The base of the bag is now complete!! If you would like a bigger base – repeat the row above, adjusting the increase round the ends of the base to allow the work to lie flat.
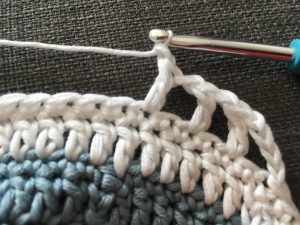
4th round – Chain 2. DC into every stitch BUT – only pick up the back of the stitch. See photo below. This creates a line that will form the edge of the bottom of the bag.
5th round – Chain 2, Tr into each stitch on the row below. Slip stitch to join to the top of the three chains that started the round. Note – lots of patterns would say to chain three before a round of Trebles but I find that chain 2 works better for me and gives a neater finish. It might be worth trying both versions to see what suits you best.
6th round – Chain 2, DC into each stitch on the row below. Slip stitch to join to the top of the two chains that started the round.
7th round – repeat the 5th round working Trebles
8th round – repeat the 6th round working DCs
9th round – repeat the 5th round working Trebles
10th round – repeat the 6th round working DCs
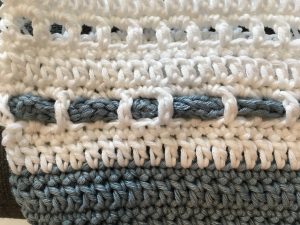
Change colour! Working with Yarn B – White – I normally try to join in the yarn on the end of the bag so that the start of each row is not in the middle of the flat part where they are more visible.
11th round – repeat the 5th round working Trebles
12th round – repeat the 6th round working DCs
13th round – This round creates the ‘holes’ that we will later weave the bands through. Chain 4, (miss one stitch and work Treble into the next, chain 1) repeat to end of round. Join with a slip stitch to the third of the four chains that started the round.
14th round – Chain 2, work one DC into the ‘hole’ on the previous row. Continue by working 2DC into each of the ‘holes’ created in the previous round. Join with a slip stitch to the second of the two chains that started the round.
15th round – repeat the 5th round working Trebles
16th round – repeat the 6th round working DCs
17th round – repeat the 13th round, creating the holes.
18th round – repeat the 14th round working DCs into the ‘holes’.
19th round – repeat the 5th round working Trebles
20th round – repeat the 6th round working DCs
Change colour! Working with Yarn C – Light Pink
21st round – repeat the 6th round working DCs
22nd round – repeat the 5th round working Trebles
23rd round – repeat the 6th round working DCs
24th round – repeat the 5th round working Trebles
25th round – repeat the 6th round working DCs
26th round – repeat the 5th round working Trebles
27th round – Chain 2, Htr into each stitch on the row below. Join with a slip stitch to the second of the two chains that started the row.
28th round – Slip stitch into each stitch on the round below to create the decorative edge. Join to the start point with a slip stitch and this completes the main part of the bag.
Creating the ‘ribbons’ that weave through the bag.
To create the two ribbons that you will weave in and out of the ‘holes’ in the bag, first take yarn A – Light Grey and make a chain 102 stitches long.
Slip stitch into the third stitch from the hook and keep going with a slip stitch into each chain until you get back to the start point. Pull both ends through the loop on the hook to finish off, leaving the two ends which you will use to stitch up the ribbon.
Work the second ribbon in the same way but in yarn C – Light Pink.
Creating the flower decorations.
First Flower – Working with Yarn A – Light Grey.
1st round – Make a magic loop then Chain 2, DC 11. Join to form a disc.

2nd round – (Chain 6 slip stitch into the row below at the base of the chain. Slip stitch into next stitch) repeat six times. This will give you a disc with six chain stitch loops that will form the basis of the petals.
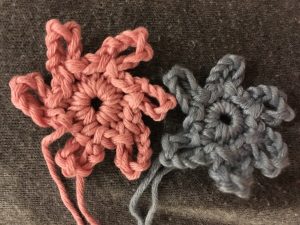
Change colour! – working with Yarn C – Light Pink
3rd round – (working into one of the chain stitch loops, 3 DC, 1 Htr, 1Tr, 1HTr, 3DC. work one slip stitch into the stitch on the row below between the chain stitch petals), repeat six times until you have a full set of six petals. You have a finished flower!
Second Flower – Now work the flower again switching round the two yarn colours.
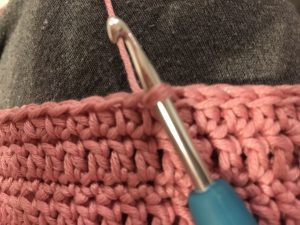
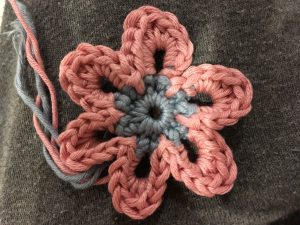
Assemble the bag by slotting the ribbon through the ‘holes’. I chose to put the Pink ribbon closest to the bottom and near to the Grey section of the bag. If you weave the ribbon in and out of the holes over and under the Trebles that form the holes you should find you come back to the start with two ‘unders’ side by side. This is probably easier to see in the photo below than it is to understand my explanation!
Join the two ends of ribbon at this point and then attach the flower over the top of the join, between the two places that the ribbon was woven under the bars. I used the flower with the Light Pink petals at the bottom of the bag next to the section that was made in Light Grey. ie use the flower with petals in Yarn C against the ribbon in Yarn C.
Finally – Adding Handles or Strap.
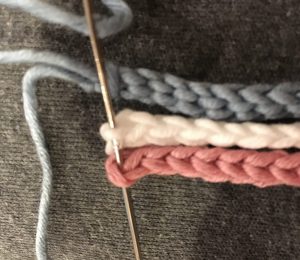
To finish the bag you need to decide whether you would like a shoulder strap or twin handles. The start point for both is to create ribbons as above. Each strap or handle needs three ribbons which are plaited.
The ribbon length I used to create the shoulder strap was 202 chain.
The ribbon length I used to create each handle was 82 chain.
Work three ribbons – one in each colour. Attach the three ribbons to each other at one end. Note – if you use two of the ribbons the same way around and one the opposite way round you will have ends of yarn at both ends of the plait, this will help with the stitching up.
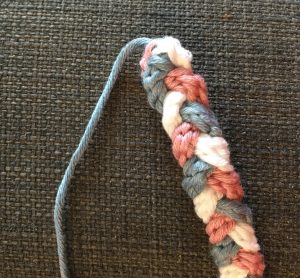
Using the ends of yarn from each ribbon stitch the handles into the bag – and you are done!!
I hope you enjoyed this pattern. Please let me know. US terms follow.
Daisy Bag instructions – US terms
The pattern uses a 4mm hook and three colours of yarn. For the example in the photo I used:
Yarn A – Drops Muskat – colour 19 – Light Grey
Yarn B – Drops Muskat – colour 18 – White
Yarn C – Drops Muskat – colour 06 – Light Pink
Starting with Yarn A – Light Grey
Base – Chain 5 stitches, slip stitch into the first chain to form a loop. Chain 35. slip stitch into the fifth stitch from the hook to form a second loop.
1st round – This is the only real fiddly bit so it is worth taking your time. Chain 2, SC 30 along the straight chain. Take care not to let the chain twist as you work it. Don’t worry if you have to pull it out a couple of times to get it right (I did!). Work 6SC into the end loop, SC 30 along the straight chain working into the SC’s from the first part of the round. This gives a strong bottom to the bag. your work should look like the photo’s below. Finally – work 6 SC into the end loop and join with a slip stitch to your start point for the round.
2nd round – Chain 2, SC 31, work 2SC into each of the middle four of the six SCs you worked into the loop of the base. SC 32, work 2SC into the middle four of the six SCs you worked into the second loop of the base. 1 SC, slip stitch to join to the start point of the round.
3rd round – Chain 2, SC 32, work 2SC into the next 6 stitches, SC 35, work 2 SC into the next 6 stitches, 1SC, slip stitch to join to the start point of the round.
The base of the bag is now complete!! If you would like a bigger base – repeat the row above, adjusting the increase round the ends of the base to allow the work to lie flat.
4th round – Chain 2. SC into every stitch BUT – only pick up the back of the stitch. See photo below. This creates a line that will form the edge of the bottom of the bag.
5th round – Chain 2, DC into each stitch on the row below. Slip stitch to join to the top of the three chains that started the round. Note – lots of patterns would say to chain three before a round of DC but I find that chain 2 works better for me and gives a neater finish. It might be worth trying both versions to see what suits you best.
6th round – Chain 2, SC into each stitch on the row below. Slip stitch to join to the top of the two chains that started the round.
7th round – repeat the 5th round working DCs
8th round – repeat the 6th round working SCs
9th round – repeat the 5th round working DCs
10th round – repeat the 6th round working SCs
Change colour! Working with Yarn B – White – I normally try to join in the yarn on the end of the bag so that the start of each row is not in the middle of the flat part where they are more visible.
11th round – repeat the 5th round working DCs
12th round – repeat the 6th round working SCs
13th round – This round creates the ‘holes’ that we will later weave the bands through. Chain 4, (miss one stitch and work DC into the next, chain 1) repeat to end of round. Join with a slip stitch to the third of the four chains that started the round.
14th round – Chain 2, work one SC into the ‘hole’ on the previous row. Continue by working 2SC into each of the ‘holes’ created in the previous round. Join with a slip stitch to the second of the two chains that started the round.
15th round – repeat the 5th round working DCs
16th round – repeat the 6th round working SCs
17th round – repeat the 13th round, creating the holes.
18th round – repeat the 14th round working SCs into the ‘holes’.
19th round – repeat the 5th round working DCs
20th round – repeat the 6th round working SCs
Change colour! Working with Yarn C – Light Pink
21st round – repeat the 6th round working SCs
22nd round – repeat the 5th round working DCs
23rd round – repeat the 6th round working SCs
24th round – repeat the 5th round working DCs
25th round – repeat the 6th round working SCs
26th round – repeat the 5th round working DCs
27th round – Chain 2, HDC into each stitch on the row below. Join with a slip stitch to the second of the two chains that started the row.
28th round – Slip stitch into each stitch on the round below to create the decorative edge. Join to the start point with a slip stitch and this completes the main part of the bag.
Creating the ‘ribbons’ that weave through the bag.
To create the two ribbons that you will weave in and out of the ‘holes’ in the bag, first take yarn A – Light Grey and make a chain 102 stitches long.
Slip stitch into the third stitch from the hook and keep going with a slip stitch into each chain until you get back to the start point. Pull both ends through the loop on the hook to finish off, leaving the two ends which you will use to stitch up the ribbon.
Work the second ribbon in the same way but in yarn C – Light Pink.
Creating the flower decorations.
First Flower – Working with Yarn A – Light Grey.
1st round – Make a magic loop then Chain 2, SC 11. Join to form a disc.
2nd round – (Chain 6 slip stitch into the row below at the base of the chain. Slip stitch into next stitch) repeat six times. This will give you a disc with six chain stitch loops that will form the basis of the petals.
Change colour! – working with Yarn C – Light Pink
3rd round – (working into one of the chain stitch loops, 3 SC, 1 HDC, 1DC, 1HDC, 3SC. work one slip stitch into the stitch on the row below between the chain stitch petals), repeat six times until you have a full set of six petals. You have a finished flower!
Second Flower – Now work the flower again switching round the two yarn colours.
Assemble the bag by slotting the ribbon through the ‘holes’. I chose to put the Pink ribbon closest to the bottom and near to the Grey section of the bag. If you weave the ribbon in and out of the holes over and under the DCs that form the holes you should find you come back to the start with two ‘unders’ side by side. This is probably easier to see in the photo below than it is to understand my explanation!
Join the two ends of ribbon at this point and then attach the flower over the top of the join, between the two places that the ribbon was woven under the bars. I used the flower with the Light Pink petals at the bottom of the bag next to the section that was made in Light Grey. ie use the flower with petals in Yarn C against the ribbon in Yarn C.
Finally – Adding Handles or Strap.
To finish the bag you need to decide whether you would like a shoulder strap or twin handles. The start point for both is to create ribbons as above. Each strap or handle needs three ribbons which are plaited.
The ribbon length I used to create the shoulder strap was 202 chain.
The ribbon length I used to create each handle was 82 chain.
Work three ribbons – one in each colour. Attach the three ribbons to each other at one end. Note – if you use two of the ribbons the same way around and one the opposite way round you will have ends of yarn at both ends of the plait, this will help with the stitching up.
Using the ends of yarn from each ribbon stitch the handles into the bag – and you are done!!
I hope you enjoyed this pattern. Please let me know.
Happy Crocheting!
Annie 🙂