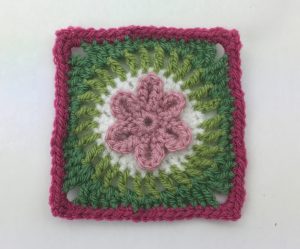
Here is the pattern for my latest block design. I have worked up a few examples, playing with colours and yarn types. I plan to add a row of these to my spring flowers blanket. This is the block worked up in those colours using Stylecraft DK yarn and a 4mm hook.

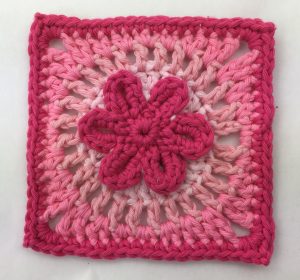
I love playing with an ombré effect. Here is the block using shades of pink radiating from a white centre. The white can only be seen from the back! The yarn here is Drops Paris worked on a 5mm hook.

Here are a couple of the blocks in Drops Muskat, back on a 4mm hook. One has a coloured flower against a white background. I really like the sheen on this yarn. I will put a proper review into my next blog update. I think a baby blanket with coloured flowers against white would be sweet. The photo also shows the reverse with white flowers on blue. You can see I became quite attached to this design quite quickly!

Here is the pattern
Daisy block – UK terms
Foundation round 1 – Make a magic loop, chain 2, 11 DC into the loop, pull closed and join with a slip stitch
Round 2 – (chain 6, slip stitch into the root of the chain to form a loop, slip stitch into the next 2 stitches) x 5, chain 6, slip stitch into the root of the chain to form a loop, slip stitch into the base of the first chain loop. You should have a circle with six loops.
Round 3 – (7 DC into the first six chain loop, slip stitch into the stitch between loops) x 6, slip stitch to join to start point. You should have six petals.
Round 4 – (chain three, slip stitch into the stitch between the petals) x 6, slip stitch to join to the start point. Tip – These chains need to sit behind the petals but will probably be in front as you work them. Don’t worry, you can pull the petals back through at the end of the round.
Round 5 – (work 3 DC into the three chain loop, 1CH) x 6, slip stitch to join to start point.
Round 6 – chain 3, 2 Tr, (2Tr into the chain space, 3 Tr) x 2, 1Tr into the chain space, (3Tr, 2Tr into the chain space) x 2, 3Tr, 1Tr into the chain space. Join with a slip stitch to the top of the starting 3 chains.
Round 7 – chain 4, (Tr, chain 1) x 27, join with a slip stitch to the third chain in the 4 chains that started the round.
Round 8 – this is where we square the circle! Ch2, DC into the first chain space. Complete the round by working two stitches into each chain space as follows: (DC HTr, HTr Tr, Tr DTr, 2 chain, DTr Tr, Tr HTr, HTr DC, 2DC) x 3, DC HTr, HTr Tr, Tr DTr, 2 chain, DTr Tr, Tr HTr, HTr DC, slip stitch to join to the top of the two chains the started the round.
Round 9 – 2ch, work DC into each stitch. At the corners work 2DC, 2ch, 2DC into the two chain space. At the end of the round join with a slip stitch to the top of the two chains the started the round. And you are done! Sit back and admire or plan the project you are going to make with this lovely little block!
Daisy block – US terms
Foundation round 1 – Make a magic loop, chain 2, 11 SC into the loop, pull closed and join with a slip stitch
Round 2 – (chain 6, slip stitch into the root of the chain to form a loop, slip stitch into the next 2 stitches) x 5, chain 6, slip stitch into the root of the chain to form a loop, slip stitch into the base of the first chain loop. You should have a circle with six loops.
Round 3 – (7 SC into the first six chain loop, slip stitch into the stitch between loops) x 6, slip stitch to join to start point. You should have six petals.
Round 4 – (chain three, slip stitch into the stitch between the petals) x 6, slip stitch to join to the start point. Tip – These chains need to sit behind the petals but will probably be in front as you work them. Don’t worry, you can pull the petals back through at the end of the round.
Round 5 – (work 3 SC into the three chain loop, 1CH) x 6, slip stitch to join to start point.
Round 6 – chain 3, 2 DC (2DC into the chain space, 3 DC) x 2, 1DC into the chain space, (3DC, 2DC into the chain space) x 2, 3DC, 1DC into the chain space. Join with a slip stitch to the top of the starting 3 chains.
Round 7 – chain 4, (DC, chain 1) x 27, join with a slip stitch to the third chain in the 4 chains that started the round.
Round 8 – this is where we square the circle! Ch2, SC into the first chain space. Complete the round by working two stitches into each chain space as follows: (SC HDC, HDC DC, DC TR, 2 chain, TR DC, DC HDC, HDC SC, 2SC) x 3, SC HDC, HDC DC, DC TR, 2 chain, TR DC, DC HDC, HDC SC, slip stitch to join to the top of the two chains the started the round.
Round 9 – 2ch, work SC into each stitch. At the corners work 2SC, 2ch, 2SC into the two chain space. At the end of the round join with a slip stitch to the top of the two chains the started the round. And you are done!
I hope you enjoy this pattern as much as I enjoyed creating it. Happy crocheting!
Annie 🙂